Setup of a new Galaxy instance
This document describes the necessary steps for installing and integrating Galaxy with IRIDA as well as using Galaxy and Galaxy Toolsheds to install workflows.
The following must be set up before proceeding with the installation.
- A machine that has been set up to install Galaxy. This could be the same machine as the IRIDA web interface, or (recommended) a separate machine.
- A shared filesystem has been set up between IRIDA and Galaxy. If Galaxy will be submitting to a compute cluster this filesystem must also be shared with the cluster.
- Dependency Installation
- Galaxy Software Installation
- Configure Galaxy
- Galaxy Tools Installation
- Link up Galaxy with IRIDA
Dependency Installation
The installation and setup of Galaxy requires a number of dependency software to be installed. To install this software on CentOS (>= 6.6) please run:
yum install mercurial pwgen python zlib-devel ncurses-devel tcsh git
The following dependencies are required for running or building some of the tools.
yum groupinstall "Development tools"
yum install db4-devel expat-devel java
Conda Installation
Galaxy makes use of conda for dependency installation of tools. Conda can also be used to manage Galaxy software dependencies. The easiest way to install conda is by downloading and installing miniconda. E.g.,
wget https://repo.continuum.io/miniconda/Miniconda3-latest-Linux-x86_64.sh
bash Miniconda3-latest-Linux-x86_64.sh
This should default to installing conda under ~/miniconda3. For the remainder of these instructions we will assume conda is installed in this location, and that conda is available on your PATH.
Note: conda requires the bash shell to fuction properly. To see which shell you are using you can run echo $SHELL. Also note that on some systems /bin/sh is simply a link to /bin/bash.
Conda Galaxy Environment
Galaxy requies a number of dependencies to be installed before it is run. The easiest way to install these dependencies is through a conda environment. Please create the initial environment and activate like so:
# Add necessary channels for software
conda config --add channels conda-forge
conda config --add channels defaults
conda config --add channels r
conda config --add channels bioconda

# Create conda environment and activate this environment
conda create --name galaxy python=2.7 samtools
source activate galaxy

# This installs some additional dependencies required by some of the IRIDA tools.
conda install perl-xml-simple perl-time-piece perl-bioperl openjdk gnuplot libjpeg-turbo
Galaxy Software Installation
This describes installing the main Galaxy software. These instructions assume you are installing Galaxy version v17.01. Older versions will also work, but any version < v16.01 will require special modifications for some tools (see our FAQ). Newer versions should also work, but have not been thoroughly tested with IRIDA yet. Most of the installation documentation for Galaxy can be found at GetGalaxy. In brief, these steps involve the following.
Step 1: Download Galaxy
Please run the following commands to download Galaxy.
git clone https://github.com/galaxyproject/galaxy.git && cd galaxy
git checkout release_17.01
Once Galaxy is downloaded some additional modifications will be needed to configure Galaxy. Please copy the configuration files from the sample configuration files like below before modifying:
# We assume you are in the galaxy/ directory.
cp config/galaxy.ini.sample config/galaxy.ini
cp config/tool_sheds_conf.xml.sample config/tool_sheds_conf.xml
Step 2: Galaxy Database Setup
By default, Galaxy uses SQLite for a database, but this is not sufficient for the larger workflows used by IRIDA. We would recommend using PostgreSQL or MySQL. You will have to modify the property database_connection in the file config/galaxy.ini to point to your database. Please refer to the Galaxy Database Setup guide for more details. As an example, see below:
database_connection = postgresql://galaxy_user:password@localhost/galaxy_irida
Step 3: Create Galaxy Environment Files
Galaxy web server environment
In order to make sure Galaxy uses the dependencies set up with conda, we need to make sure this environment is activated before Galaxy is run. This can be accomplished by adding the following code to a file called config/local_env.sh (this file may not exist yet).
export PATH=~/miniconda3/bin:$PATH
source activate galaxy
Additionally, please change the shell used by Galaxy from sh to bash if necessary (that is, if /bin/sh is different from /bin/bash). This can be done by changing #!/bin/sh to #!/bin/bash in the file run.sh.
Tool environments
Additionally, some Python dependencies and additional dependencies may be required by Galaxy on execution of tools. This can be accomplished by creating another file env.sh and activating the conda galaxy environment here. E.g.:
export PATH=~/miniconda3/bin:$PATH
source activate galaxy
Other steps will specify when you need to add additional instructions to this file.
Step 4: Modify configuration file
The main Galaxy configuration file is located in config/galaxy.ini. Please make the following changes to this file. More information on this configuration file can be found at Running Galaxy in a production environment.
- Modify the address that Galaxy should listen on for incoming connections to allow for connections external to the Galaxy server.
- Change
#host = 127.0.0.1tohost = 0.0.0.0. (0.0.0.0listens on all interfaces and addresses)
- Change
- Modify the port that Galaxy listens on so there are no conflicts with Tomcat (or other software).
- E.g., change
#port = 8080toport = [some other port].
- E.g., change
- The below is necessary to allow direct linking of files in Galaxy to the IRIDA file locations.
- Change
#allow_library_path_paste = Falsetoallow_library_path_paste = True.
- Change
- Give the Galaxy admin and workflow users admin privileges (necessary for running workflows on linked files within Galaxy, see create galaxy accounts).
- Change
#admin_users = Nonetoadmin_users = admin@localhost.localdomain,workflow@localhost.localdomain(or whatever other users you wish to use).
- Change
- Disable developer settings if enabled (from Galaxy Disable Developer Settings).
- Change
debug = Truetodebug = False. - Change
use_interactive = Truetouse_interactive = False. - Make sure
filter-with = gzipis disabled.
- Change
- Set the Galaxy id_secret for encoding database ids.
- Change
#id_secret = USING THE DEFAULT IS NOT SECURE!toid_secret = some secure password- The command
pwgen --secure -N 1 56may be useful for picking a hard-to-guess key. - Note: Once this key is set, please do not change it. This key is used to translate database ids in Galaxy to API ids used by IRIDA to access datasets, histories, and workflows. IRIDA does store some of these API ids internally for debugging and tracking purposes and changing this value will render any of the API ids stored in IRIDA useless.
- The command
- Change
- Setup the Galaxy environment file
env.sh. This file is read by Galaxy to setup the environment for each tool.- Change
#environment_setup_file = Nonetoenvironment_setup_file = env.sh
- Change
- Setup Conda for installing tool dependencies.
- Set
conda_prefix = /home/galaxy-irida/miniconda3, or wherever conda is installed for Galaxy. - Set
conda_ensure_channels = iuc,bioconda,r,defaults,conda-forge.
- Set
- Set the directory to install tool dependencies.
- Set
#tool_dependency_dir = database/dependenciestotool_dependency_dir = database/dependencies(uncomment). -
You may also need to create the directory
database/dependenciestoo. E.g.,mkdir database/dependencies
- Set
Step 5: Start up Galaxy
Verify that Galaxy can start by running:
# Starts Galaxy and builds new database
stdbuf -o 0 sh run.sh 2>&1 | tee run.sh.log
This will attempt to build the Galaxy database and start up Galaxy on http://127.0.0.1:9090.
Note: run.sh builds and starts Galaxy, tee keeps a copy of the output, and stdbuf changes to no buffering to deal with pauses in output when running tee. If stdbuf is not installed on your system you can just run sh run.sh 2>&1 > run.sh.log and tail -f run.sh.log.
When complete you should see something similar to:
Starting server in PID 8967.
serving on 0.0.0.0:9090 view at http://127.0.0.1:9090
Once complete, Galaxy can be killed by pressing CTRL+C.
Note: You may need to give port 9090 access through the firewall. For CentOS this can be done by adding the line -A INPUT -m state --state NEW -m tcp -p tcp --dport 9090 -j ACCEPT to the file /etc/sysconfig/iptables and then running service iptables restart.
Do not proceed if Galaxy does not start.
Step 6: Configure Galaxy as a service
Example scripts to configure Galaxy as a service can be found in the contrib/ directory of Galaxy. Additional details can be found in the Galaxy documentation. This guide assumes a Redhat distribution so we will be working with contrib/galaxy.fedora-init, but scripts for other systems are available.
-
If not already configured, create a non-root user for Galaxy.
useradd --no-create-home --system galaxy-irida chown -R galaxy-irida galaxy/ -
Copy the startup script to the appropriate location.
cp galax/contrib/galaxy.fedora-init /etc/init.d/galaxy -
Make necessary modifications to variables in
/etc/init.d/galaxy(user to run Galaxy, etc). For example:SERVICE_NAME="galaxy" RUN_AS="galaxy-irida" RUN_IN="/home/galaxy-irida/galaxy" -
Enable Galaxy as a service.
chkconfig galaxy on
service galaxy start
service galaxy status
Step 7: Configure Galaxy Jobs Scheduler
The default job configuration is fine for running Galaxy on a single server or for evaluation purposes. This will default to running all jobs on the local machine and limit to 4 jobs at any given time.
For more complicated job scheduling, please refer to the Galaxy Job Config documentation.
Step 8: Test out Galaxy
Once these steps are done, you should be able to connect to Galaxy by going to http://galaxy-server-name:8080. If this works, please move on to the next step. If this does not work, then please check the log file galaxy/paster.log for more details.
Configure Galaxy
Once Galaxy is up and running, there are a few steps needed in order to configure Galaxy with IRIDA.
Step 1: Create Galaxy Accounts
To create the accounts in Galaxy for administration and workflow execution please log into Galaxy and go to User > Register. Please use the same e-mail addresses as configured previously for the admin and workflow. You can configure to use only one account, admin, if you choose, or you can keep admin tasks and the IRIDA workflow executions separated using admin and workflow users.
Step 2: Generate Workflow API Key
Please log in as the workflow user and go to User > Preferences > Manage API Key and click on Create a new key. This will generate an API key for the user which is used by IRIDA to interact with Galaxy. Please make note of this key for later when configuring IRIDA.
Galaxy Tools Installation
Automated installation of tools
The tool Ephemeris can be used to automate installing of tools in Galaxy. A list of tools to install is provided with the irida-[version].zip download on the IRIDA releases page. Instructions can be accessed on the Automated tools install page.
The short version is to:
-
Install Ephemeris
conda install -c bioconda ephemeris -
Install tools
shed-tools install --toolsfile tools-list.yml --galaxy [http://url-to-galaxy] --api_key [api key]Please replace url-to-galaxy and api key with appropriate values for your Galaxy instance.
You may want to monitor the Galaxy log files (e.g., galaxy/*.log) as the installation is proceeding. This may take a while to download, build, and install all tools.
Note: Please take a look through the Manual installation of tools instructions to see if there are any additional setup instructions needed (such as environment variables that need to be set).
Manual installation of tools
Alternatively, the necessary tools can be installed manually through the following instructions specific to each pipeline in IRIDA:
- SNVPhyl Whole Genome Phylogeny
- Assembly and Annotation
- Assembly and Annotation Collection
- SISTR Salmonella Typing
- refseq_masher
- MentaLiST MLST
- Bio_Hansel
Each of these will step through installing the necessary tools in IRIDA. These steps will involve going to Galaxy, navigating to Admin > Search tool sheds, finding the appropriate tool and installing. On completion, you should be able to go to Admin > Manage installed tools to check the status of each tool. For a successfull install, you should see a status of Installed. If there is an error, you can click on each tool for more details.
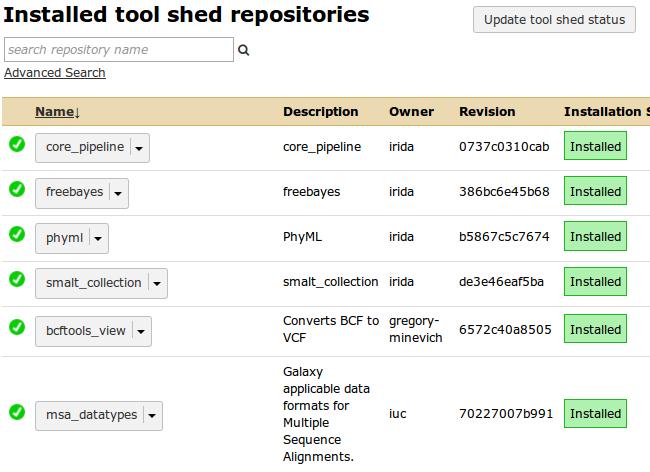
All tools are, by default, installed in the directory galaxy/../shed_tools with binary dependencies installed in galaxy/database/dependencies. Monitoring the install process of each tool can be done by monitoring the main Galaxy log file paster.log.
Link up Galaxy with IRIDA
In order to link up Galaxy with IRIDA please proceed through the following steps.
Step 1: Install and configure the IRIDA web interface
Follow the instructions to install and configure the IRIDA web interface. In particular, you will need to modify the parameters galaxy.execution.url, galaxy.execution.email, and galaxy.execution.dataStorage in the file /etc/irida/irida.conf.
Step 2: Test and monitor workflows
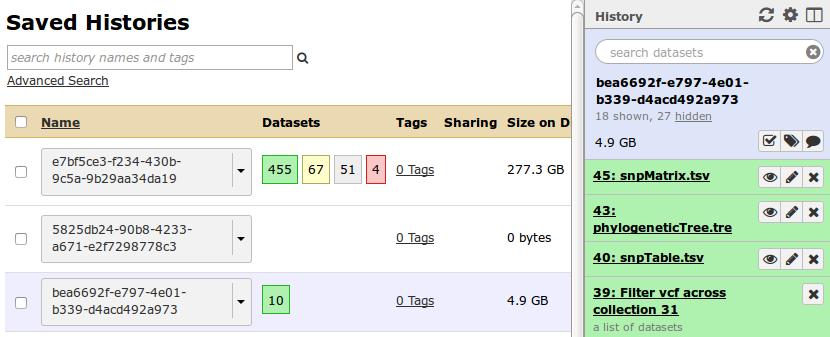
Once you have configured IRIDA to connect to Galaxy you can attempt to execute a workflow by adding some data to your cart, selecting Pipelines from the main menu, then selecting a particular pipeline. You will have to have some data uploaded into IRIDA before testing. Currently all workflows assume you are using paired-end sequence reads.
Each workflow in IRIDA is run using Galaxy, and it’s possible to monitor the status of a workflow or debug a workflow through Galaxy. To do this, please log into Galaxy as the workflow-user and click on the History Options icon ![]() in the top-right of the History panel to view a list of saved histories. You should see these histories being populated as you execute new workflows in IRIDA.
in the top-right of the History panel to view a list of saved histories. You should see these histories being populated as you execute new workflows in IRIDA.