
IRIDA Pipeline Development
This document describes the necessary steps for integrating new pipelines into IRIDA.
- IRIDA Pipeline Development
- 1. Introduction
- 2. Galaxy Workflow Development
- 3. IRIDA Integration
- 3.1. Write IRIDA workflow files
- 3.2. Write IRIDA workflow plugin
- 3.2.1. Install IRIDA to local Maven repository
- 3.2.2. Download IRIDA plugin example
- 3.2.3. Copy workflow files above from
output/to src/main/resources/workflows - 3.2.4. Write a
Pluginimplementation defining some key properties of the pipeline - 3.2.5. (Optional) Implement an Updater class
- 3.2.6. (Optional) Set a viewer for analysis results
- 3.3. Update the pom.xml file
- 3.4. Build
- 4. Test in IRIDA
1. Introduction
Pipelines in IRIDA take as input data managed by IRIDA and run through a collection of tools to produce some meaningful result. Pipelines are implemented as a Galaxy Workflow and executed using an instance of Galaxy that has been setup for IRIDA. Pipelines are versioned and are stored and distributed either along with the IRIDA software, or as a separate plugin compiled into a Java JAR file. Tools used by a pipeline are versioned and are stored and distributed using Galaxy Toolsheds. In particular, the Galaxy Main Toolshed is used to store and distribute tools for a pipeline.
IRIDA provides support for developing and integrating additional pipelines from Galaxy. This process can be divided into two stages: Galaxy Workflow Development and IRIDA Integration. The necessary steps, in brief, are:
- Galaxy Workflow Development
- Integrate tools into Galaxy
- Develop a Galaxy Workflow
- Export Workflow
- IRIDA Integration
- Write IRIDA workflow files (or run irida-wf-ga2xml)
- Write IRIDA workflow plugin
- Build plugin JAR and move to
/etc/irida/pluginsdirectory - Start IRIDA
2. Galaxy Workflow Development
Galaxy provides the ability to organize different bioinformatics tools together into a single workflow for producing specific results. These workflows can make use of already existing bioinformatics tools in Galaxy, or can include customized tools which can be distributed using a Galaxy Toolshed.
2.1. Integrate tools into Galaxy
The first step to constructing a pipeline for IRIDA is to make sure the underlying bioinformatics tools are available in Galaxy. You can check the Galaxy Main Toolshed to see if the software you wish to use is available.
If the software does not already exist as an installable tool in Galaxy, then you may have to package the necessary files to integrate into Galaxy yourself. The software package Planemo can be used to construct the necessary wrappers for tools in Galaxy and integrate these into the Galaxy environment. More information on how to develop Galaxy tools with Planemo can be found in the Planemo Building Galaxy Tools section.
Once the necessary wrappers are constructed for Galaxy, these should be integrated into Galaxy Toolshed. This step will allow anyone to install the Galaxy tools into their local Galaxy instance. On upload of a Galaxy tool to the Galaxy Toolshed, a unique id will be assigned to each tool, which is used by IRIDA to specify the exact software to be run in Galaxy. For example, the id for Prokka, which is used for annotation of genomes, is toolshed.g2.bx.psu.edu/repos/crs4/prokka/prokka/1.4.0, which includes the name of the toolshed where Prokka can be found https://toolshed.g2.bx.psu.edu/.
2.2. Develop a Galaxy Workflow
Tools in Galaxy can be linked together to construct a workflow. Galaxy provides a built-in editor for constructing and modifying workflows.
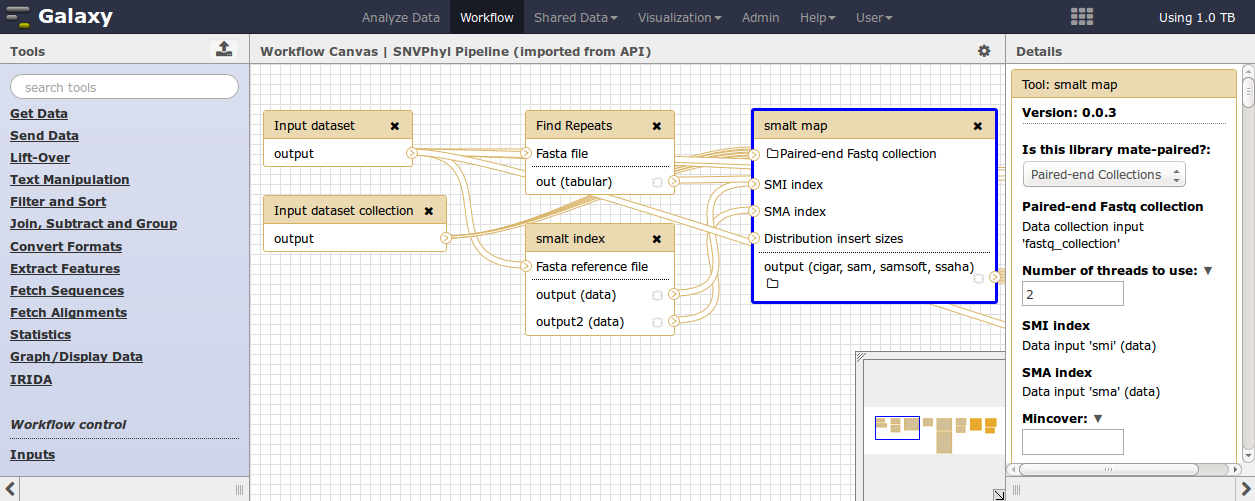
This editor allows for the definition of input files and file types, tools and parameter settings for the tools, as well as which files will be used as output from the workflow. More information on constructing Galaxy workflows can be found in the Galaxy Workflow Editor documentation.
In order for a workflow to properly be integrated into IRIDA, the input and output to this workflow must be in a specific format.
2.2.1. Input Format
IRIDA currently only supports two types of input files: a collection of paired-end sequence reads in FASTQ format, and an optional reference genome in FASTA format.
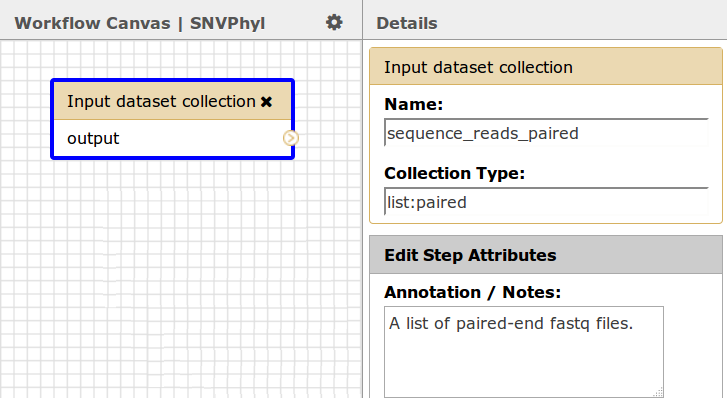
For the paired-end sequence reads this must be a dataset collection of type list:paired, which will correspond to a list of paired-end FASTQ sequence reads (one entry in the list per each sample/pair of fastq files transferred from IRIDA).
For the optional reference genome, if you wish to use a reference genome, the type must be an input dataset, not a dataset collection. Currently, IRIDA only supports reference genomes in FASTA format.
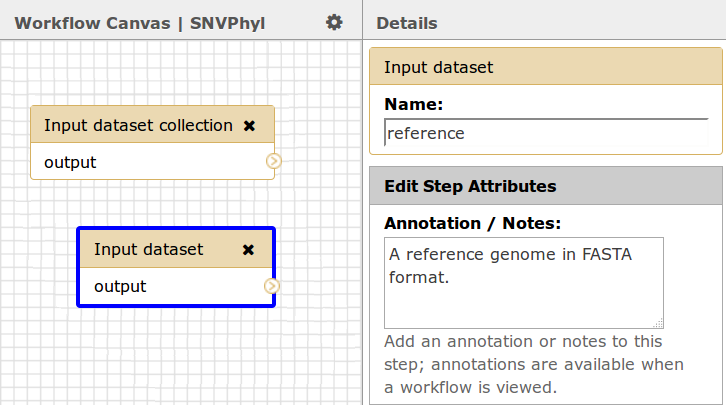
Please also make note of the names given to each input dataset, in this case sequence_reads_paired and reference, as the names will be used to link up data sent from IRIDA to the Galaxy workflow.
2.2.2. Output Format
Output datasets within IRIDA can be of any file type and there can be many outputs for each workflow. Each output should have a consistent name which will be used by IRIDA to find and download the appropriate file from Galaxy. This can be accomplished by adding a Rename Dataset action to each output file. In this case, for the tool PhyML the name is phylogeneticTree.tre.
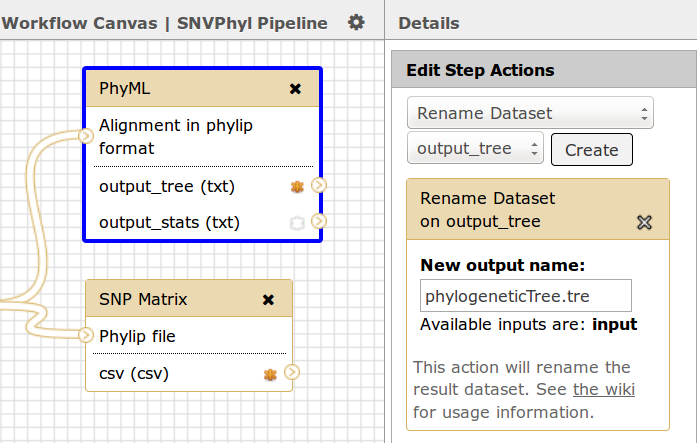
In addition, each output dataset should be marked as a workflow output by selecting the asterix * icon, in this case both the output_tree and the csv files from the PhyML and SNP Matrix tools have been selected as output.
2.3. Export Workflow
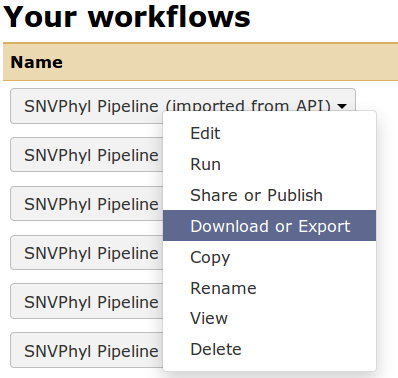
Once the workflow is written in Galaxy, it can be exported to a file by going to the Workflow menu at the top, finding your particular workflow and selecting Download or Export. This will save the workflow as a *.ga file, which is a JSON-formatted file defining the tools, tool versions, and structure of the workflow.
3. IRIDA Integration
3.1. Write IRIDA workflow files
IRIDA makes use of three files irida_workflow.xml, irida_workflow_structure.ga, and messages_en.properties to define the workflow and associated metadata about the workflow.
The easiest way to generate these files is to make use of the irida-wf-ga2xml program. Assuming you already have a galaxy_workflow.ga file exported from the steps above, you can generate the necessary additional files for IRIDA with:
java -jar irida-wf-ga2xml-1.0.0-SNAPSHOT-standalone.jar \
  -i galaxy_workflow.ga \
  -n WORKFLOW_NAME \
  -t ANALYSIS_TYPE \
  -W WORKFLOW_VERSION \
  -o output
This will build the necesary files under output/. As an example:
java -jar irida-wf-ga2xml-1.0.0-SNAPSHOT-standalone.jar -i src/main/resources/ca/corefacility/bioinformatics/irida/model/workflow/analysis/type/workflows/SISTRTyping/0.3/irida_workflow_structure.ga -n SISTRTyping -t SISTR_TYPING -W 0.1.0 -o output
This will produce the following directory structure:
output
└── SISTRTyping
    └── 0.1.0
        ├── irida_workflow_structure.ga
        ├── irida_workflow.xml
        └── messages_en.properties
NOTE: You may need to edit the output from irida-wf-ga2xml to ensure that only necessary tool parameters are kept in the irida_workflow.xml file and that the proper tool revision is used for each tool if this information is not embedded in your Galaxy Workflow ga file.
3.2. Write IRIDA workflow plugin
IRIDA includes a mechanism for packaging up all the above workflow files into a single JAR file which can be distributed and installed independently of the main IRIDA software. To package up the IRIDA workflow into a JAR file you can start with a template plugin located in irida-plugin-example. An overview of the changes you will need to make is as follows.
3.2.1. Install IRIDA to local Maven repository
In order to compile the IRIDA plugin, you will have to install the main IRIDA code (https://github.com/phac-nml/irida) to your local Maven repository. This can be accomplished with:
git clone https://github.com/phac-nml/irida.git
cd irida
./gradlew clean publishToMavenLocal -xtest
3.2.2. Download IRIDA plugin example
Once you’ve installed IRIDA to your local Maven repository, you can download the IRIDA example plugin to your machine and begin modifying the files in this project to suite your needs.
git clone https://github.com/phac-nml/irida-plugin-example
cd irida-plugin-example
3.2.3. Copy workflow files above from output/ to src/main/resources/workflows
You will need to copy over the files generated above to src/main/resources/workflows. The directory structure you should end up with will be:
workflows/
└── 0.1.0
    ├── irida_workflow_structure.ga
    ├── irida_workflow.xml
    └── messages_en.properties
- The directory
0.1.0corresponds to all files for a particular version of a pipeline (in this case0.1.0). Previous versions of the pipeline should each be kept in their own numbered directory (e.g.,0.1.0,0.2.0) so that IRIDA can load up information about these pipelines. - The file
irida_workflow_structure.gais a Galaxy workflow file which is uploaded to a Galaxy instance by IRIDA before execution. - The file
irida_workflow.xmlcontains information about the particular pipeline used by IRIDA. - The file
messages_en.propertiescontains messages which will be displayed in the IRIDA UI.
You may (or may not) need to modify these files from the automatically generated versions. A description of each of these files is as follows.
3.2.3.1. irida_workflow_structure.ga
The irida_workflow_structure.ga file contains the workflow structure (generated from Galaxy). An example of the format is as follows:
{
    "a_galaxy_workflow": "true",
    "annotation": "",
    "format-version": "0.1",
    "name": "Read info",
    "steps": {
        "0": {
            "annotation": "",
            "content_id": null,
            "id": 0,
            "input_connections": {},
            "inputs": [
                {
                    "description": "",
                    "name": "sequence_reads"
                }
            ],
            "label": null,
            "name": "Input dataset collection",
            "outputs": [],
            "position": {
                "left": 200,
                "top": 200
            },
            "tool_errors": null,
            "tool_id": null,
            "tool_state": "{\"collection_type\": \"list:paired\", \"name\": \"sequence_reads\"}",
            "tool_version": null,
            "type": "data_collection_input",
            "uuid": "e267248b-6ddc-4b5e-a476-e805ce1bc4d5",
            "workflow_outputs": [
                {
                    "label": null,
                    "output_name": "output",
                    "uuid": "ae59d874-94ab-4b14-b456-15e2fee2860d"
                }
            ]
        },
...
Normally you will not be required to modify this file.
3.2.3.2. irida_workflow.xml
This file contains information about the particular pipeline installed in IRIDA. An example would be:
<?xml version="1.0" encoding="UTF-8"?>
<iridaWorkflow>
  <id>79d90ca8-00ae-441b-b5c7-193c9e85a968</id>
  <name>ReadInfo</name>
  <version>0.1.0</version>
  <analysisType>READ_INFO</analysisType>
  <inputs>
    <sequenceReadsPaired>sequence_reads</sequenceReadsPaired>
    <requiresSingleSample>true</requiresSingleSample>
  </inputs>
  <parameters>
    <parameter name="Grep1-4-pattern" defaultValue="^@">
      <toolParameter toolId="Grep1" parameterName="pattern"/>
    </parameter>
  </parameters>
  <outputs>
    <output name="hash.txt" fileName="hash.txt"/>
    <output name="read-count.txt" fileName="read-count.txt"/>
  </outputs>
  <toolRepositories/>
</iridaWorkflow>
Normally this file will be generated for you by irida-wf-ga2xml. A few key elements are:
<id>defines a unique id for the workflow. This must be a UUID. A quick way to generate a random UUID on linux is the commanduuid -v 4.<analysisType>defines what type of analysis this workflow belongs to. This string should match the string defined for theAnalysisTypein the Java plugin class defined below.<sequenceReadsPaired>defines the name of the input dataset in Galaxy for the paired-end sequence reads chosen previously. In this case it is sequence_reads.<toolParameter>defines how to map parameters a user selects in IRIDA to those in Galaxy (defined in the irida_workflow_structure.ga file).<output>defines, for an output file, a name in IRIDA and maps it to the name of the file in Galaxy that was chosen previously. In this case it is hash.txt and read-count.txt.<toolRepositories>defines the different Galaxy ToolSheds from which the dependency tools come from, as well as a revision number for the tool.
Additional details and a description of the syntax of this file can be found in the IRIDA Workflow Description documentation.
Note:
If the pipeline outputs an html file, then any custom styling (css) required for the page must be added directly to the html page. There are two ways to do this:
1) Pull directly from a CDN provider by adding <script src="URL_TO_CSS_FILE"></script> to the <head></head> tags in the html output.
2) Add your styles directly in the <head></head> tags as follows:
<style>
    //CSS styles go here
</style>
Any javascript required by the page will also need to be either embedded in the html file in <script></script> tags or pulled from a CDN provider by adding <script src="URL_TO_JS_FILE"></script>
3.2.3.3. messages_en.properties
This file contains information on the text to display in the IRIDA UI for each pipeline (specifically the en or English text, other languages can be stored in other messages_xx.properties files). An example of this file is:
pipeline.parameters.modal-title.readinfo=ReadInfo Pipeline Parameters
workflow.READ_INFO.title=ReadInfo Pipeline
pipeline.h1.ReadInfo=ReadInfo Pipeline
pipeline.title.ReadInfo=Pipelines - ReadInfo
workflow.READ_INFO.description=

pipeline.parameters.readinfo.Grep1-4-invert=Grep1-4-invert
pipeline.parameters.readinfo.Grep1-4-pattern=Grep1-4-pattern

pipeline.parameters.readinfo.wc_gnu-5-include_header=wc_gnu-5-include_header
The entries like workflow.READ_INFO.title=ReadInfo Pipeline contain the text used to display the pipeline entry on the “Pipelines” page in the UI:
The entries like pipeline.parameters.readinfo.Grep1-4-pattern=Grep1-4-pattern contain information used to display the text when adjusting pipeline parameters:
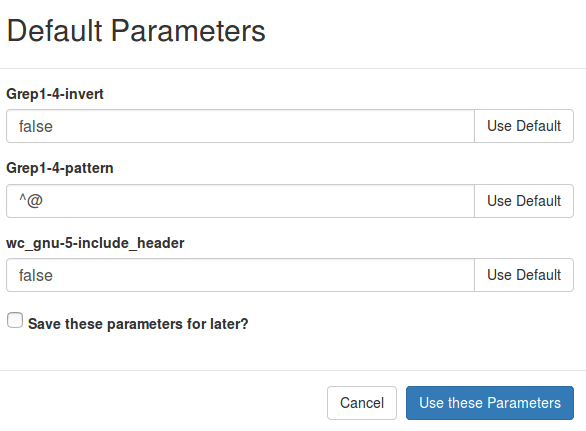
The Grep1-4-pattern part corresponds to the name attribute under a <parameter> entry in the irida_workflow.xml file:
<parameter name="Grep1-4-pattern" defaultValue="^@">
  <toolParameter toolId="Grep1" parameterName="pattern"/>
</parameter>
3.2.4. Write a Plugin implementation defining some key properties of the pipeline
This is a class which defines configuration for the pipeline and allows IRIDA to load the necessary files. When implementing the pipeline as a plugin this class can be located in any package you wish, and can have any name you wish. You will want to implement the two methods which are indicated as required in this file. You can also override the methods indicated as optional in the file for additional configuration. For an example of a class you can look at ExamplePlugin.java. This should look like:
public class ExamplePlugin extends Plugin {

	public static final AnalysisType MY_ANALYSIS_TYPE = new AnalysisType("MY_ANALYSIS_TYPE");

	public ExamplePlugin(PluginWrapper wrapper) {
		super(wrapper);
	}

	@Extension
	public static class PluginInfo implements IridaPlugin {

		/*** Required ***/

		@Override
		public AnalysisType getAnalysisType() {
			return new AnalysisType("READ_INFO");
		}

		@Override
		public UUID getDefaultWorkflowUUID() {
			return UUID.fromString("79d90ca8-00ae-441b-b5c7-193c9e85a968");
		}

		/*** Optional ***/

		@Override
		public Optional<Color> getBackgroundColor() {
			return Optional.of(Color.decode("#dd1c77"));
		}

		@Override
		public Optional<Color> getTextColor() {
			return Optional.of(Color.BLACK);
		}

		@Override
		public Optional<AnalysisSampleUpdater> getUpdater(MetadataTemplateService metadataTemplateService,
				SampleService sampleService, IridaWorkflowsService iridaWorkflowsService) throws IridaPluginException {
			return Optional.of(new ExamplePluginUpdater(metadataTemplateService, sampleService, iridaWorkflowsService));
		}

		@Override
		public Optional<String> getAnalysisViewer() {
			return Optional.of("tree");
		}
	}
}
The purpose of each method is as follows:
-
getAnalysisType(): This returns anAnalysisTypeobject which stores the type of analysis as aString(matches the<analysisType>READ_INFO</analysisType>entry in the irida_workflow.xml file). -
getDefaultWorkflowUUID(): This returns the id of the workflow (matching the<id>79d90ca8-00ae-441b-b5c7-193c9e85a968</id>entry in the irida_workflow.xml file). Returning the appropriate value here is especially important if there are multiple versions of the same pipeline in this plugin (this will define the default or “latest” version). -
getBackgroundColor()andgetTextColor(): The background and text color to display in the UI (defaults to grey for background and black for text). This is optional. See example below: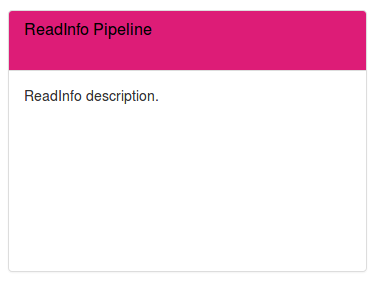
-
getUpdater(): Gets an instance of a class used for post-processing on pipeline results (e.g., updating the IRIDA metadata). This is optional. Additional documentation about this class is described below.
3.2.5. (Optional) Implement an Updater class
An Updater class is used to perform post-processing on the resulting files, primarily intended to write back pipeline results into the IRIDA metadata system. Please see the ExamplePluginUpdater.java for an example implementation, or the built-in implementations in https://github.com/phac-nml/irida/tree/development/src/main/java/ca/corefacility/bioinformatics/irida/pipeline/results/updater/impl. Implementing this class is optional for your pipeline.
If you do implement this class, you will also want to make sure to update the messages_en.properties file with an entry like:
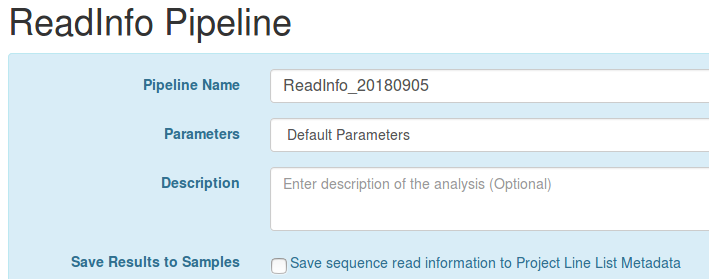
workflow.label.share-analysis-samples.READ_INFO=Save sequence read information to Project Line List Metadata
This contains the message to display asking the user if they wish to Save Results to Samples for their pipeline before launching the pipeline.
3.2.6. (Optional) Set a viewer for analysis results
Your plugin can use one of IRIDA’s built in analysis results viewers by implementing the getAnalysisViewer() method in IridaPlugin.
The viewers available to plugins in IRIDA are the following:
tree- A phylogentic tree viewer. By setting this analysis viewer type, IRIDA will look for an output file with a.newickextension and display it in the analysis output pages. Note that only one tree file is currently able to be visualized.sistr- A viewer for SISTR results. Generally this should only be used for the SISTR pipeline.biohansel- A viwer for BioHansel results. Generally this should only be used for the BioHansel pipeline.
3.3. Update the pom.xml file
You will have to update the pom.xml file in order to set version information and other metadata about your pipeline.
3.3.1. Update the Maven version/info
You will want to update the Maven version/information section for this particular plugin. That is:
<groupId>ca.corefacility.bioinformatics.irida.plugins</groupId>
<artifactId>example-plugin</artifactId>
<version>0.1.0-SNAPSHOT</version>
Please see the Maven Documentation for more details.
3.3.2. Update the properties section/plugin info
The properties section contains additional information you will have to update. In particular:
<plugin.id>example-plugin</plugin.id>
<plugin.class>ca.corefacility.bioinformatics.irida.plugins.ExamplePlugin</plugin.class>
<plugin.version>0.1.0</plugin.version>
<plugin.provider>Aaron Petkau</plugin.provider>
<plugin.dependencies></plugin.dependencies>
<plugin.requires.runtime>1.1.0</plugin.requires.runtime>

<irida.version.compiletime>21.01</irida.version.compiletime>
The <plugin.*> entries contain information about your particular plugin as defined by PF4J.
plugin.id: An identifier for your plugin.plugin.class: The fully-qualified name of the class implementing this plugin (in this case, the ExamplePlugin.java class).plugin.version: A version number for your plugin.plugin.provider: The provider of this plugin.plugin.dependencies: Other IRIDA plugins this plugin depends on.plugin.requires.runtime: The exact version of the IRIDA plugin API this plugin requires at runtime (stored in the IridaPlugin.java interface). You normally don’t need to update this unless the version is also updated in IRIDA.
The <irida.version.compiletime> contains the exact IRIDA version this plugin will need to be compiled against (compile-time version).
3.4. Build
Once you’ve made all the updates, you can try building and testing your plugin. To build your plugin, you can run:
mvn clean package
You should find your packaged plugin JAR file in target/ (e.g., target/example-plugin-0.1.0-SNAPSHOT.jar).
4. Test in IRIDA
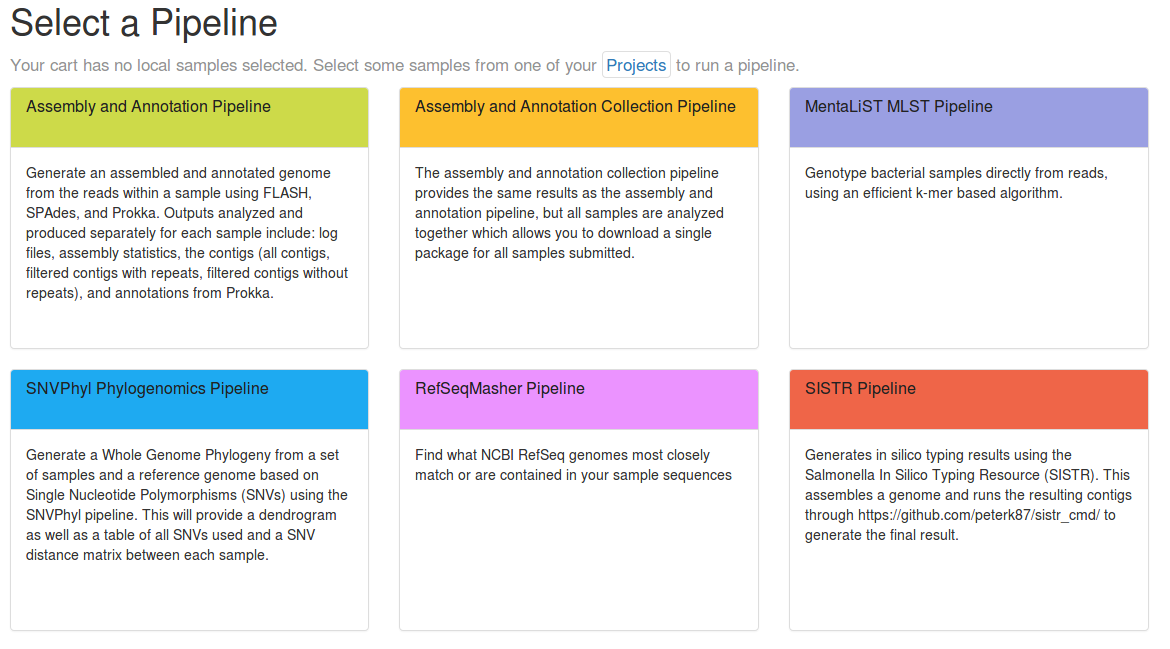
Once you’ve built your Galaxy workflow and made all the above modifications, you can attempt to load up the pipeline in IRIDA. To do this, please first copy the target/*.jar file to /etc/irida/plugins on a machine with IRIDA installed and restart IRIDA. Your plugin should show up in the Analyses > Pipelines page in IRIDA.
You should also be able to see messages like below in the IRIDA log file when starting up:
INFO org.pf4j.AbstractPluginManager:801 - Plugin 'example-plugin@0.1.0' resolved
INFO org.pf4j.AbstractPluginManager:320 - Start plugin 'example-plugin@0.1.0'
DEBUG ca.corefacility.bioinformatics.irida.config.services.IridaPluginConfig:45 - Loaded 1 valid pipeline plugins.