
IRIDA Development Primer
This guide is for new developers to the IRIDA project to get a basic understanding of the layout of the project. Before getting started, new developers should read our Contributing page.
- Important links
- Languages and Libraries
- Development platform
- Quick start development requirements
- Running and building IRIDA
- IRIDA Codebase
- Building new features
- Version control
Document History
- Aug 18, 2017: Document creation.
Important links
- IRIDA GitHub - https://github.com/phac-nml/irida
- Documentation site - https://irida.corefacility.ca/documentation/
- Contributing guide - https://github.com/phac-nml/irida/blob/development/CONTRIBUTING.md
- Public information website - https://irida.ca
Languages and Libraries
IRIDA is a Java application developed using Java 11.
Spring framework
Documentation: https://docs.spring.io/spring-framework/docs/5.2.2.RELEASE/spring-framework-reference/
IRIDA uses the Spring Framework as the main backbone of the application. Spring is used to assist with many of the main functions of the application including configuration, dependency injection, MVC, REST API, Java persistance API management, and more.
For a better understanding of how Spring works, it’s recommended that IRIDA developers attend a Core Spring Training course https://pivotal.io/training/courses/core-spring-training.
Gradle
Documentation: https://docs.gradle.org/current/userguide/userguide.html
IRIDA uses Gradle for dependency management and build automation. Gradle allows developers to specify dependencies for a Java application and Gradle will handle downloading all necessary required packages and ensuring they’re available for developers on the Java classpath. It also allows you to specify build lifecycles to automate packaging an application for distribution or execute code for development.
Gradle settings and dependencies can generally be found in the settings.gradle.kts and build.gradle.kts files in the IRIDA root directory.
Hibernate
Documentation:http://hibernate.org/orm/documentation/4.3/
Hibernate is used to map Java objects to database tables without the need for writing extra database code. IRIDA uses hibernate through the Java Persistence API abstraction.
Liquibase
Documentation: http://www.liquibase.org/documentation/index.html
Liquibase is used to manage IRIDA’s relational database change management. Any time a change is made to IRIDA’s production database schema, Liquibase is used to perform the change. See the Database Updates section for more.
Galaxy
Documentation: https://docs.galaxyproject.org/en/master/index.html
Galaxy is used as IRIDA’s analysis workflow engine. Analysis pipelines must be developed as Galaxy pipelines to integrate with IRIDA’s workflow system. See the Galaxy Setup documentation for Galaxy installation and the Tool Development documentation for building tools for IRDIA.
Other important libraries
- Thymeleaf - Web interface templating - http://www.thymeleaf.org/documentation.html
- JQuery - Javascript libraries - https://api.jquery.com/
- AngularJS - Javascript libraries and templating - https://docs.angularjs.org/api
- Jekyll - Documentation build - http://jekyllrb.com/docs/home/
Development platform
The development platform used by most IRIDA developers is the Eclipse IDE.
The following plugins are recommended:
- Eclipse EGit - Git integration. Helps by showing changes made to your codebase.
The following code formatting file should be imported into Eclipse for consistency between developers: IRIDA eclipse code format
Quick start development requirements
An (incomplete) set of instructions for getting the IRIDA service layer and web front up and running for development on your Linux machine. To include Galaxy and all the pipeline requirements, see the main IRIDA documentation.
- Clone IRIDA from the IRIDA GitHub.
- Install the following dependencies from your chosen package manager:
- MariaDB
- Java 11 JDK
- Gradle
- Create a test database in MariaDB with the name
irida_testand usertestwith passwordtest. - Create a second test database in MariaDB with the name
irida_integration_testand usertestwith passwordtest(for running local integration tests).
# Setup databases example
# These steps may differ depending on your installation

# log into mysql as root
sudo mysql -u root
# create databases
create database irida_test;
create database irida_integration_test;

# give test user access
grant all privileges on irida_test.* to 'test'@'localhost' identified by 'test';
grant all privileges on irida_integration_test.* to 'test'@'localhost' identified by 'test';

# exit
quit
# check that test user has access
mysql -u test -p irida_test
From here you should be able to run the IRIDA service layer, REST API, and web UI using Tomcat.
Running and building IRIDA
Running a development server
An IRIDA development server can be run with the run.sh script available in the project root directory. The script has one option --create-db. Using this option will automatically drop and recreate the database using test data. A newly created development database will contain the profile admin, with password password1, that can be used to log in to IRIDA.
Running the run.sh without arguments script is equivalent to running:
./gradlew clean bootRun --args="--spring.profiles.active=dev"
Spring profiles
Spring allows us to set profiles in the application that can be used to set up certain services for running in different environments.
Basic profiles
prod- Production mode.- Hibernate will not be allowed to make changes to the database schema.
- Database will be managed by Liquibase.
- Attempt to connect to Galaxy to run workflows
- Run all scheduled tasks such as NCBI uploads, data synchronization, etc.
dev- Development mode.- Hibernate to attempt to update the IRIDA database as you make code changes.
- No galaxy connection.
- Run only the file processing scheduled task.
Advanced profiles
The advanced profiles allow you to configure your server to run specific components of the IRIDA application. The different profiles enable specific scheduled tasks which are used to run many of IRIDA’s analysis, processing, or data transfer tools. For more information on setting up an IRIDA server to run in multi-server mode, see the installation documentation.
web- Run the IRIDA user interface and REST API web application servers.email- Run the email subscription service. This will send email digests out to users on a scheduled basis.analysis- Run the IRIDA analysis engine. This profile launches and monitors progress of all analysis pipelines in IRIDA.processing- File processing pipeline for uploaded sequencing data.sync- Synchronizing remote projects.ncbi- Uploading data to NCBI.
Testing profiles
it- Integration test.- Liquibase is used for database setup, but should only be used for integration testing.
test- This profile is generally used when testing connection to Galaxy.
When running IRIDA from the command line, a profile can be set by adding the following parameter:
--args="--spring.profiles.active=YOURPROFILE"
Running IRIDA tests locally
While GitHub Actions runs all IRIDA’s testing on every pull request, it is often useful to run IRIDA’s test suite locally for debugging or development. IRIDA’s test suite can be run with Grade using the test and check goals.
See the IRIDA tests section for more on how IRIDA’s tests are developed.
Unit tests
IRIDA’s unit tests can be run with the following command:
./gradlew clean test
Gradle will download all required dependencies and run the full suite of unit tests. This will take a couple minutes and a report stating what tests passed and failed will be presented.
Integration tests
IRIDA has 5 integration test tasks which splits the integration test suite into functional groups. This allows GitHub Actions to run the tests in parallel, and local test executions to only run the required portion of the test suite. The 5 tasks are the following:
serviceITest- Runs the service layer and repository testing.uiITest- Integration tests for IRIDA’s web interface.restITest- Tests IRIDA’s REST API.galaxyITest- Runs tests for IRIDA communicating with Galaxy. This profile will automatically start a test galaxy instance to test with.galaxyPipelineITest- Runs tests for running a pipeline with Galaxy. This profile will automatically start a test galaxy instance to test with.
See the integrationTestMap definition in the build.gradle.kts file to see how the tasks are defined.
As the integration tests simulate a running IRIDA installation, in order to run any integration test the requirements needed to run a production IRIDA server must be installed on your development machine. The test tasks can each be run directly with ./gradlew TEST_TASK, but additional setup may be required for the tests to work properly. To perform this setup and run all the tests, the run-tests.sh script can be used. To run a test task with run-tests.sh please run the following:
./run-tests.sh <TEST PROFILE>
Where
service_testing- Runs theserviceITesttaskui_testing- Runs theuiITesttaskrest_testing- Runs therestITesttaskgalaxy_testing- Runs thegalaxyITesttaskgalaxy_pipeline_testing- Runs thegalaxyPipelineITesttask
This will clean and setup an empty database for IRIDA on the local machine named irida_integration_test. This will also, for the Galaxy test profile, start up a Galaxy IRIDA testing Docker image running on http://localhost:48889 and destroy this Docker image afterwards (you can skip destroying the Docker image by passing --no-kill-docker to this script). If you wish to use a different database than the default irida_integration_test, you may pass the name of the database with the -d flag:
./run-tests.sh -d <DATABASE> <TEST PROFILE>
This assumes that the user test has been given all permissions to <DATABASE> (e.g., in SQL grant all privileges on <DATABASE>.* to 'test'@'localhost';).
As an example of how to run the IRIDA integration tests:
./run-tests.sh galaxy_testing
This will:
- Clean/re-build the IRIDA database on
irida_integration_test(use-dto override). - Remove any previous Docker images from previous tests (named irida-galaxy-test).
- Start up a new Docker image with Galaxy running on http://localhost:48889.
- Run IRIDA
galaxyITestintegration test task. - Remove Docker image on http://localhost:48889.
Additional Gradle parameters can be passed to run-tests.sh. In particular, individual test classes can be run using --tests=ca.corefacilty.bioinformatics.irida.TheTestClass. For example:
./run-tests.sh rest_testing --tests=ca.corefacility.bioinformatics.irida.web.controller.test.integration.analysis.RESTAnalysisSubmissionControllerIT
Building IRIDA for release
Run the following:
./gradlew clean build -xtest
This will create the .war and .zip files for IRIDA release under the build/dist/ directory.
Building IRIDA documentation
IRIDA documentation can be found in the https://github.com/phac-nml/irida-docs GitHub project. IRIDA’s documentation is built using Jekyll and GitHub Pages. Jekyll allows us to write documentation in Markdown format and it will convert the pages to HTML. We can use Jekyll both for viewing the documentation locally and for publishing to GitHub Pages. The current documentation can be found at https://phac-nml.github.io/irida-docs.
Testing IRIDA documentation locally
To view the documentation locally or make changes, you can checkout the above GitHub project and make changes. To run the server locally you can run Jekyll to generate the pages.
First cd into the docs/ directory and run the following command:
bundle exec jekyll serve
Note that you must have Ruby and Jekyll installed. See the documentation README.md for info on installing these tools.
This command will read the _config.yml file in the directory for configuration settings, then serve the built documentation at http://localhost:4000/irida-docs/. As you make changes to documentation files it will automatically regenerate the documentation and reload its webserver.
Updating IRIDA documentation for release
The IRIDA documentation is automatically published from the current state of the main branch of the https://github.com/phac-nml/irida-documentation repository. To update the docs be sure you have a recent copy of the irida-documentation repository checked out and on the development branch. The build-docs.py script has been built to assist with updating the docs repository. Below are the steps you should perform to publish a new version of the IRIDA documentation.
- Run the
build-docs.pyscript from the root of theiridarepository. You must provide it with the path to youririda-documentation/docsfolder:./build-docs.py path/to/irida-documentation/docsThis will compile the Java documentation into the documentation directory, then update the documentation in
irida-documentation/docs. - Go to your
irida-documentationfolder. Create a new branch and commit your changes. - Create a new PR and have another IRIDA developer review the changes. There will be many changes in the
docs/developer/apidocsdirectory that were automatically generated. These should not require manual review. - Once changes are ready in the
developmentbranch, they must be merged intomainfor release. Manually update themainbranch by mergingdevelopment. You should also create a tag for the IRIDA release version.git checkout development # checkout the development branch git pull # ensure the branch is up to date git checkout main # checkout the main branch git pull # ensure the branch is up to date git merge development # merge development into the main branch git tag <the current IRIDA version> # tag the current release for easy retrieval of previous versions git push origin main # push the new code to GitHub git push --tags # push the newly created tag
Shortly after pushing the new changes to GitHub, the updated pages should be reflected on the GitHub Pages site.
IRIDA Codebase
IRIDA is organized as a fairly classic Java web application. All main source can be found in the src/main/ path. Test code will be in src/test/
src/main/java- IRIDA’s Java source code. All Java code for the main application is in this root.src/main/webapp- Web application code. All web templates, Javascript, CSS, etc. is found here.src/main/resources- Configuration files, database update files, internationalization, and other scripts which are outside of the othersrc/maindirectories.src/test/java- Java test files. IRIDA uses JUnit for testing. See the IRIDA tests section for more.src/test/resources- Additional files required for IRIDA testing. These will generally be database files, test data, and test configuration.
Java classpath
All files are found under the ca.corefacility.bioinformatics.irida package root.
config- Configuration classes. All Spring application config, web config, and scheduled task configuration can be found here.database.changesets- Java Liquibase changesets. See more about our liquibase usage in the Database Updates section.events- Classes here handle theProjectEventstructure in IRIDA. These are the messages you can find on the IRIDA dashboard and project recent activity pages.exceptions- JavaExceptionclasses written for IRIDA.model- IRIDA uses MVC. These are the model classes which are persisted into the database using Spring Data JPA and Hibernate.pipeline.upload- Classes used to communicate workflows, libraries, and histories to Galaxy.processing- IRIDA’s file processing chain. This contains classes used when processing files uploaded to IRIDA such as unzipping, FastQC, and quality control.repositories- Repositories used for communicating with IRIDA’s database. These classes generally use Spring Data JPA for communicating with the database.ria- “Rich Internet Application”, this is where the controller code and all Java code for the web interface is found.security- IRIDA’s security layer. You’ll mostly find Spring Security classes within. See more in the security section.service- IRIDA’s service layer. Here you’ll find the business logic for reading, saving, and manipulating data.util- General utility classes. These are generally developer tools that don’t fit anywhere else in the class structure.validators- Validation classes used to verify data being saved in the database is correct.web- IRIDA’s REST API.
IRIDA Security
IRIDA uses Spring Security extensively to control access and authentication in the platform. The majority of the security resides at the service layer of the application, but some security functions can be found elsewhere in the codebase.
Method security is generally handled by adding Spring security annotations to methods. These annotations can have a number of different forms.
Role based security
The @PreAuthorize annotation is used for the majority of security functions. This annotation outlines the conditions which must be met in order for a user to run a given method. If the user does not meet the conditions, an AccessDeniedException will be thrown.
The simplest case for this annotation uses the hasRole('ROLE') format. In this case it is checking whether the logged in user has a given system role. For example the following block will check if the logged in user is an admin:
@PreAuthorize("hasRole('ROLE_ADMIN')")
public void doStuff(){}
Custom permission classes
In cases where role-based security isn’t enough, Spring Security allows us to write custom permissions classes to test whether a user can perform a function. For most cases in IRIDA, this is checking whether a user has access to a given object in the database (Project, Sample, SequencingObject, etc.) to perform a given action (read, update, delete, etc.). These custom permission classes can be found in the ca.corefacility.bioinformatics.irida.security.permissions classpath of the project. Permissions must extend the BasePermission class and be annotated as a @Component to be wired into the IRIDA security layer. See ReadProjectPermission for an example.
The meat of the permission lies in the public boolean customPermissionAllowed(final Authentication authentication, final DOMAIN_OBJECT p) method. This method uses the logged in user’s authentication and a reference to the object they’re trying to access to try to determine if they should be able to perform the action. Since the permission class is a Spring @Component it can wire in any repository layer elements needed to perform the test. Once the customPermissionAllowed method determines if a user can perform the action, it returns true/false and the action will be approved or denied as such.
The second required method is public String getPermissionProvided(). This method provides the security system a name for the permission. This name will be used in the @PreAuthorize or @PostFilter annotations using Spring Expression Language.
When a permission class implements both of these methods, it can be used in Spring security annotations. For example if we had the permission ReadProjectPermission named canReadProject, we could use it on a method in the following fashion:
@PreAuthorize("hasPermission(#project, 'canReadProject')")
public void doStuff(Project project){}
This block does the following:
- Loads the
ReadProjectPermissionclass based on thecanReadProjectname - Passes the
projectparameter into thecustomPermissionAllowedmethod of the permission class as it’s identified by the#projectparameter in the annotation. - Executes the
customPermissionAllowedmethod to determine if the logged in user has access to do the requested action. - If the user should have access, the method runs as normal. If not,
AccessDeniedExceptionis thrown.
In addition to passing in domain objects, the permission classes are able to read objects by their ID. For example if we have the following block:
@PreAuthorize("hasPermission(#projectId, 'canReadProject')")
public void doStuff(Long projectId){}
Passing the projectId parameter to the annotation will read a Project from the database before passing to the customPermissionAllowed method.
These permission classes can also be used with the @PostFilter annotation. This annotation runs after the method completes to see if the user has access to the output of the method. This is generally used for methods returning collections of objects. For example with the following block:
@PostFilter("hasPermission(filterObject, 'canReadProject')")
public List<Project> doStuff(){}
This code will ensure the logged in user can read each of the Projects being returned. Any object they should not have access to will be pruned from the list.
Building new features
GitHub Issues
Any time a request comes in from a user for a new feature, or a bug is found, an issue should be created on GitHub. The IRIDA project uses GitHub’s issues list as it’s main project tracking system. The issue should be documented as fully as possible with the following:
- A general description of the problem/feature.
- What the expected functionality should be.
- Steps to reproduce the issue or how the feature should work.
- Who reported the bug or feature request.
Once an issue is completed it should be referenced in a pull request in GitHub so the reviewer can know the full scope of the issue.
Informing users of changes
When adding new features we have a couple places we need to inform our users. First is the CHANGELOG.md file found in the root of the project. If you’ve added a feature, fixed a bug, or made any changes worthwhile of telling IRIDA users, other IRIDA developers, or administrators they should be mentioned here. Next is the UPGRADING.md guide. This file is used to inform IRIDA system admins what steps need to be taken when upgrading from one version of IRIDA to another. For example if you add anything to a configuration file, if there are changes which require an upgrade to the database, a workflow, or any dependencies, it should be mentioned here.
IRIDA tests
IRIDA uses JUnit for the majority of its testing. To ensure the IRIDA codebase is performing as expected, when developing new features you should also write tests for the newly developed code.
IRIDA has 2 main types of tests:
Unit tests
IRIDA unit tests are written entirely with JUnit and run with Gradle. Any classes or methods performing any sort of business logic should have unit tests written for them. In general all test requirements should be mocked with Mockito, and tests should be written for expected behaviour, failure cases, and edge cases. To mark a class as a unit test, the java file must be named with a *Test.java suffix. For examples of existing IRIDA unit tests, see any classes under src/test/java class path ca.corefacility.bioinformatics.irida.service.impl.unit.
Integration tests
IRIDA’s integration tests are again developed using JUnit and run with Gradle. In addition to the unit tests described above, IRIDA’s integration tests verify that all components of the application work correctly together to produce the intended result. Integration tests are generally written using the SpringJUnit4ClassRunner class which allows us to use a Spring application context and @Autowired to wire in test dependencies. Mocking generally should not be used for dependencies in any integration tests.
As integration tests rely on the full application stack, database entries must be created at the beginning of each test. To do this IRIDA uses the DBUnit library to load test data into the database prior to every test, and to clear the database after the test is completed. Test database files are generally created for each test class, but some are reused between test classes. DBUnit test files are written in an easy XML format.
Tests for different parts of the application may use additional libraries such as:
- Selenium for user interface testing.
- REST-assured for REST API testing.
Refer to similar tests for examples of writing tests for the UI, REST API, etc.
To mark a class as a unit test, the java file must be named with a *IT.java suffix. For examples of existing basic IRIDA integration tests, see classes under src/test/java class path ca.corefacility.bioinformatics.irida.service.impl.integration.
Database Updates
While in development we use Hibernate to manage our database changes, in production we use Liquibase.
Liquibase allows you to create changesets for an application’s database in incremental, database agnostic XML files. In practice IRIDA requires MariaDB or MySQL, but it’s still worthwhile to use a tool to properly manage the updates. Liquibase ensures that all changes to the database are performed in the correct order, and manages this by keeping track of a hashcode of the last applied changeset. When IRIDA is started, liquibase runs first to check if there are new changesets to be applied, and also that the current state of the database is in the format that IRIDA will be expecting.
When we’re doing development, Liquibase is generally not used. Instead we generally rely on Hibernate’s HBM2DDL module which allows us to directly make changes to the model classes and those changes will be reflected into the database. This can be enabled by running IRIDA in the dev Spring profile. Additionally when running in the dev profile example data from src/main/resounrces/ca/corefacility/bioinformatics/irida/sql will be loaded into the database for test purpose. Since HBM2DDL is not to be used in production environments, before creating a pull request you should add any changes that are made to the database to a new changeset XML file and test that the database is correctly built in the prod Spring profile. If you’ve modified any tables in the database it’s also worth testing whether those changes can be properly migrated from an existing production database. To do this you should take a dump of a production IRIDA database, load the dump up on your development machine, and run a server in prod profile to ensure the database upgrades correctly.
You can find the existing Liquibase changeset files in /src/manin/resounces/ca/corefacility/bioinformatics/irida/database/changesets.
Sometimes database changes are too complex to be able to use Liquibase XML files. Conveniently Liquibase also allows you to apply change sets using Java code. This mode is not recommended to use very often as you don’t get some of the same change management features, but it’s useful when you have a difficult migration. If you need to use a change set written in Java, place it under the ca.corefacility.bioinformatics.irida.database.changesets package.
Documentation
IRIDA has a number of sources of documentation. For any user-facing changes, documentation should be added to the appropriate section of the user documentation under the doc/ directory with instructions on how to use the new feature.
Developer documentation is also necessary for all Java classes, methods, code blocks, JavaScript, and any other code written for IRIDA. In the Java portion of the IRIDA codebase, all methods and classes must have associated Javadoc. To generate a Javadoc template for a method or class in Eclipse, type /** and press <Enter>. A method/class description, all parameters, and return value should be documented.
Version control
The IRIDA project uses Git and GitHub for version control purposes. External collaborators are welcomed to develop new features and should submit pull requests on IRIDA’s GitHub page. See the Contributing guide for more information on contributing to IRIDA.
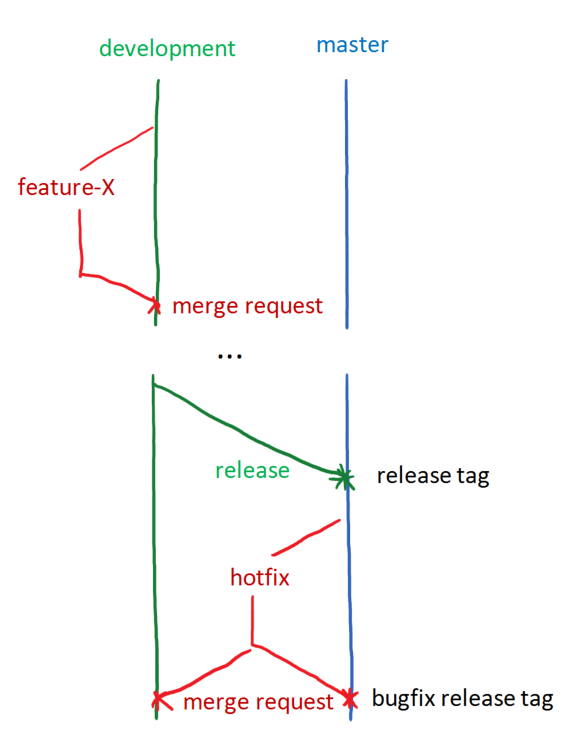
Branch structure
IRIDA’s branch structure is loosely based on the GitFlow branch model. This model allows the team to develop multiple features in parallel without contaminating the main development branch, keeping pull requests sane, and allows for stable and patchable releases.
Branches
- development - This is the main running development branch. It represents the latest features that have been developed by the team. Features here should be kept in a state that they can be released at any time.
- main - This is the release branch. It should be kept at the latest stable release.
- feature branches - These should be created by the developers as they work on new additions to the application. They should be branched off development and merged back once the feature is entirely complete and ready to release.
- hotfix branches - These branches will be created when there is an bug in the main branch which must be fixed immediately. When these branches are complete they should be merged into both development and main.
Release tags & versioning scheme
IRIDA uses a CalVer style versioning scheme. This means the release version number is based on the year and month that it was released. The scheme used is YY.0M.minor. First segment is last 2 digits of the year, 2nd is 2 digit month, and 3rd is the number of bugfix release (optional). For example a major release in January 2019 would be 19.01. If a bugfix release was performed for that version, it would be 19.01.1.
Whenever code is merged into main, a release should be created. To mark the release the person merging the code should create a git tag at the point of the merge.
git tag YY.MM.minor
Don’t forget to push the tag when you’re finished.
git push --tags
Once the tag has been pushed, the tag should have been automatically created on IRIDA’s GitHub site at https://github.com/phac-nml/irida/releases. This release will be created as a tag, but will not be a full release until release notes and release files are uploaded to GitHub. To do this, click Edit next to the new tag, enter the details from the CHANGELOG.md file for this release, and upload the .war and .zip files for this release.
Example workflow:
Pull requests
Code is not to be merged into the development or main branches by the developer who wrote the code. Instead a merge request should be made on GitHub and assigned to another developer on the project. The reviewer should look over the code for issues, and anything that needs to be fixed should be mentioned in a comment in the merge request. Once an issue has been fixed, the developer should push the changes to the merge request branch and mention the commit id in the comment so the reviewer can track the changes.
The reviewer of a merge request should ensure the following:
- The new or updated functionality works as expected. This includes properly handling error cases.
- Any new functionality is well documented in Javadoc, inline code comments, and in the user guide.
- CHANGELOG.md and UPGRADING.md files are updated with necessary information.
- Any new features have appropriate unit and/or integration tests written and all tests are passing.
- New code is properly formatted using IRIDA’s code formatter file.
- New code does not produce any Java errors or warnings. Acceptable warnings may include deprecated warnings for methods or classes which should be refactored out. See Eclipse’s Problems panel for warnings produced.
If a merge request is a fix for an issue that is being tracked in GitHub, the developer should mention the issue number in the merge request with the format Fixes #1234 so that the merge request will be linked to the issue and it will be automatically closed once the merge is complete.
When the reviewer is satisfied with the state of the branch to be merged, they should merge it into the development branch in GitHub to close the request.