Managing Samples
Each project in IRIDA may contain a collection of samples that corresponds to an isolate. Each sample may contain one or more of the following types of files: sequencing files in paired-end or single-end format, or assembled genomes. This section of the user guide describes how you can view samples, manage samples (merging, copying, renaming, exporting), and search for samples by name.
- Viewing samples in a project
- Adding a new sample
- Filtering samples
- Modifying samples
- Sharing and Moving Samples
- Exporting samples
Viewing samples in a project
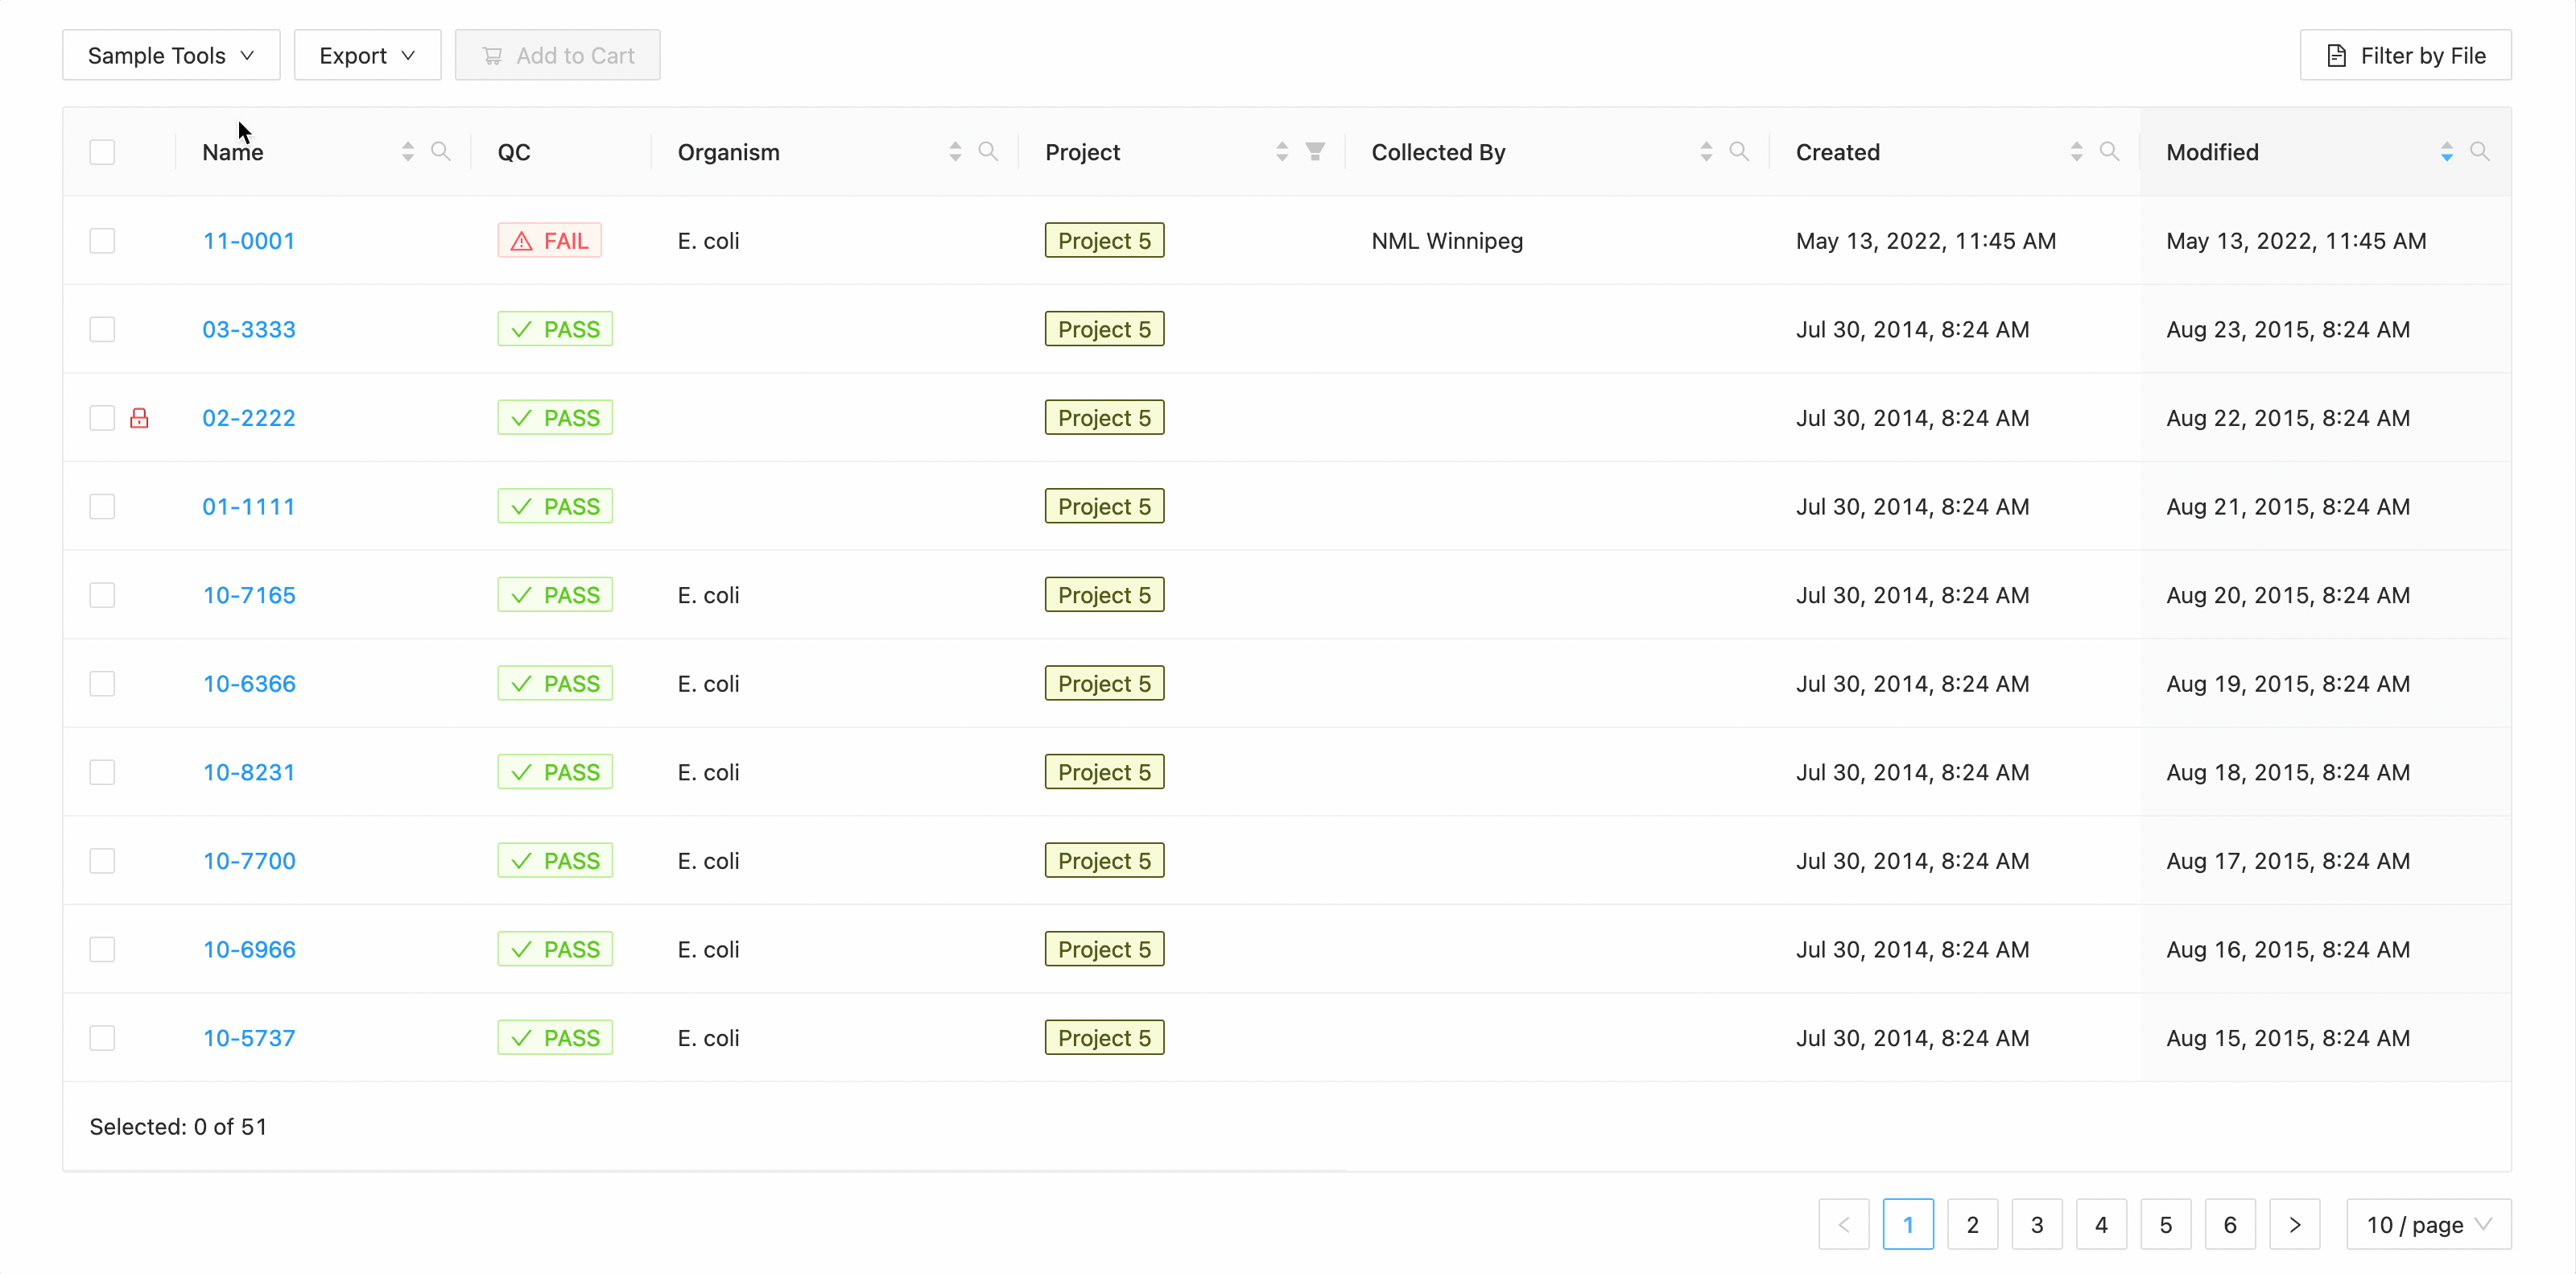
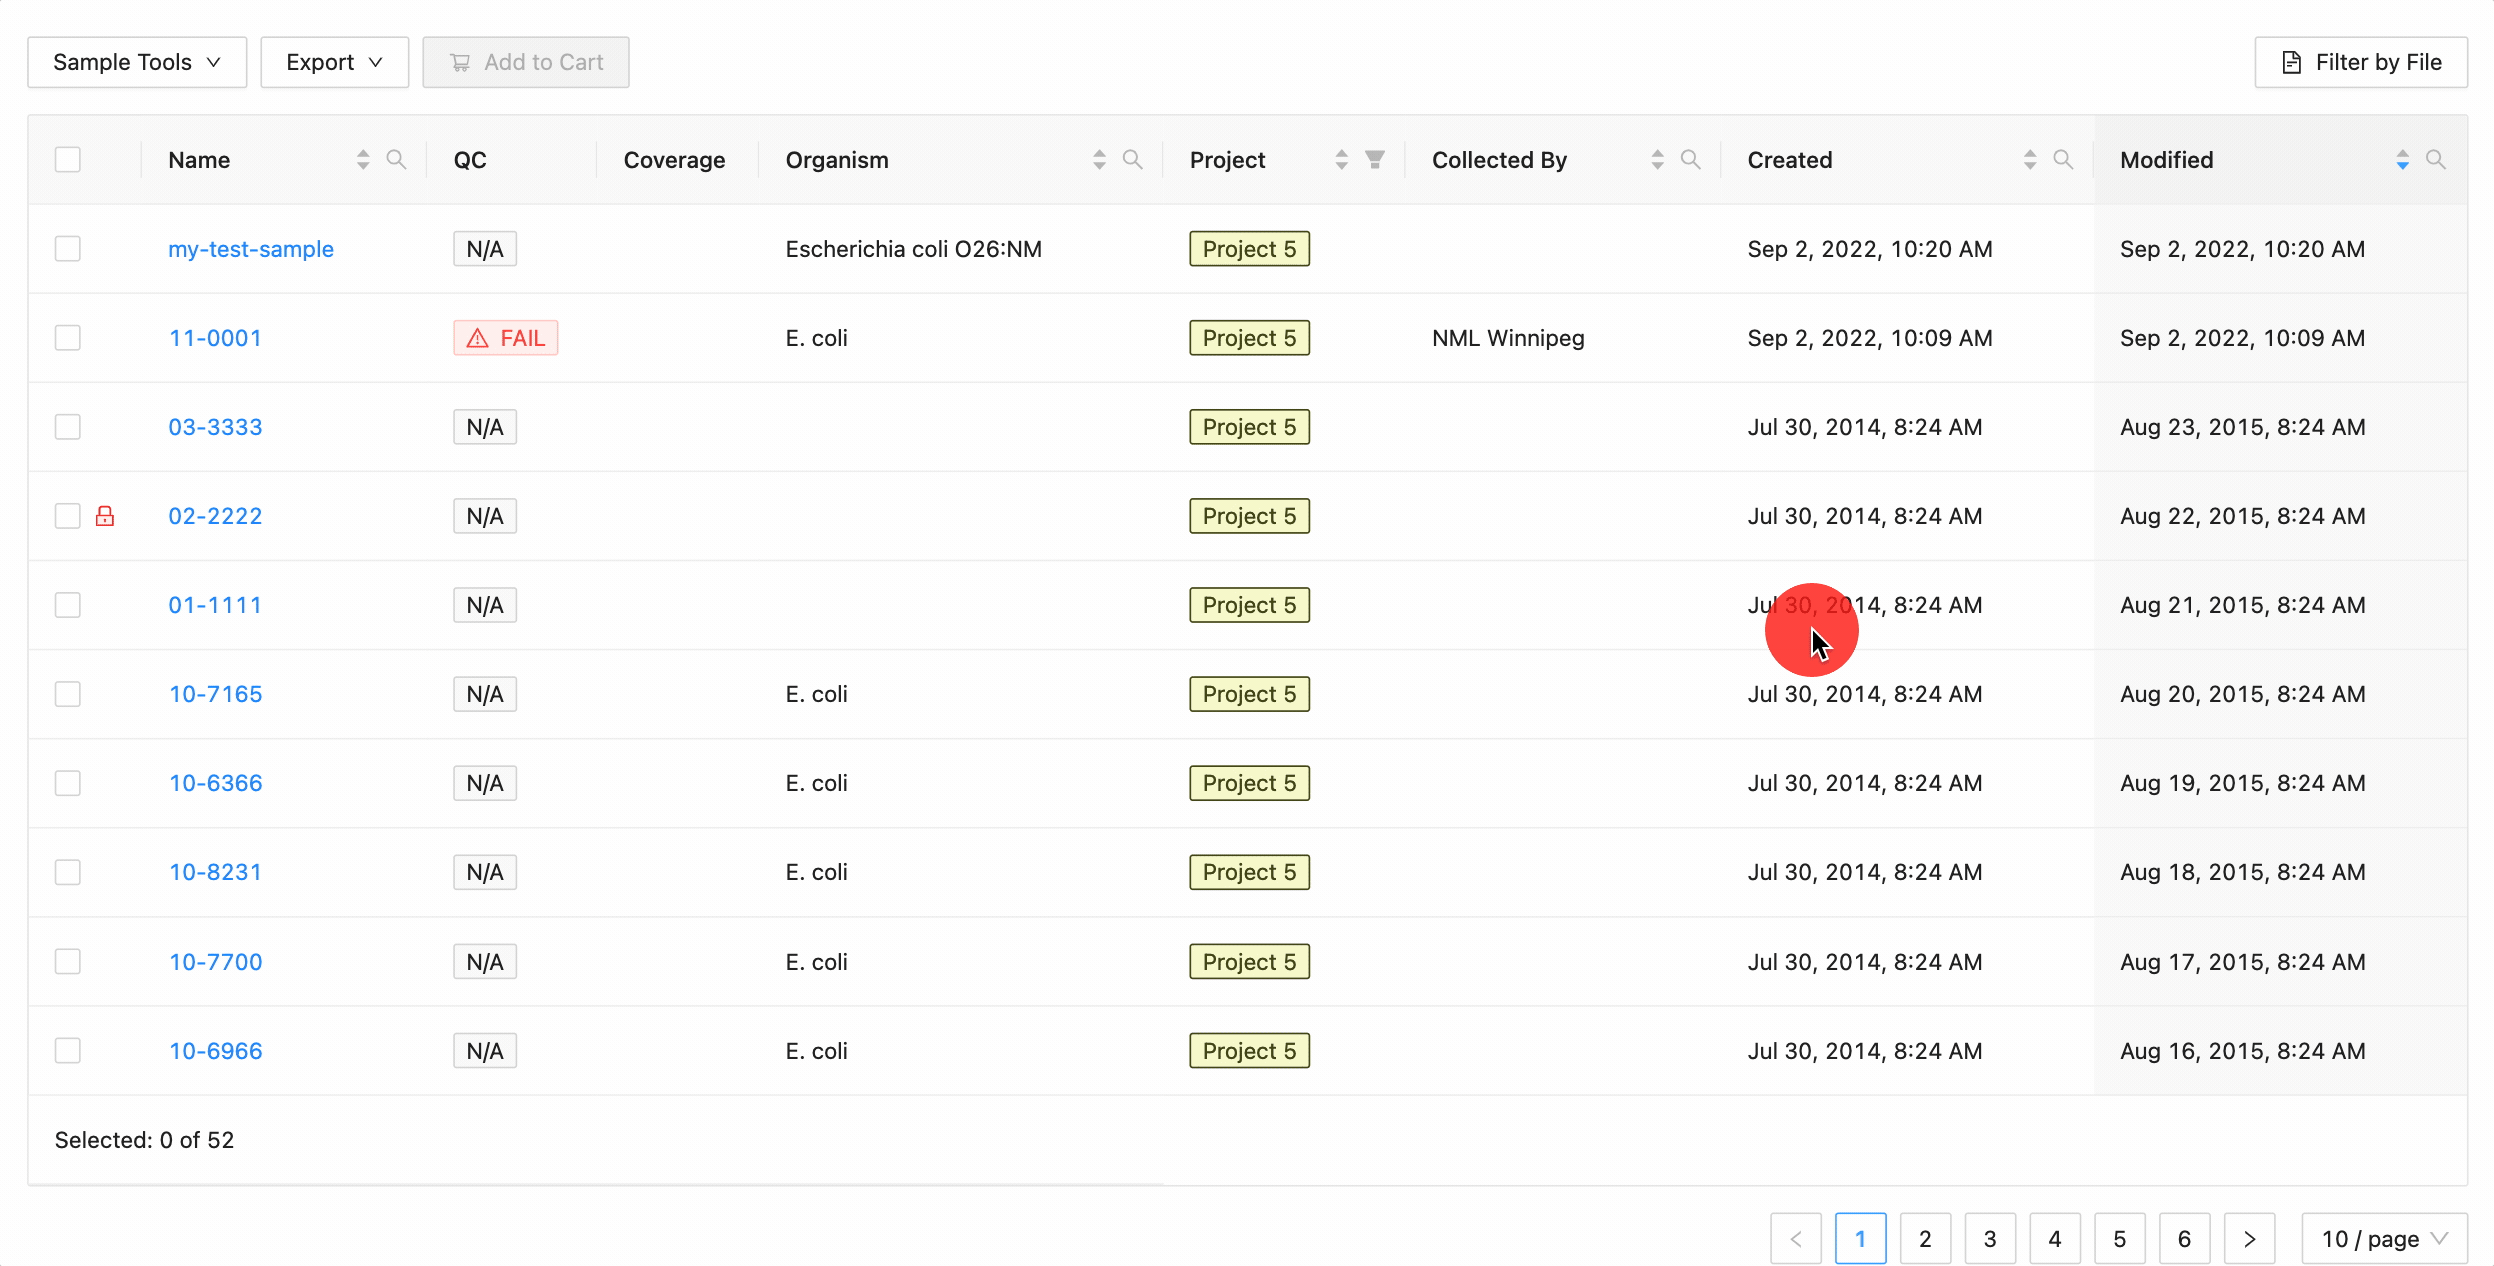
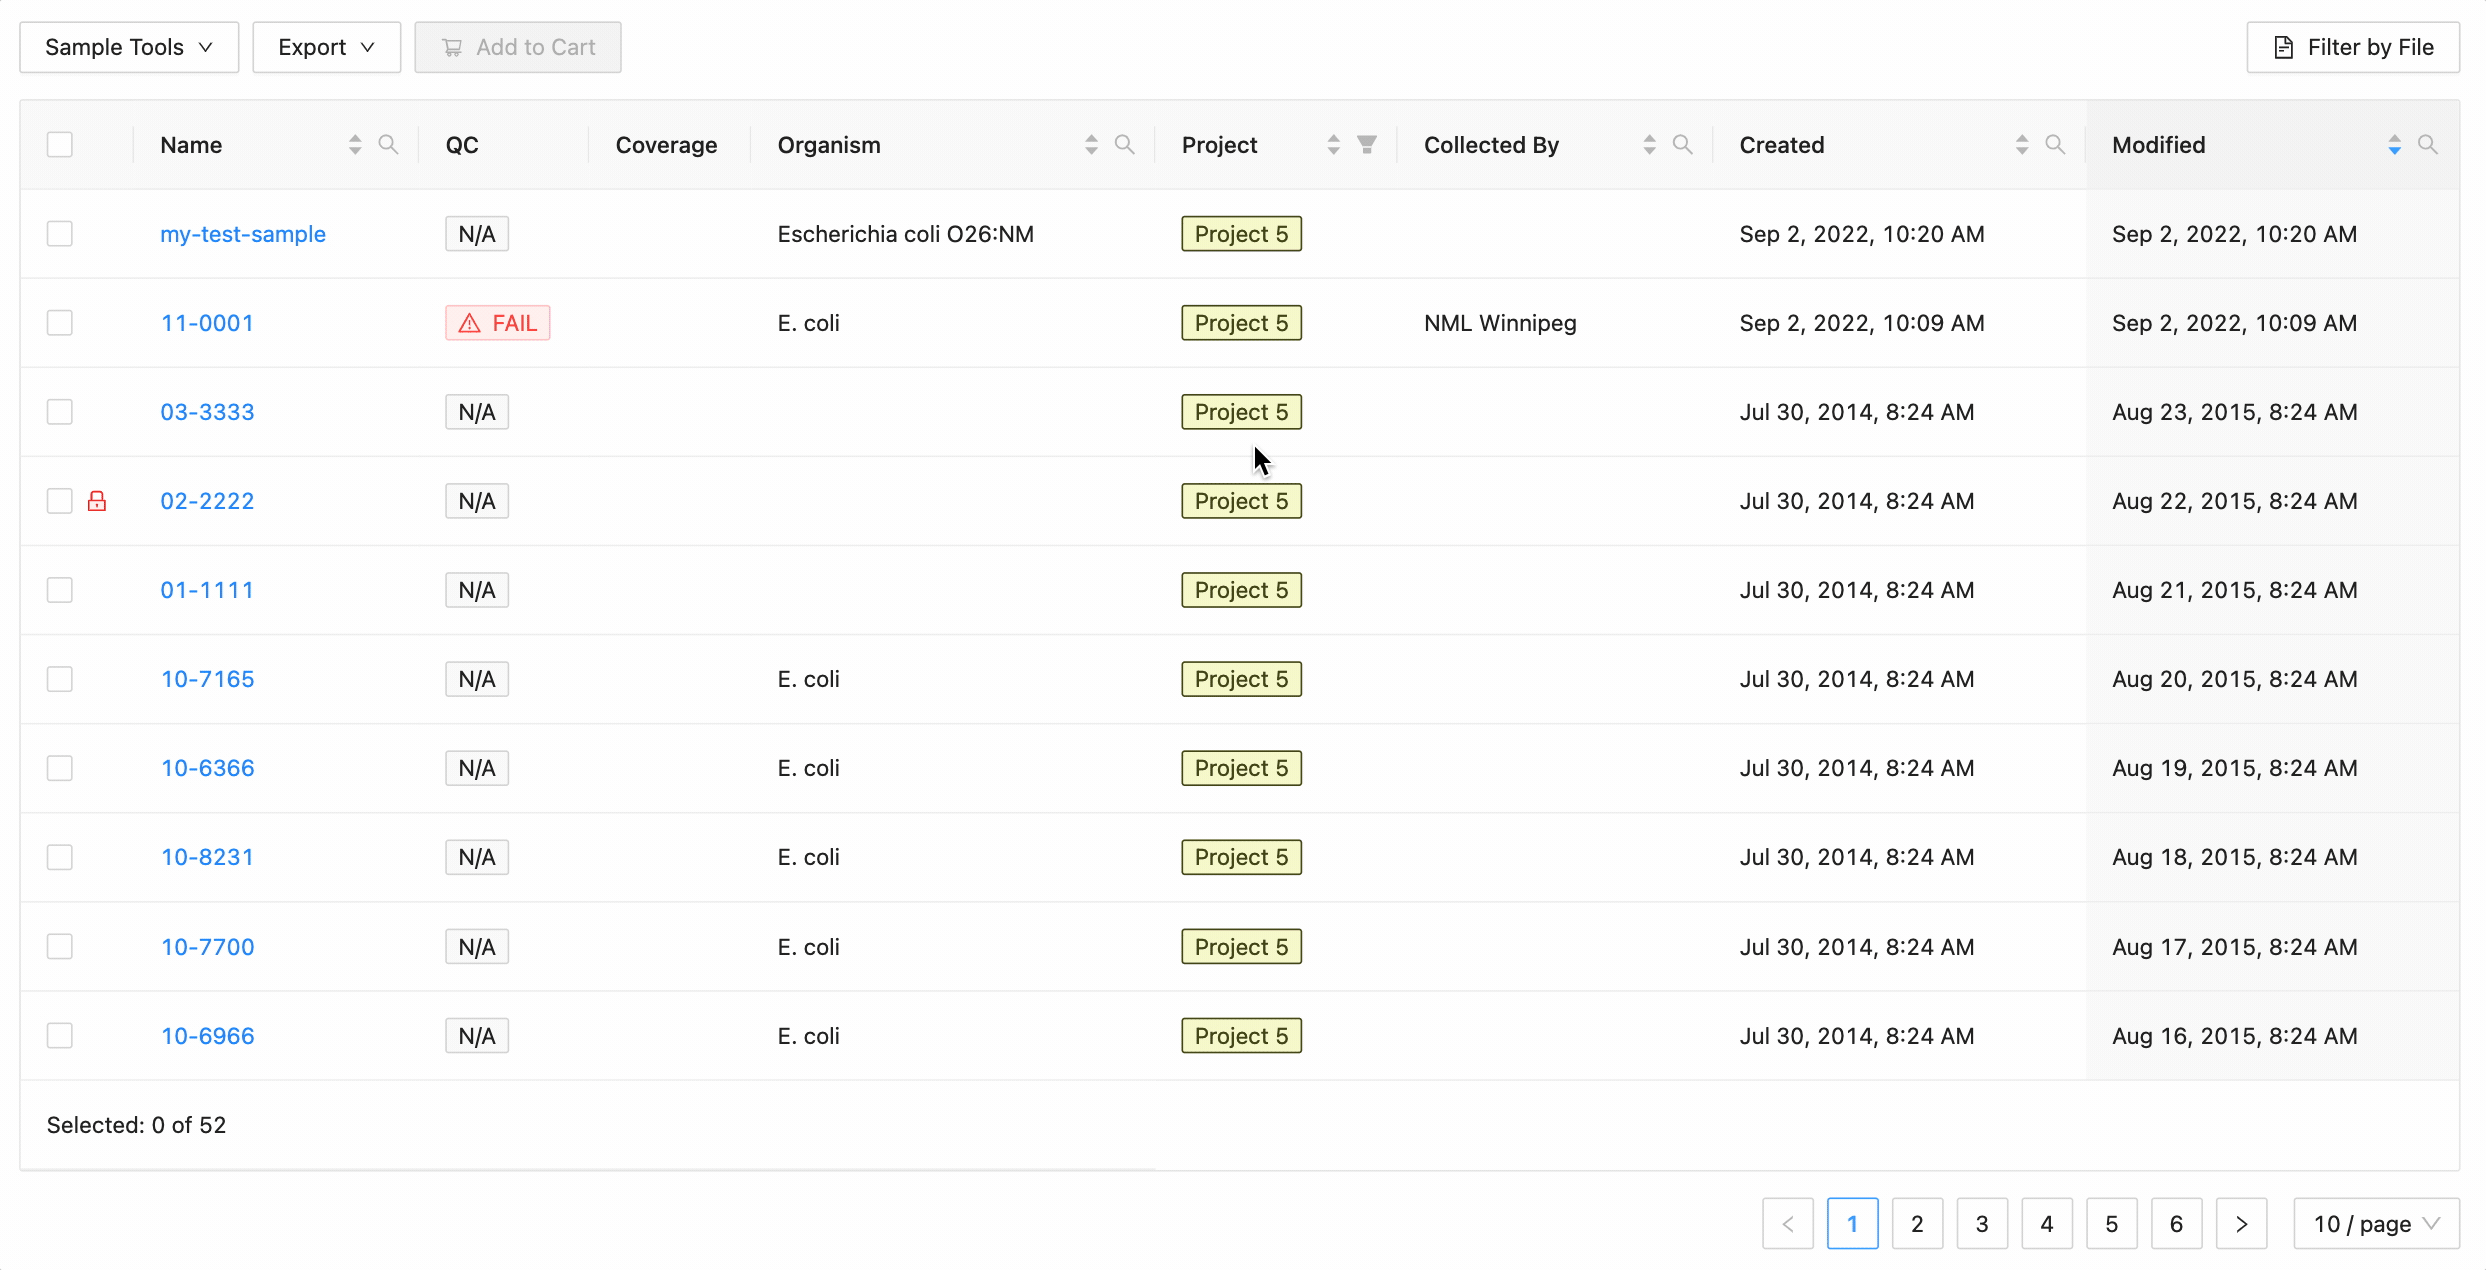
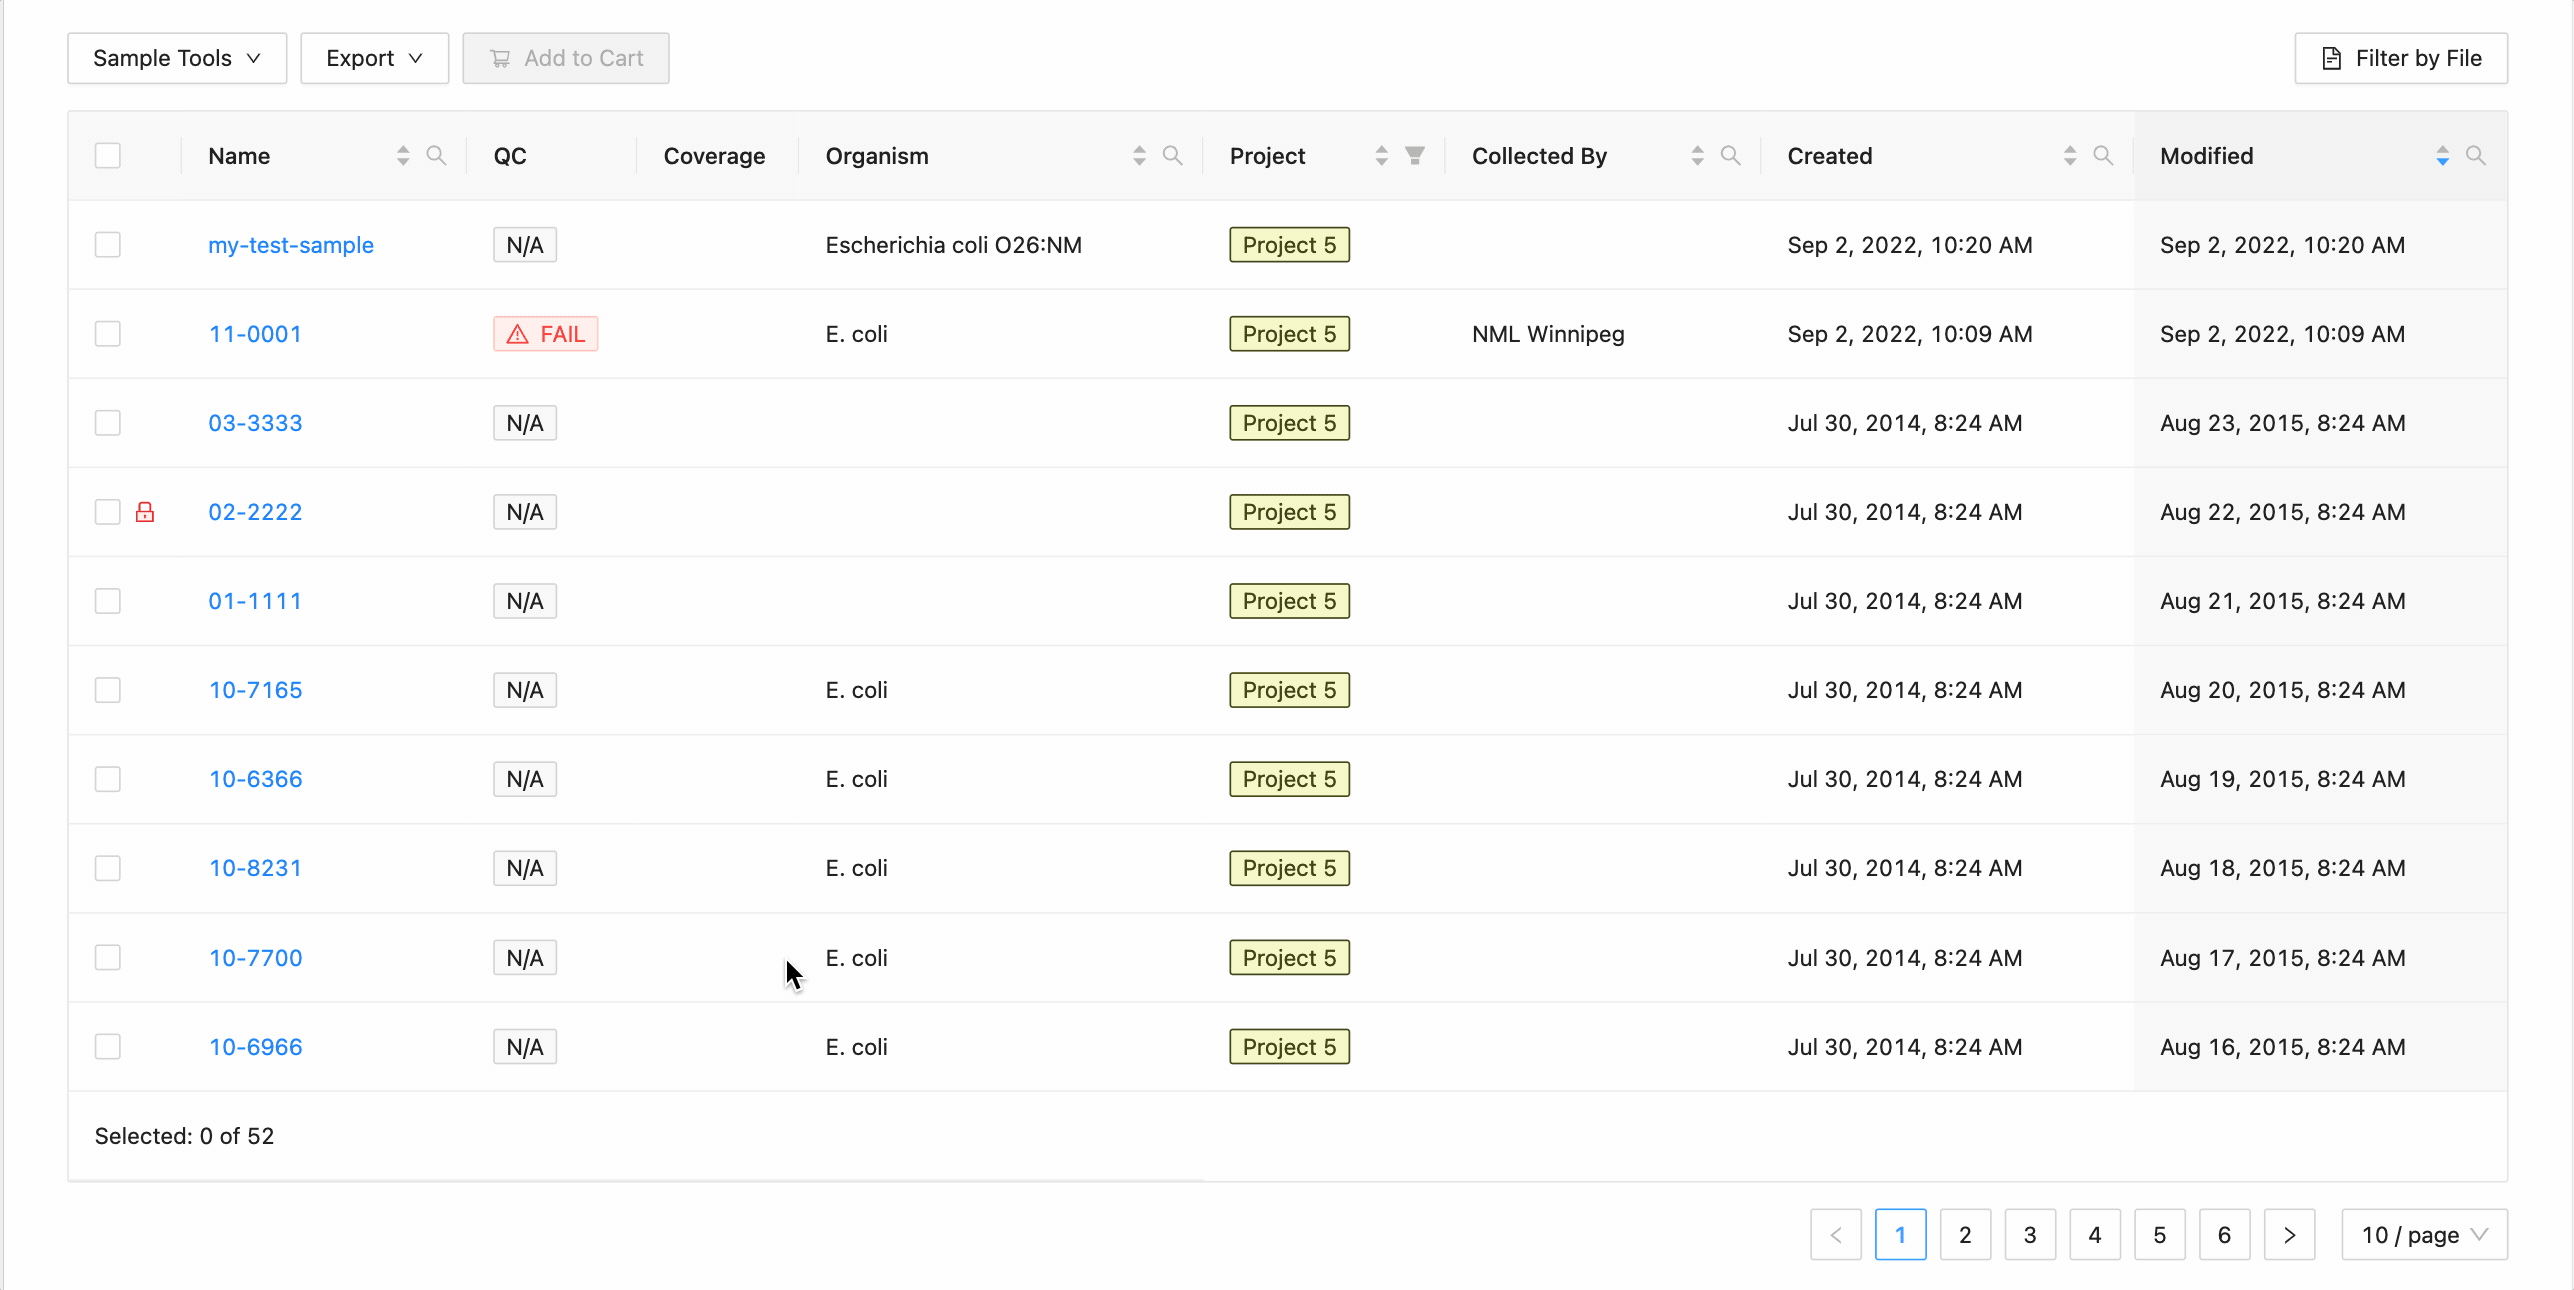
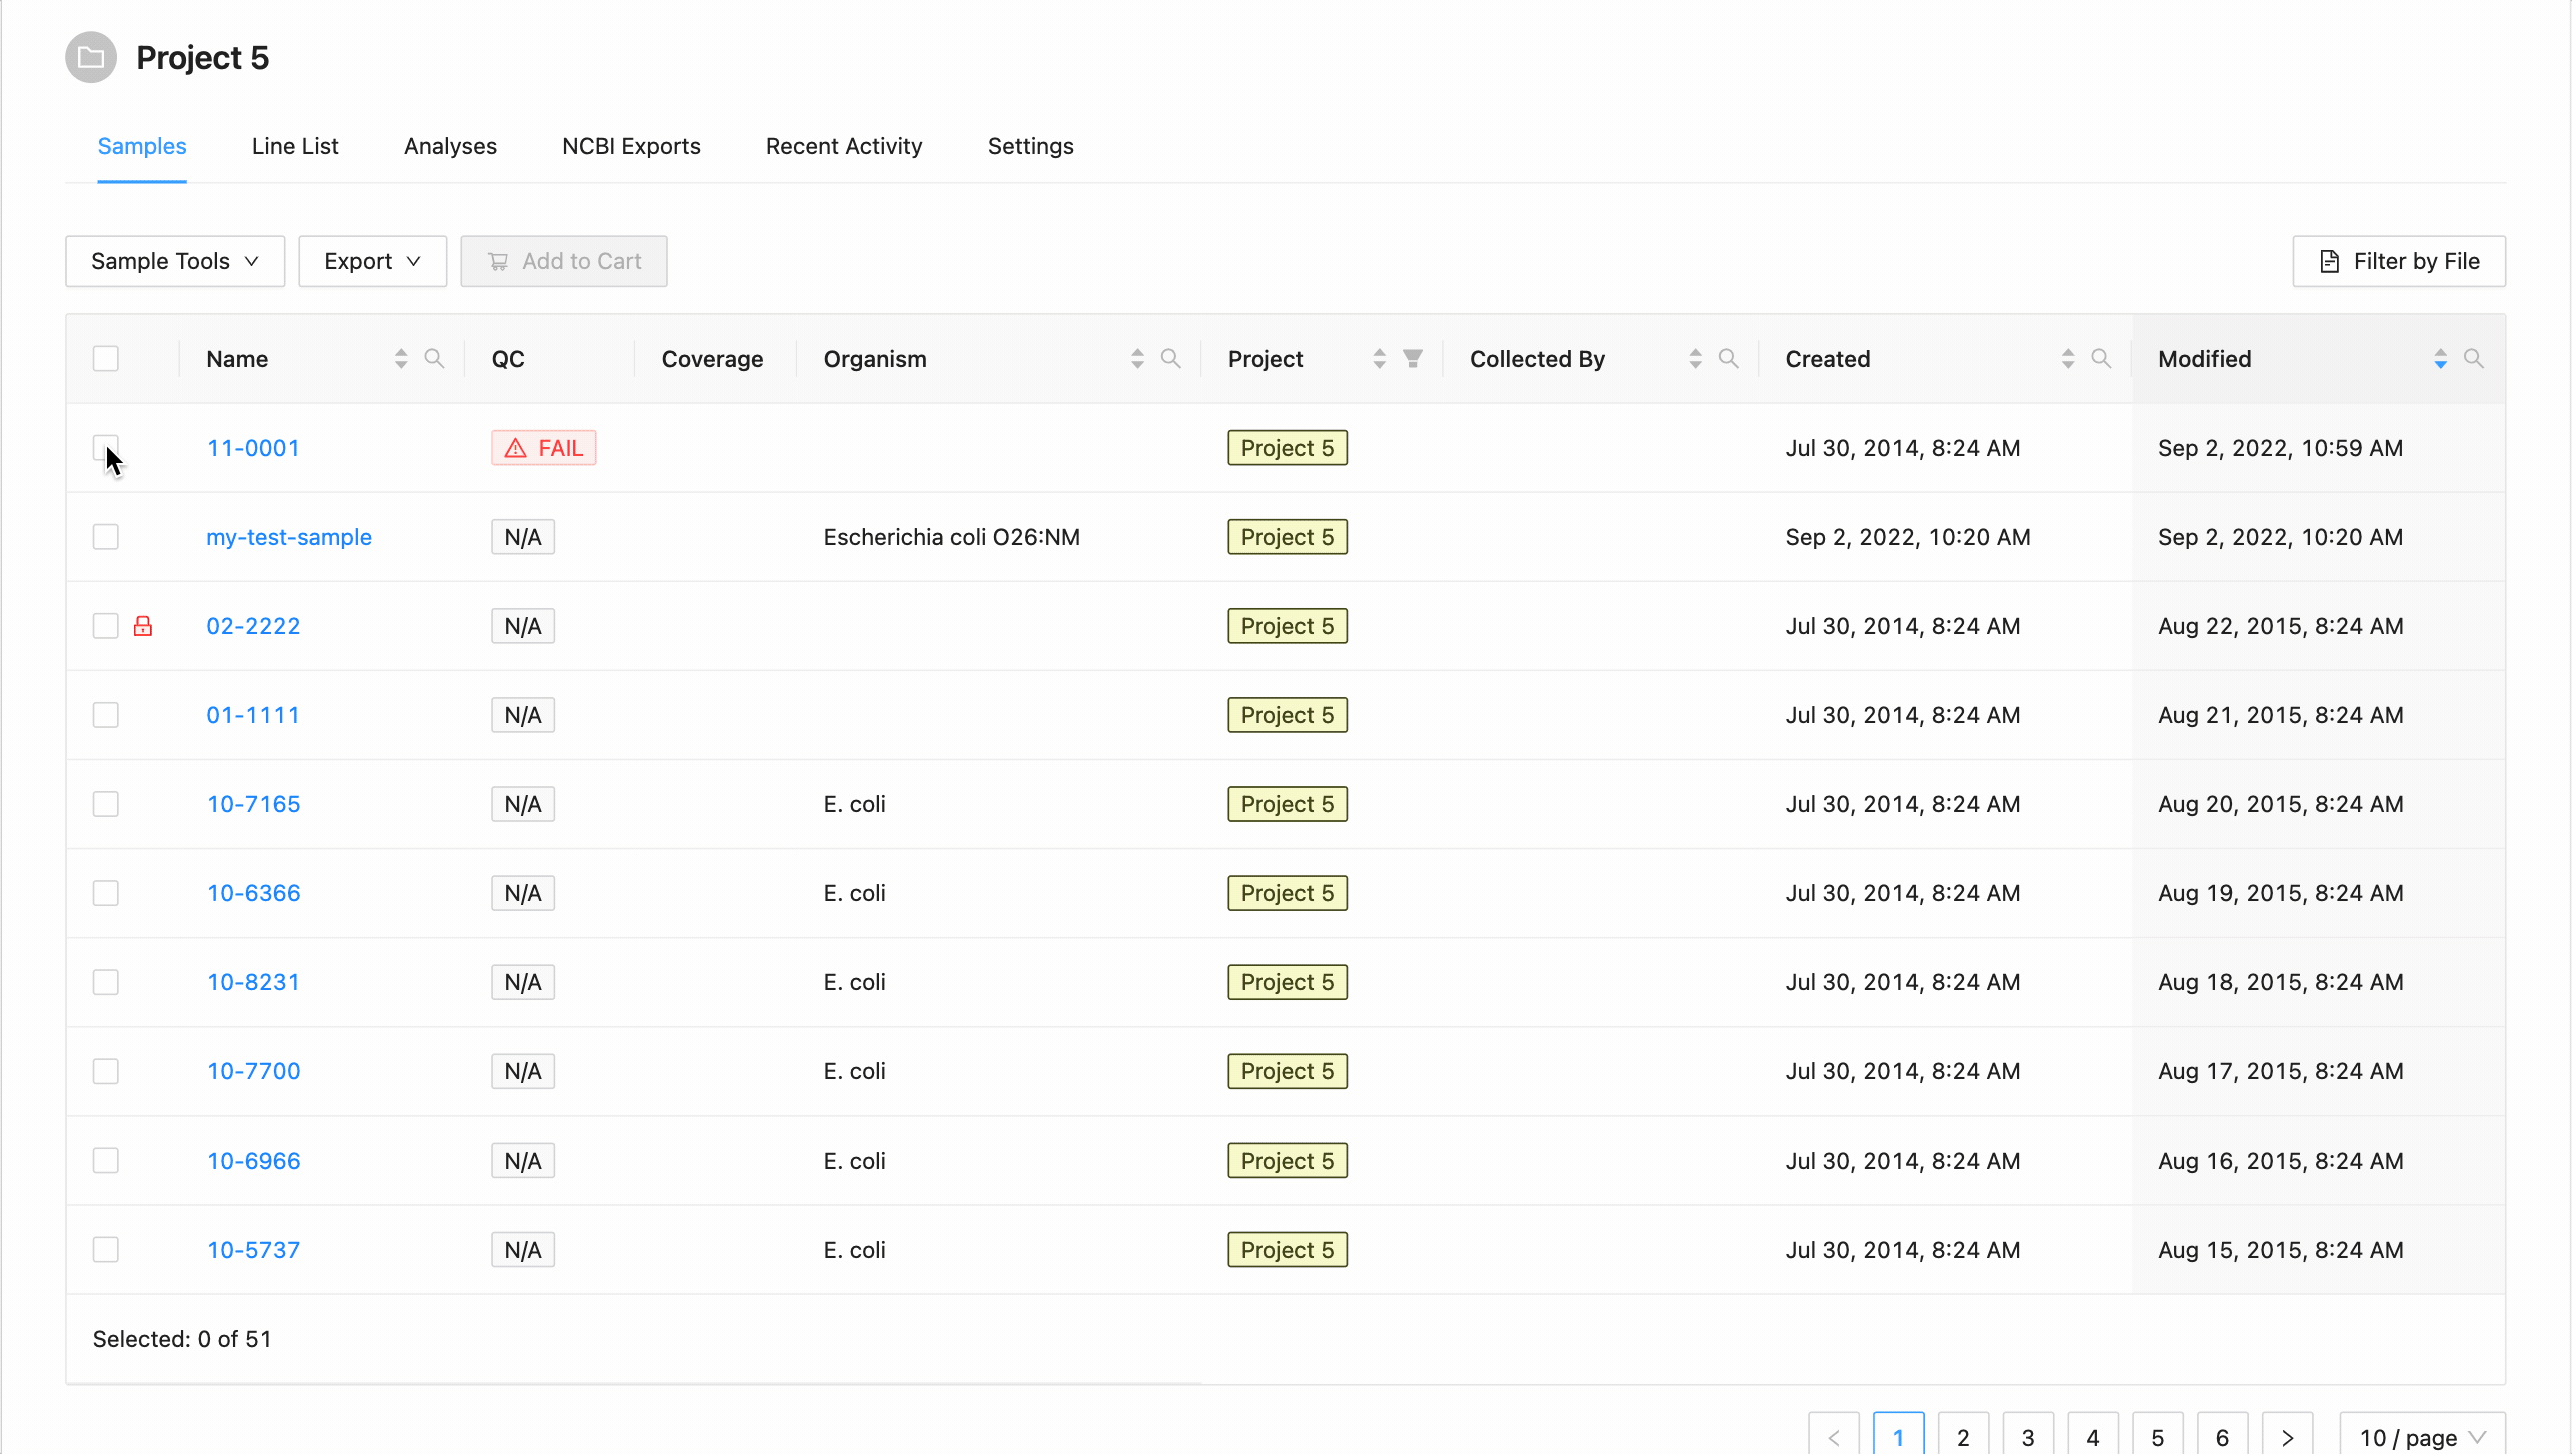
Start by viewing the project details of a project. The list of samples in the project is shown in the middle of the project details screen:
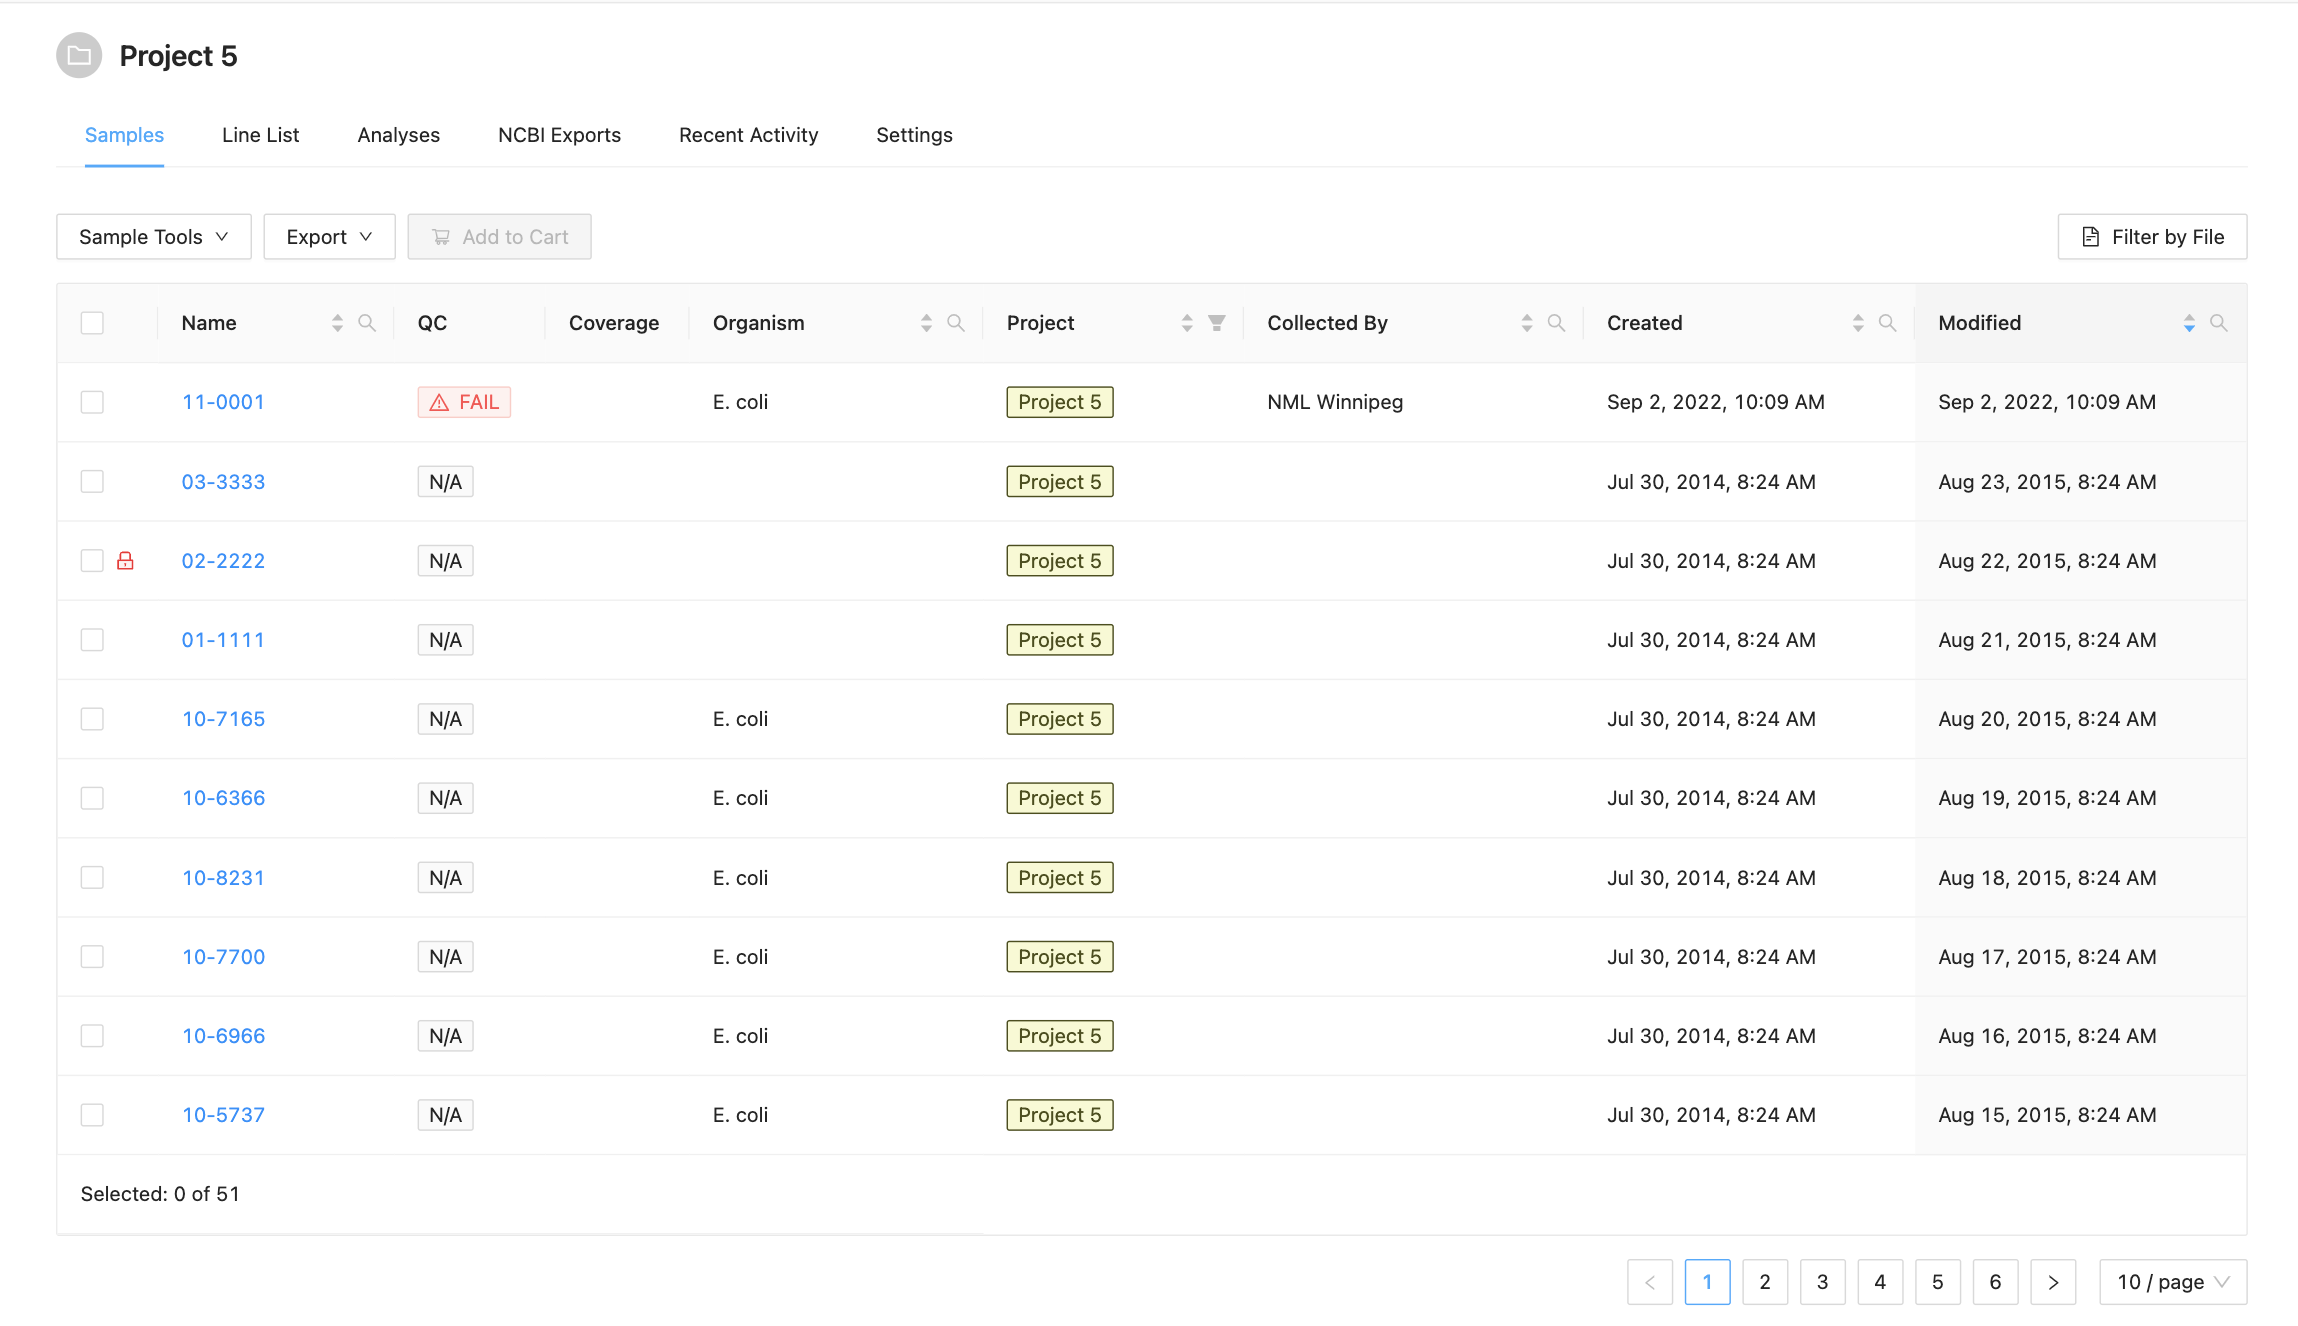
The samples listing shows high-level sample details, such as:
- The name of the sample,
- The estimated coverage of the Sample (if the project has set the genome size),
- The user-defined organism of the sample (if provided),
- The name of the person who collected the sample (if provided),
- The project that the sample belongs to (if from a related project),
- The date that the sample was created in IRIDA.
- Whether the sample failed IRIDA’s quality control checks. If a sample has failed QC, the cell will have a red background and warning icon . If a sample does not have any Sequencing Objects associated with it, the cell will have a grey background with the text N.A. Note if you are displaying associated project samples QC information will come from the sample’s parent project.
- Whether the sample can be modified in this project. If the project does not have modification access, a lock icon will be displayed .
Viewing individual sample details
Note: Details for individual samples can be viewed from anywhere a sample is listed (such as from the recent activity, analysis results, analysis output files, sharing of samples, etc) by clicking on the sample name. This will launch the sample details viewer. Only a user with the project Manager role will be able to modify sample details, metadata, and files.
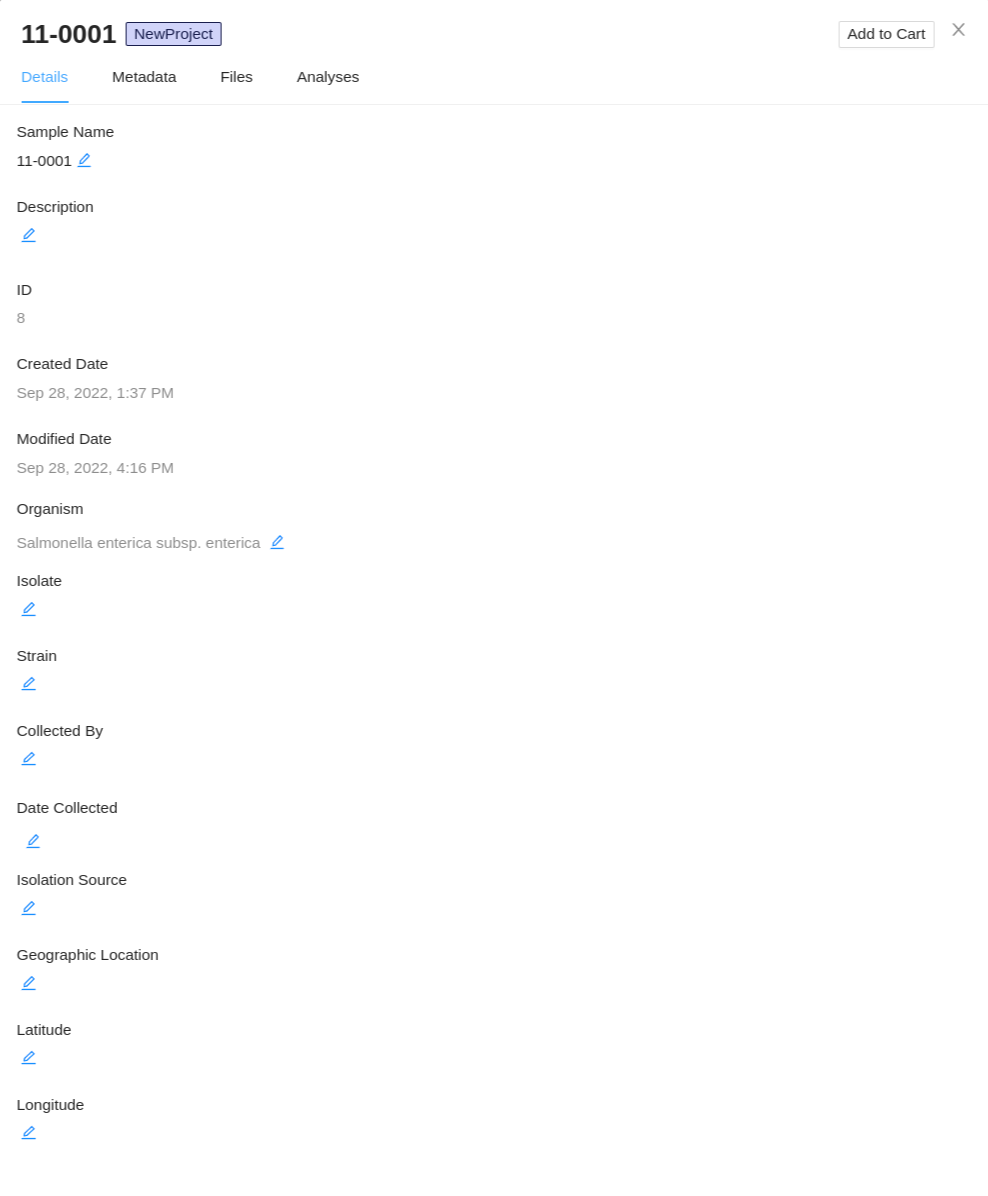
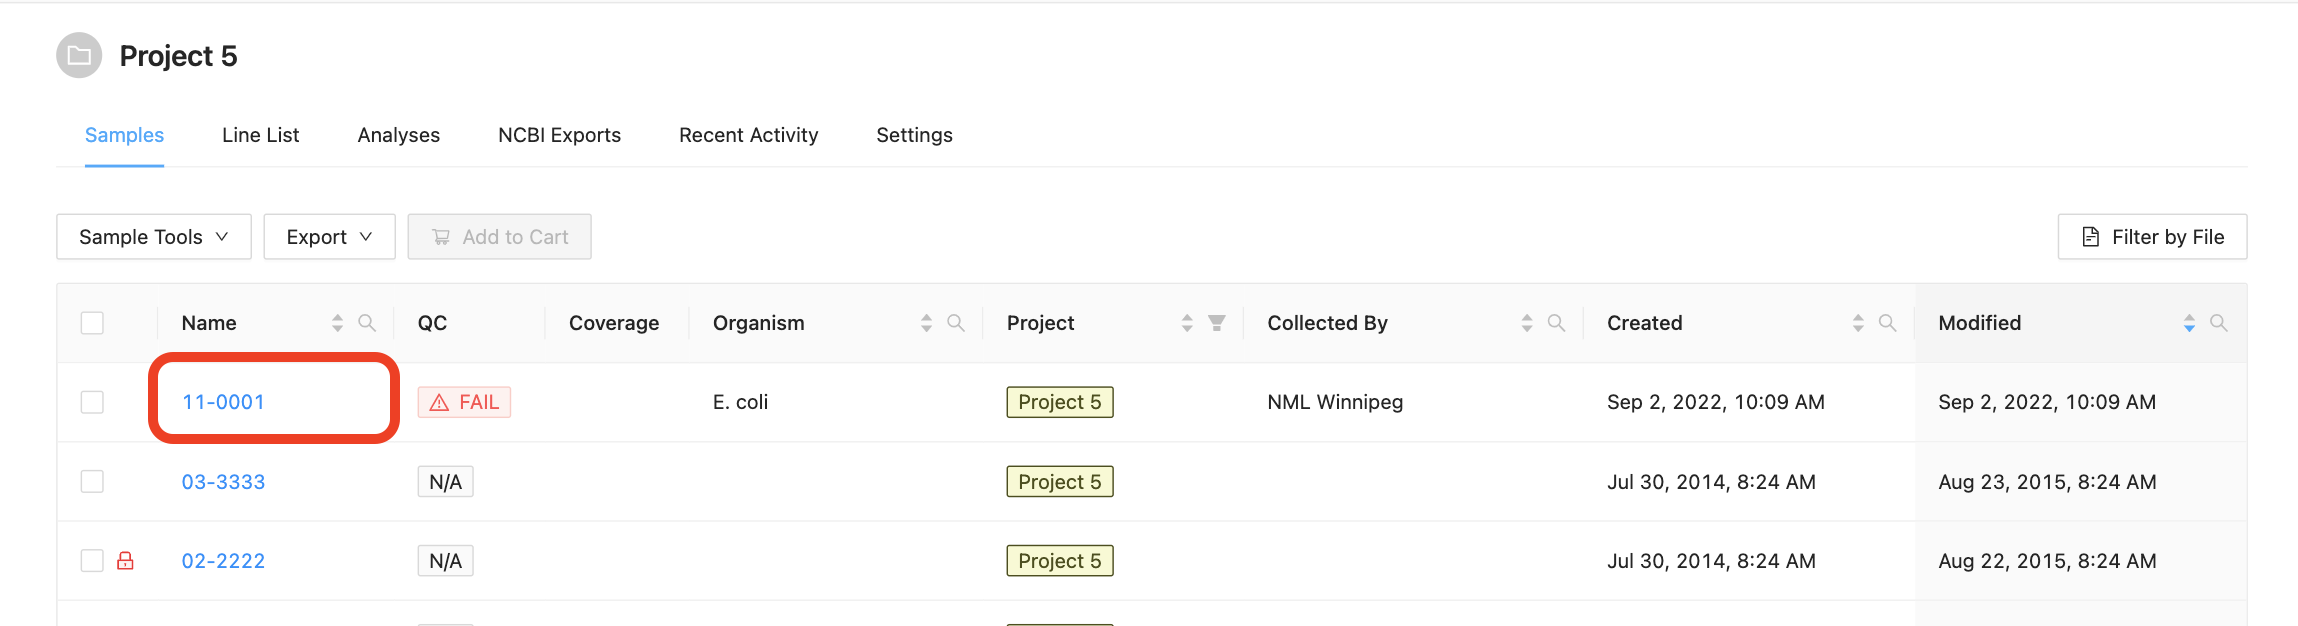
All of the sample details that are in IRIDA are currently provided by a user with the project Manager role. To view details about an individual sample, start by viewing the samples in a project, then click on the sample name in the samples table:
The sample details viewer shows all of the details that are currently known about a sample:
Editing sample details
Start by viewing the details of an individual sample. On the Details tab of the sample details viewer, click on the  button next to the details you would like to update:
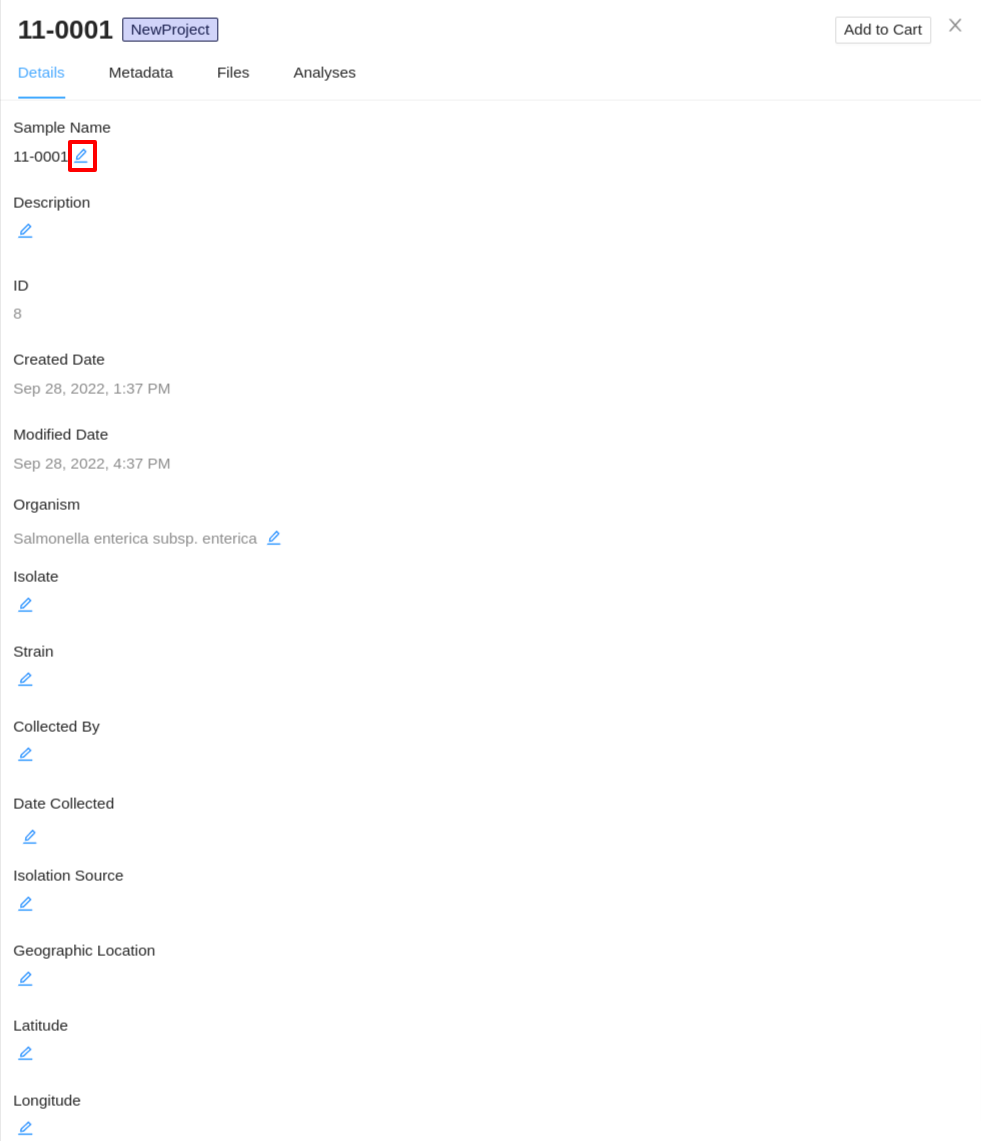
You can provide as many or as few sample details that you want – the sample details are not used by any workflows in IRIDA (except the sample name in the SNVPhyl workflow), and (with the exception of the sample name) none of the sample details are required fields.
Viewing contained files
Samples can contain different types of files, either Sequence Files which are produced by a sequencing instrument, or Assemblies which consist of the re-constructed genome from the sequence reads.
Viewing Sequence Files
Start by viewing the details of an individual sample. On the sample details page, click on the “Files” tab, just above the sample details panel:

Sequence files may have been uploaded as paired-end files or as single-end files, depending on how the isolate was sequenced.
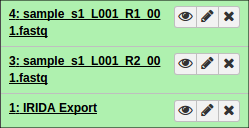
Single-end files will appear in the sample alone:

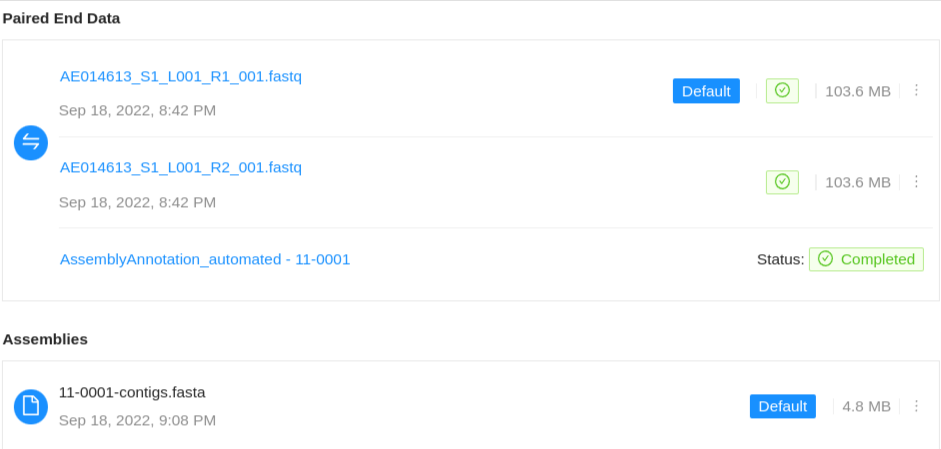
Paired-end files will appear in a pair:
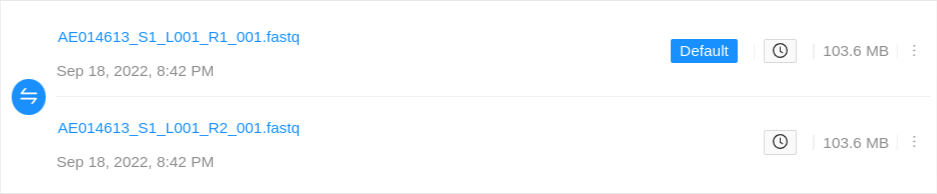
Quality control information for a sequence file may appear below the file:

Uploading Sequence Files
Sequence Files & Assemblies
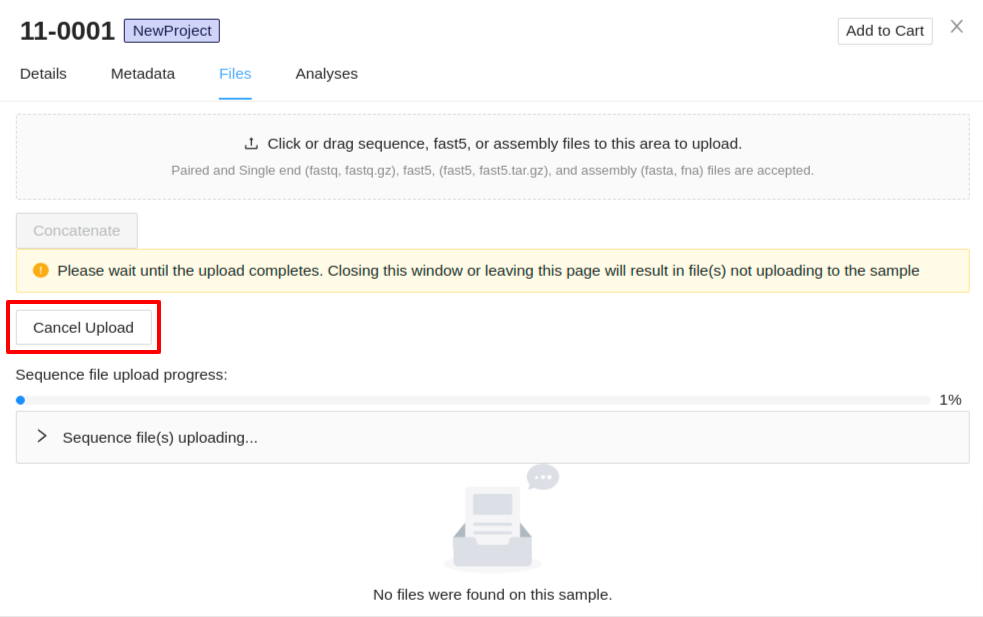
Sequence files can be uploaded by either dragging and dropping the files into the upload section, or by clicking the section and selecting the files. Sequence, fast5, and assembly files can be uploaded at the same time.
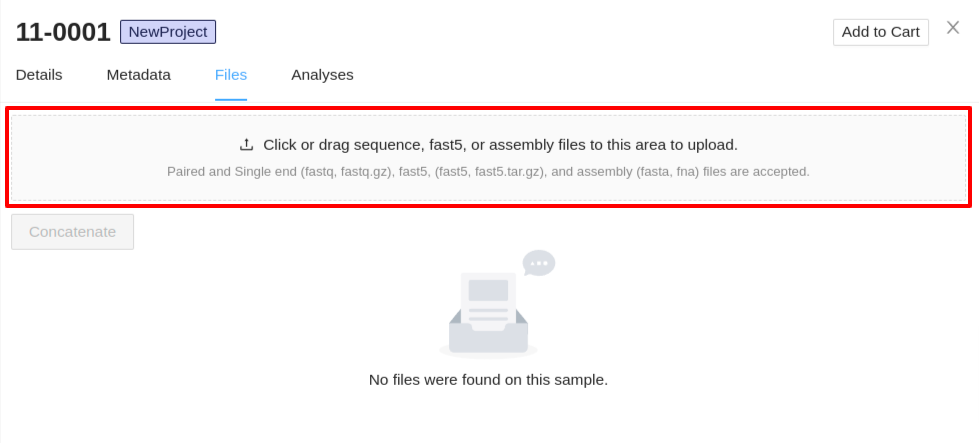
- Upload Sequence Files - Files must have the extension
.fastqor.fastq.gz, all other formats will be ignored. You can select single or multiple files in the system file selection window. If you are uploading paired end data, ensure they are selected in the same upload. -
Upload Fast5 Files - Files must have the extension
.fast5or.fast5.tar.gz. - Upload Assembly - Assembly files must have the extension
.fastaor.fna.
Uploading of files will begin immediately. A progress bar for each of the file types (sequence, assembly, and fast5 files) will be displayed with the status of the upload. Also, expandable panels for each of the file types will be displayed below each progress bar which can be expanded to show the files that are uploading. If you need to cancel an upload click the Cancel Upload button. Do not close the sample details viewer or refresh the page as this will cancel the upload.
Downloading a sequence file
You can download a sequence file by clicking on the Download button, on the right-hand side of the row for the sequence file.
You can download all sequence files in a sample by following the instructions in the exporting samples section about downloading samples.
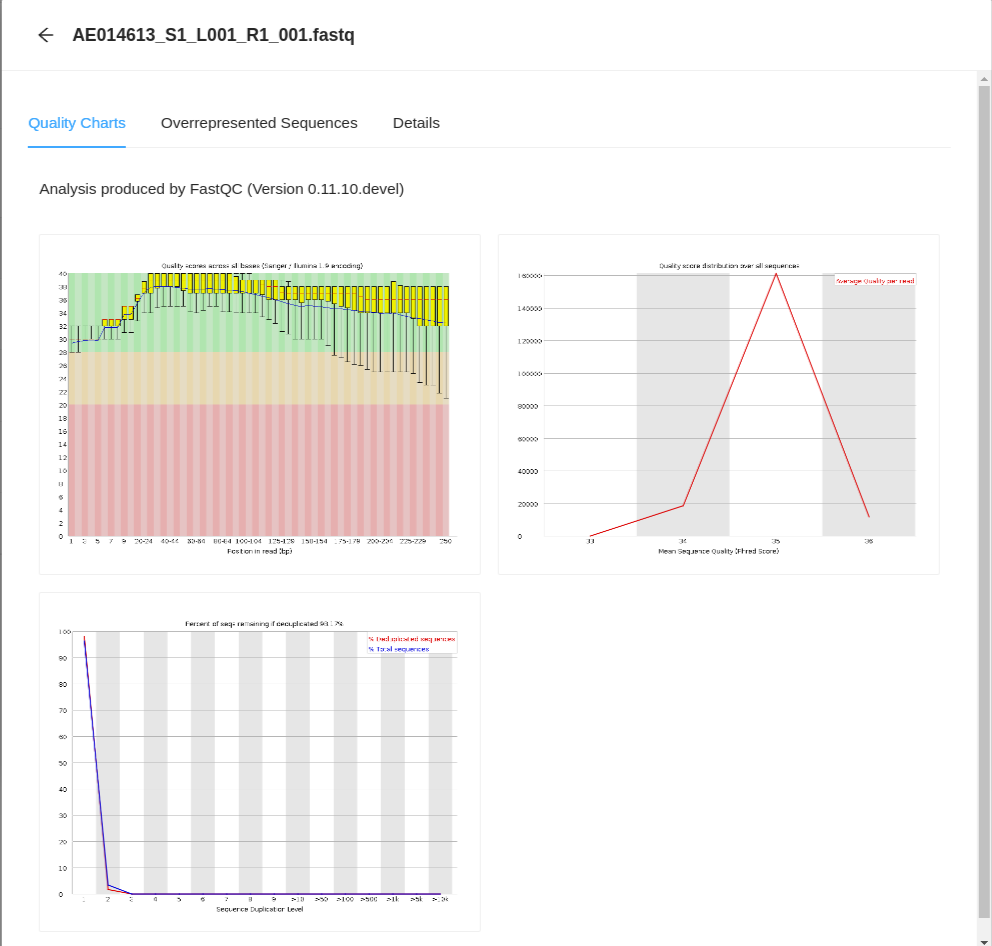
Viewing sequence file quality control (FastQC) results
Start by viewing the sequence files.
From here, clicking on any of the files will take you to the FastQC Quality Charts page for the file.
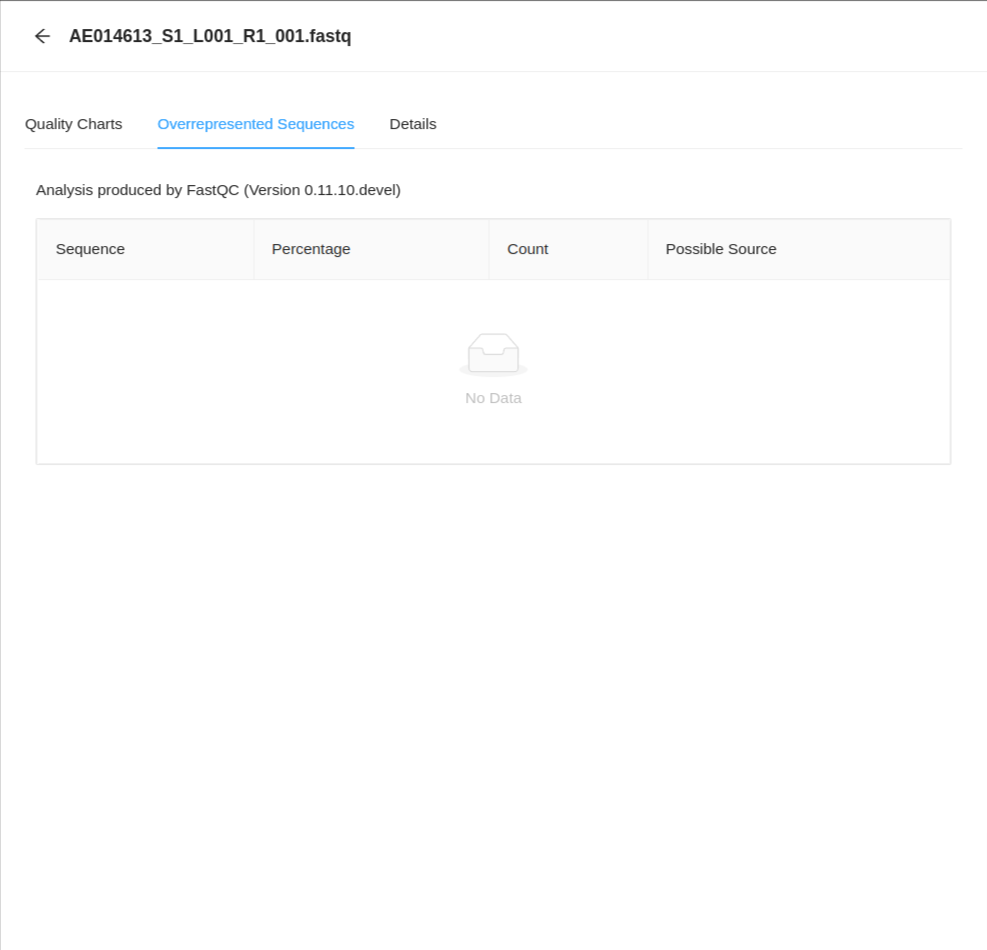
You can also view the Overrepresented Sequences by clicking on the Overrepresented Sequences tab.
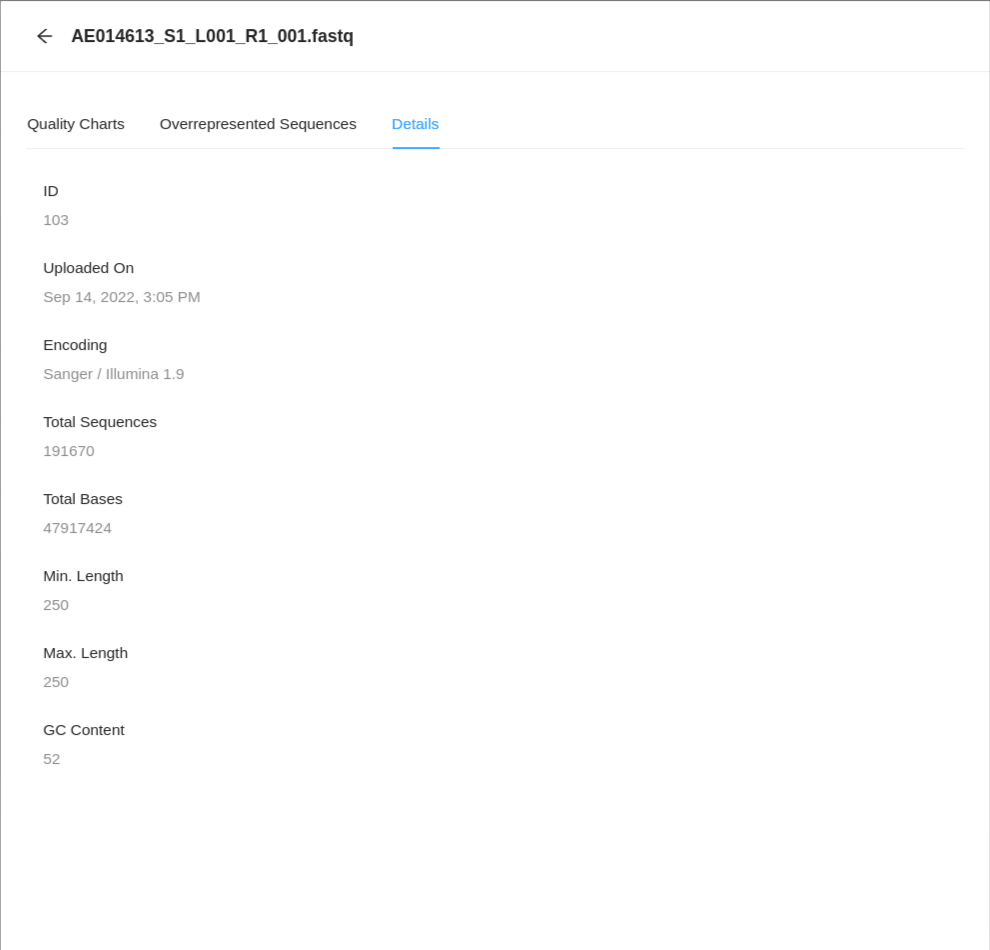
If you would like to see details about the file and the encapsulated sequence, then click on the Details tab.
Deleting a sequence file
If you need to delete a sequence file from IRIDA, you can do so by clicking on the  button on the right-hand side of the row for the sequencing object/genome assembly and then clicking Remove.
You can only delete a sequence file from a sample if you have the project ![]() Manager role on the project.
Manager role on the project.
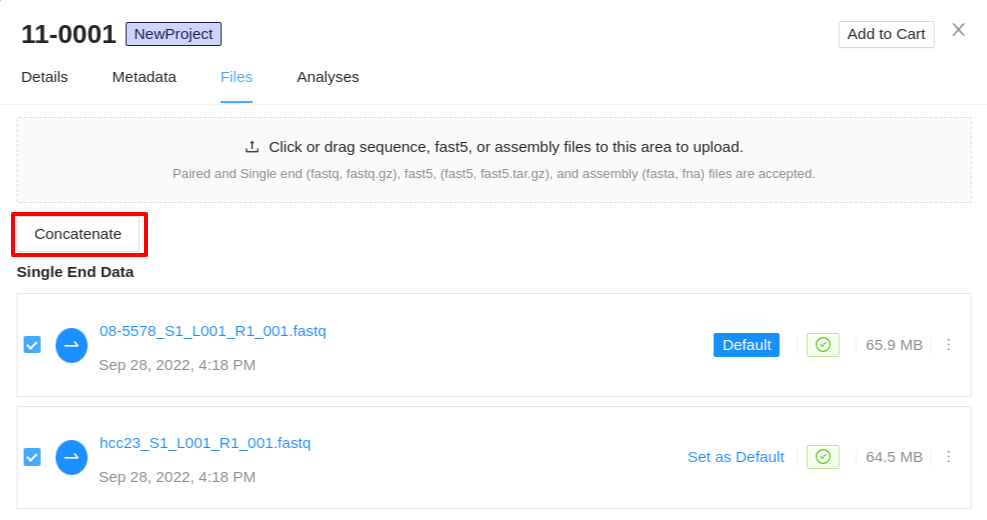
Concatenating sequence files
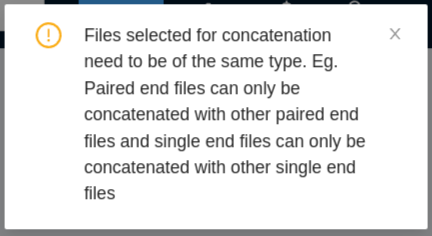
In cases where a top-up run or any other additional data is added to a sample, you may want to combine the sequence files into a single concatenated file. IRIDA allows you to do this from the files tab of the sample details viewer. You must select 2 or more sequence file objects of the same type to concatenate. If you have selected a collection of files which cannot be concatenated, a warning will be displayed once the Concatenate button is clicked.
If two different types of collections are selected then you will see the following warning in the upper right corner:
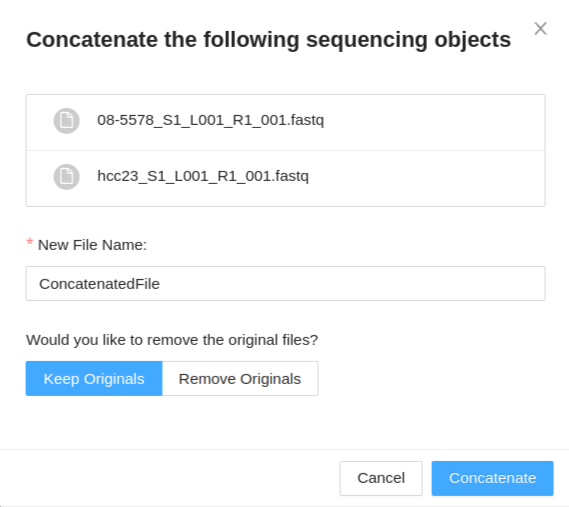
Once you have selected your files (same type of collections) to concatenate, and clicked the Concatenate button, a modal is displayed. The modal will display the files you have selected to concatenate. You have the following options:
- New File Name - This will set the base name of the new concatenated files. For paired-end data a modifier will be appended to determine the forward and reverse files.
- Keep Originals / Remove originals - This will allow you to select if you want to remove or keep the original files from the sample, leaving only the new concatenated file if remove originals is selected.
Once you have provided a file name and selected if you want to keep/remove the original files, click Concatenate to begin the concatenation. This process may take a while. Once your files are concatenated, they will be listed in the files tab of the sample details viewer.
Viewing genome assemblies
Samples can also contain assembled genomes.
Genome assemblies can be linked to samples in the following ways:
- By uploading assemblies to the sample through the file upload interface
- By enabling the assembly pipeline as an automated pipeline, which will be triggered on upload of sequencing files in the appropriate project.
- Or by selecting the option to save assemblies back to a sample from the Launch Pipelines page.
The assembled genome file can be downloaded by clicking the Download button on the right-hand side of the row for the assembly.
If the project manager has enabled automated assemblies for uploaded data an assembly will also be shown associated with the particular sequence files used to generate the assembled genome.
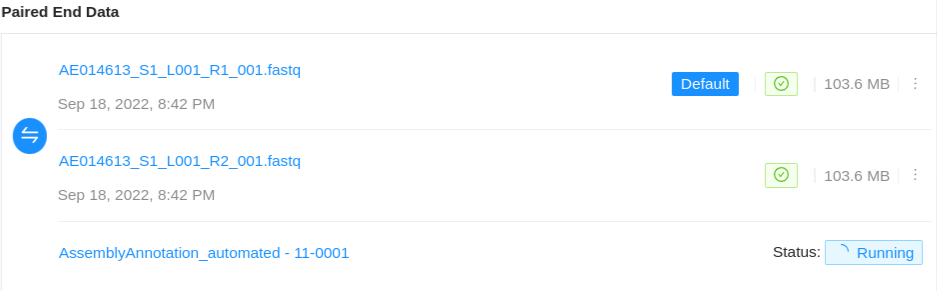
The assembly status will be displayed along with a link to view the assembly results page. On completion, the assembled genome will be saved back to the Sample. For more information on viewing pipeline results see the pipeline documentation
See the project documentation for information on enabling automated assembly.
Deleting genome assemblies
Assembled genomes may be deleted from a sample by clicking the button on the right-hand side of the row for the assembly and then selecting Remove.
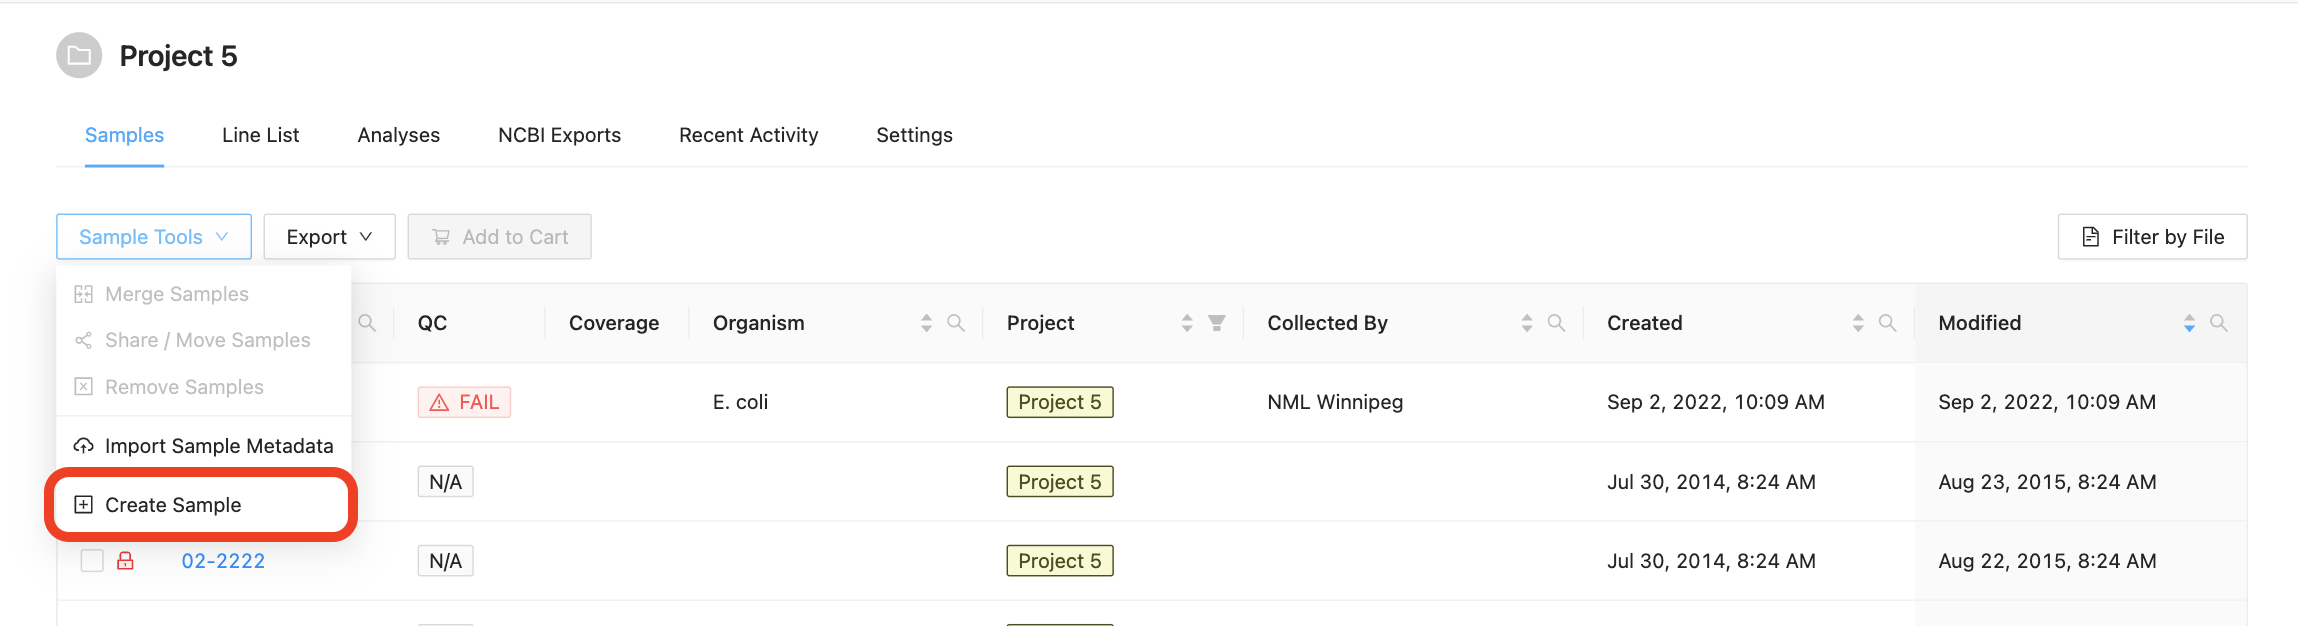
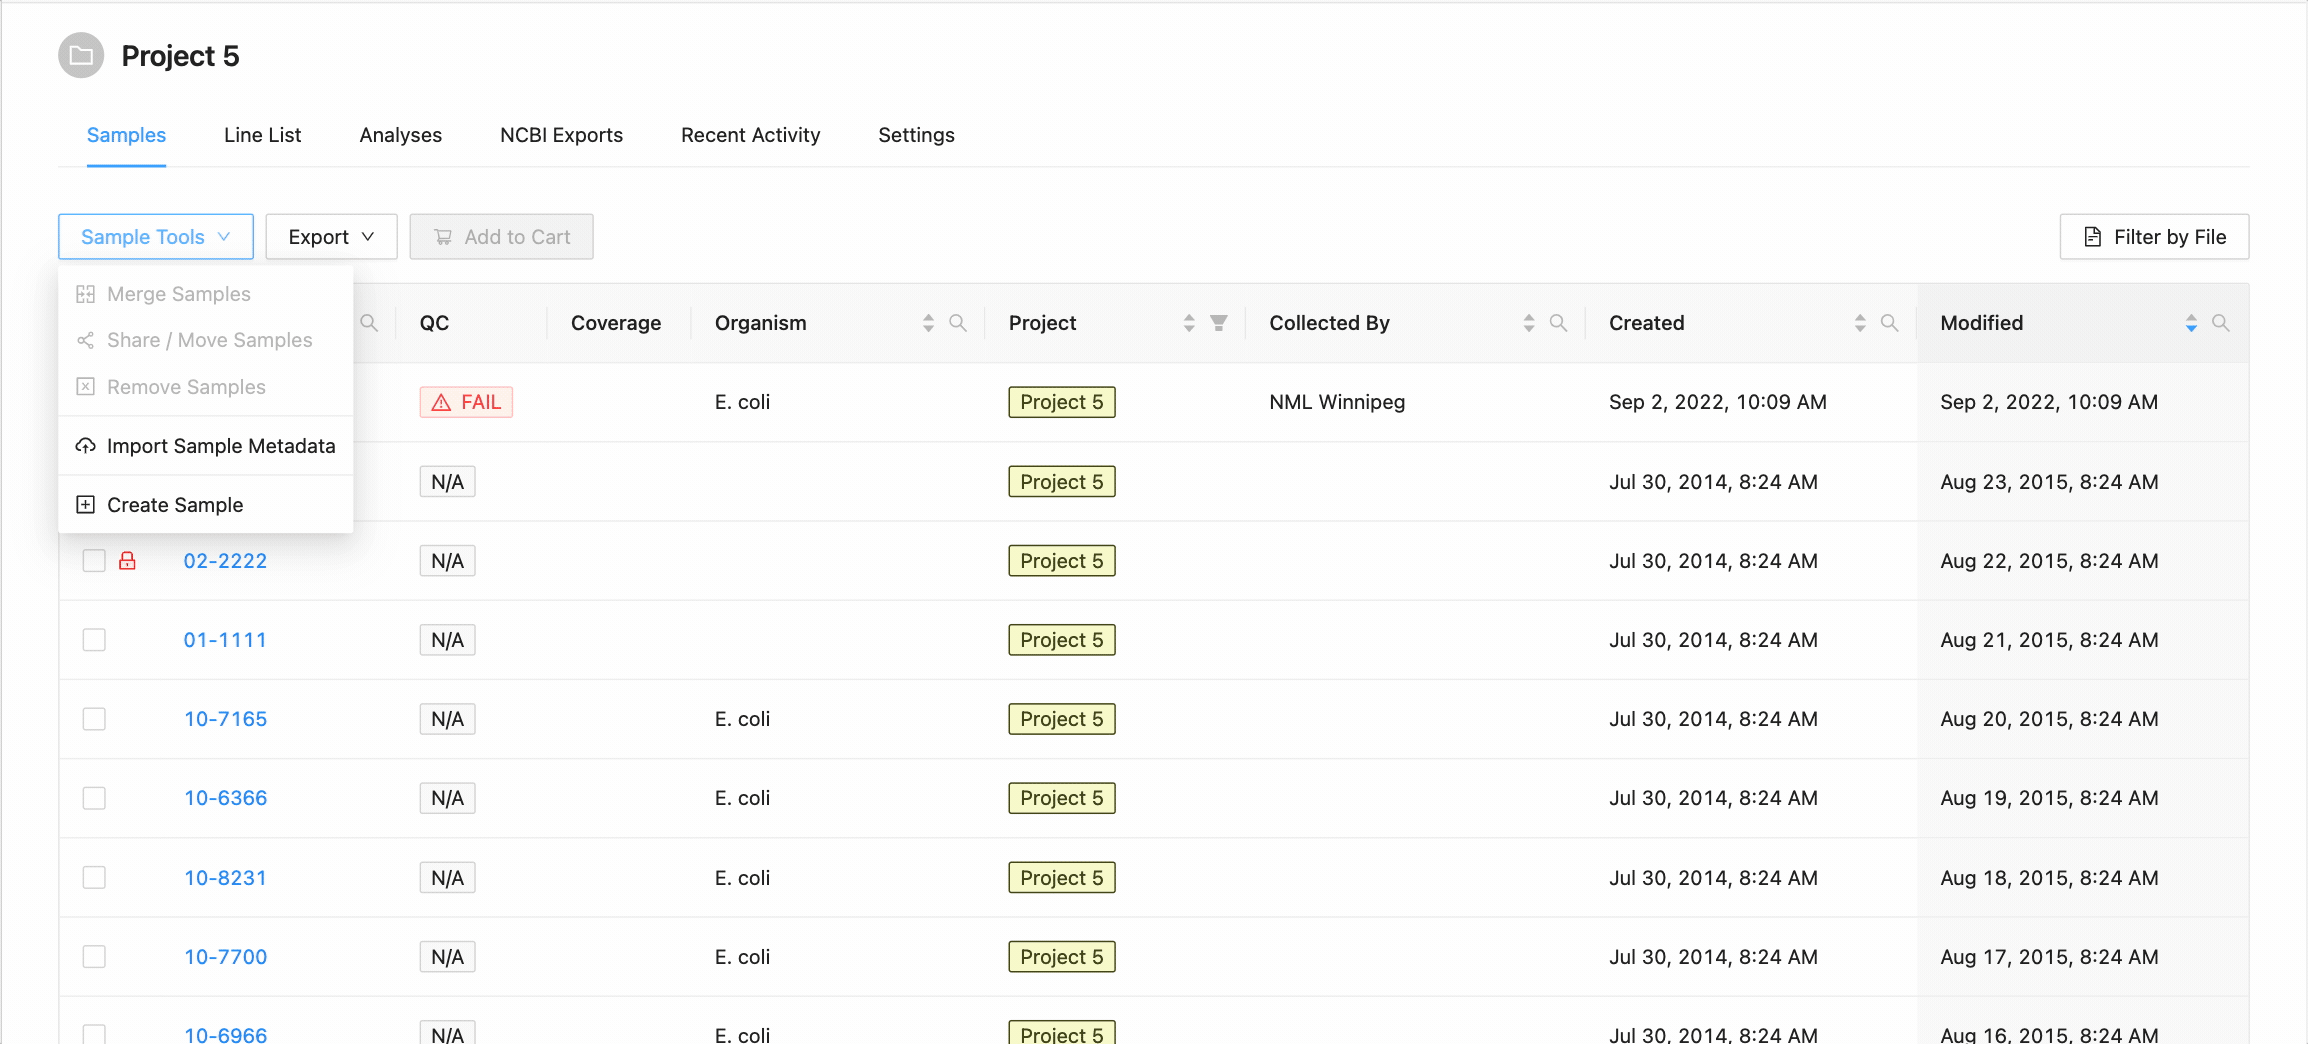
Adding a new sample
You can add a new sample to the project if you have the project Manager role on the project. To add a new sample to the project, click on the “Add New Sample” button in the “Samples” menu:
Clicking this button will open the Create New Sample modal dialog. When creating a sample, you must define the sample name (only upper and lowercase letters, numbers, and the special characters !, @, #, $, %, _, -, and ` are allowed) and optionally choose an organism for the sample:
When you’ve finished choosing the name and organism for the sample, click on the “Create Sample” button.
Filtering samples
Each column in the projects’ samples table, (except the quality control column and coverage column) can be filtered by typing in the filter box. The filter box is located in the right corner of the column header.

Sample name, organism, and collected by filtering:
Opening the filter on these columns allows access to a search that allows for multiple search terms.
In this example, the table is being filtered by sample name. Here the user is looking for all samples that contain the
characters 10- or the characters 11-. Typing 10- and then Enter does the initial filtering to get all
samples containing those characters. Typing 11- and then Enter adds this as an additional search and the
table is filtered to only show samples that either contain the 10- or 11-.
Filtering by created and modified dates
Quickly finding samples based on either their created or modified dates can be done using the date range pickers available in the column header filter. In this example, a modified date filter is being applied to search for all samples that were modified between Aug 15, 2015 and Aug 16, 2015 inclusively (meaning samples modified on those dates will be included).
Projects filtering
Projects filtering works slightly different from the other filters. Samples from the current project are always available (excluding filtered ones) in the table, but associated projects (these can be added through the project settings page) can have their sample displayed in the table as well by selecting the project name within the filter dropdown. These samples will be included in all filtering.
Filter by File
Filtering by file allows you to quickly filter the table by use a text (
E.g.
10-8231
02-2222
01-1111
11-11-1
11-0002
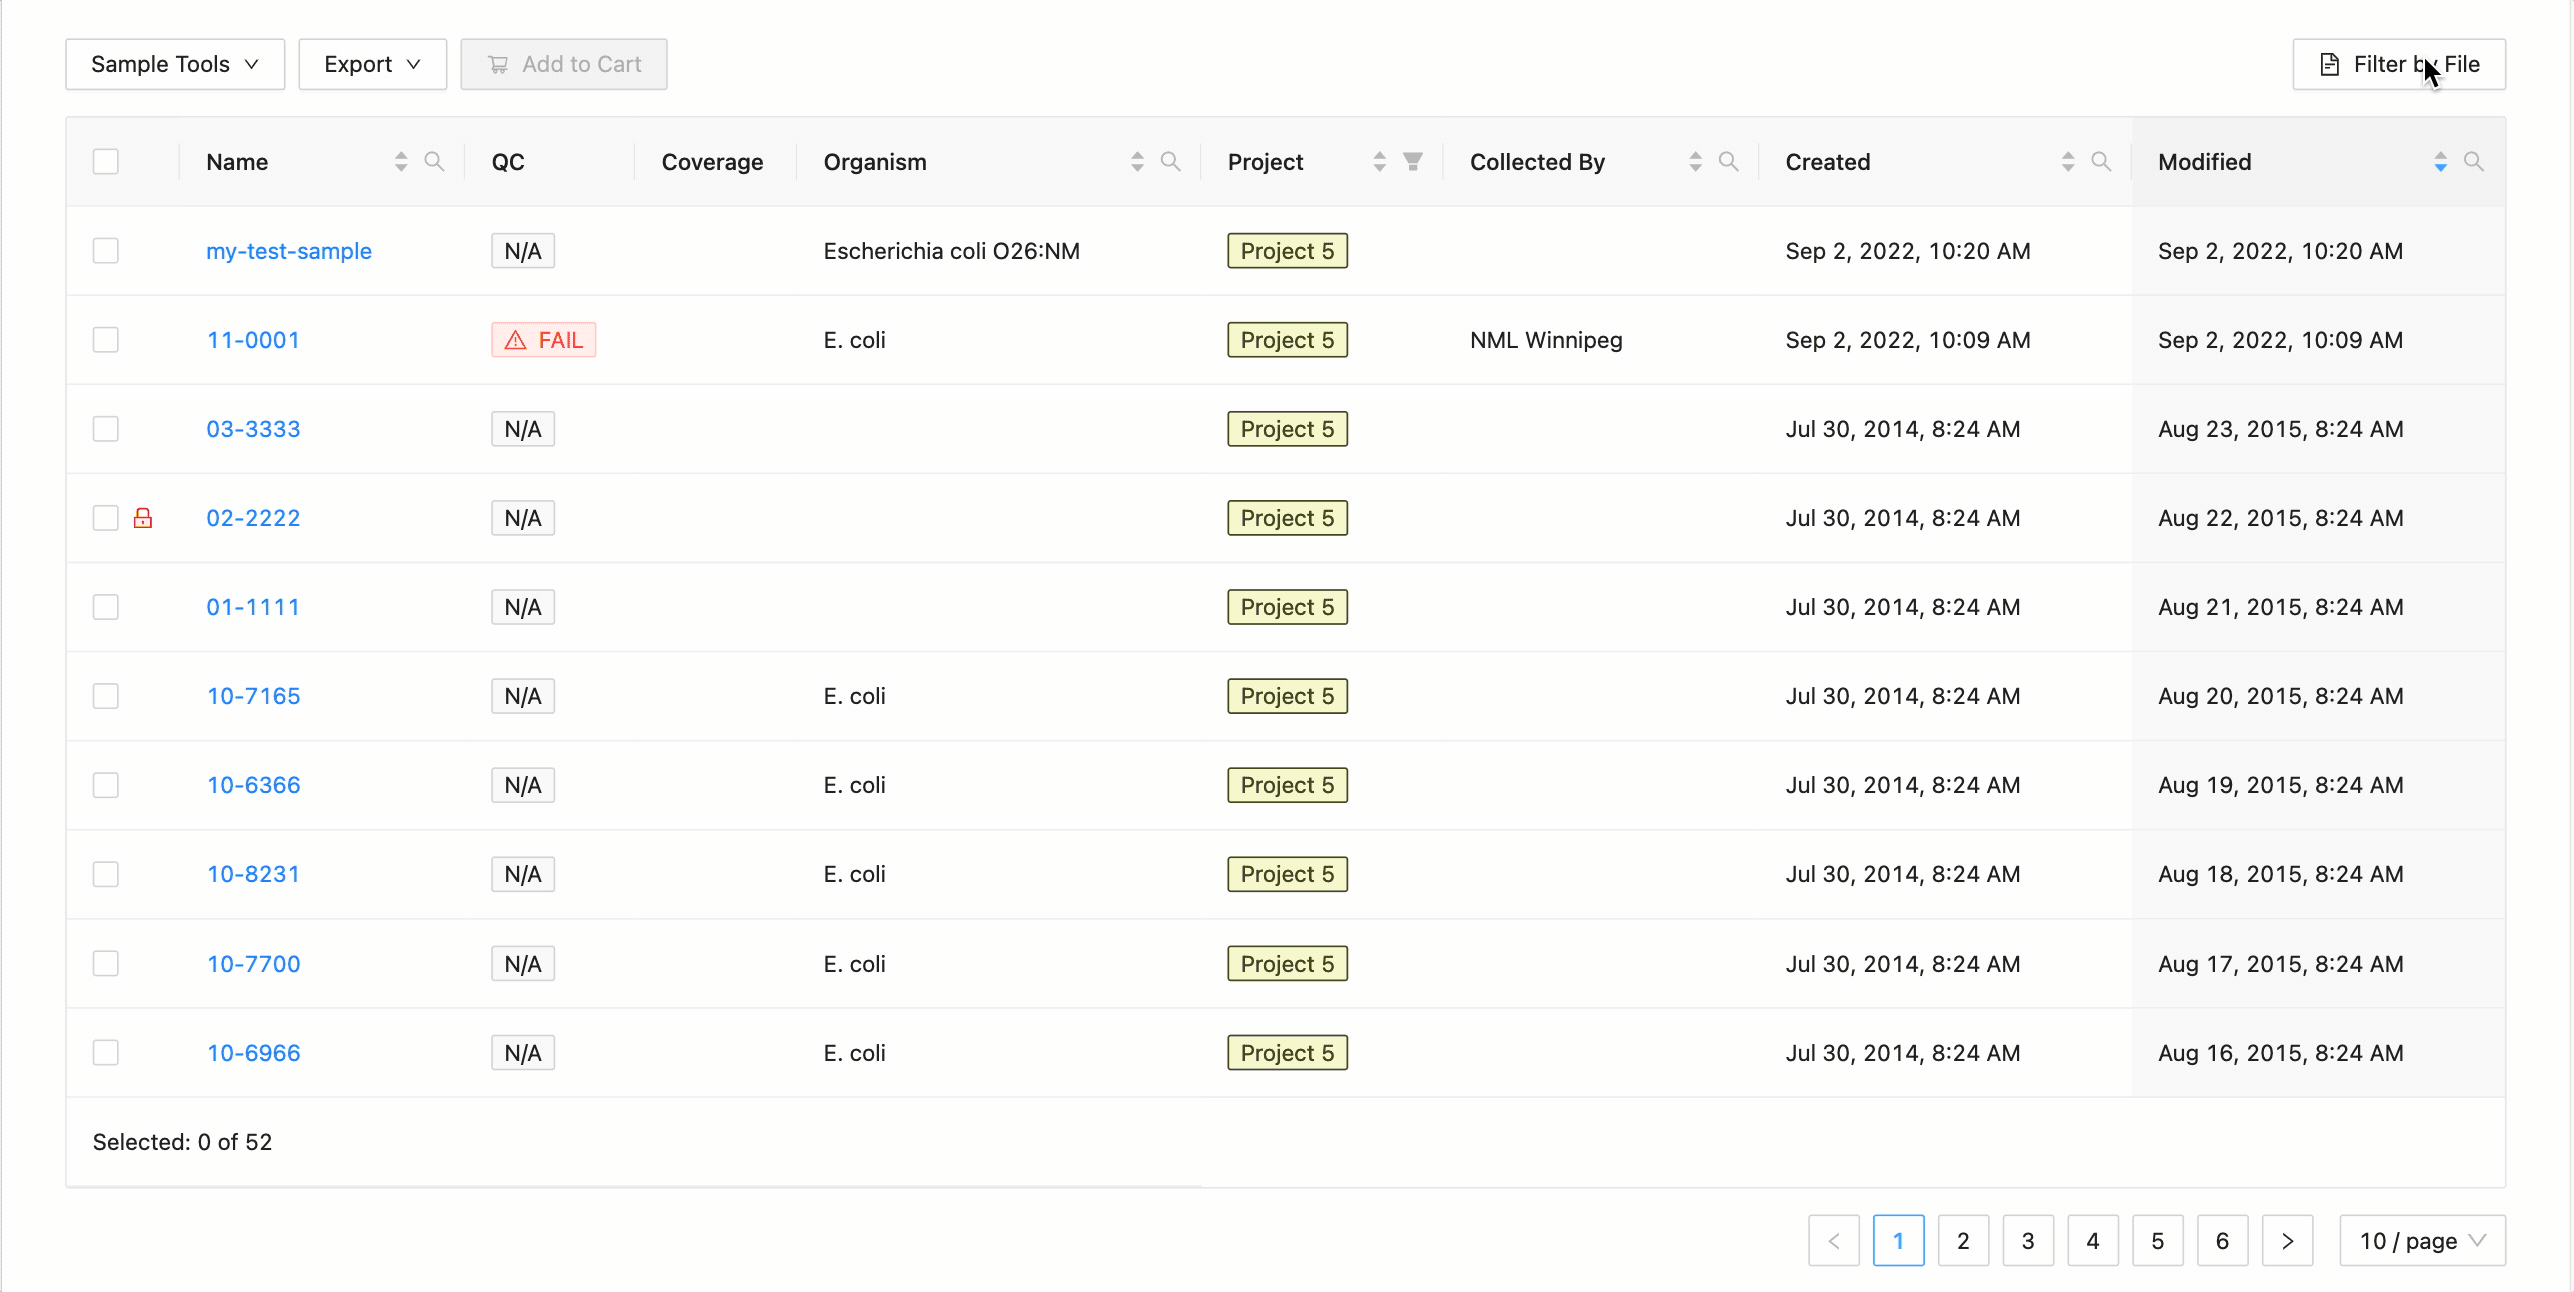

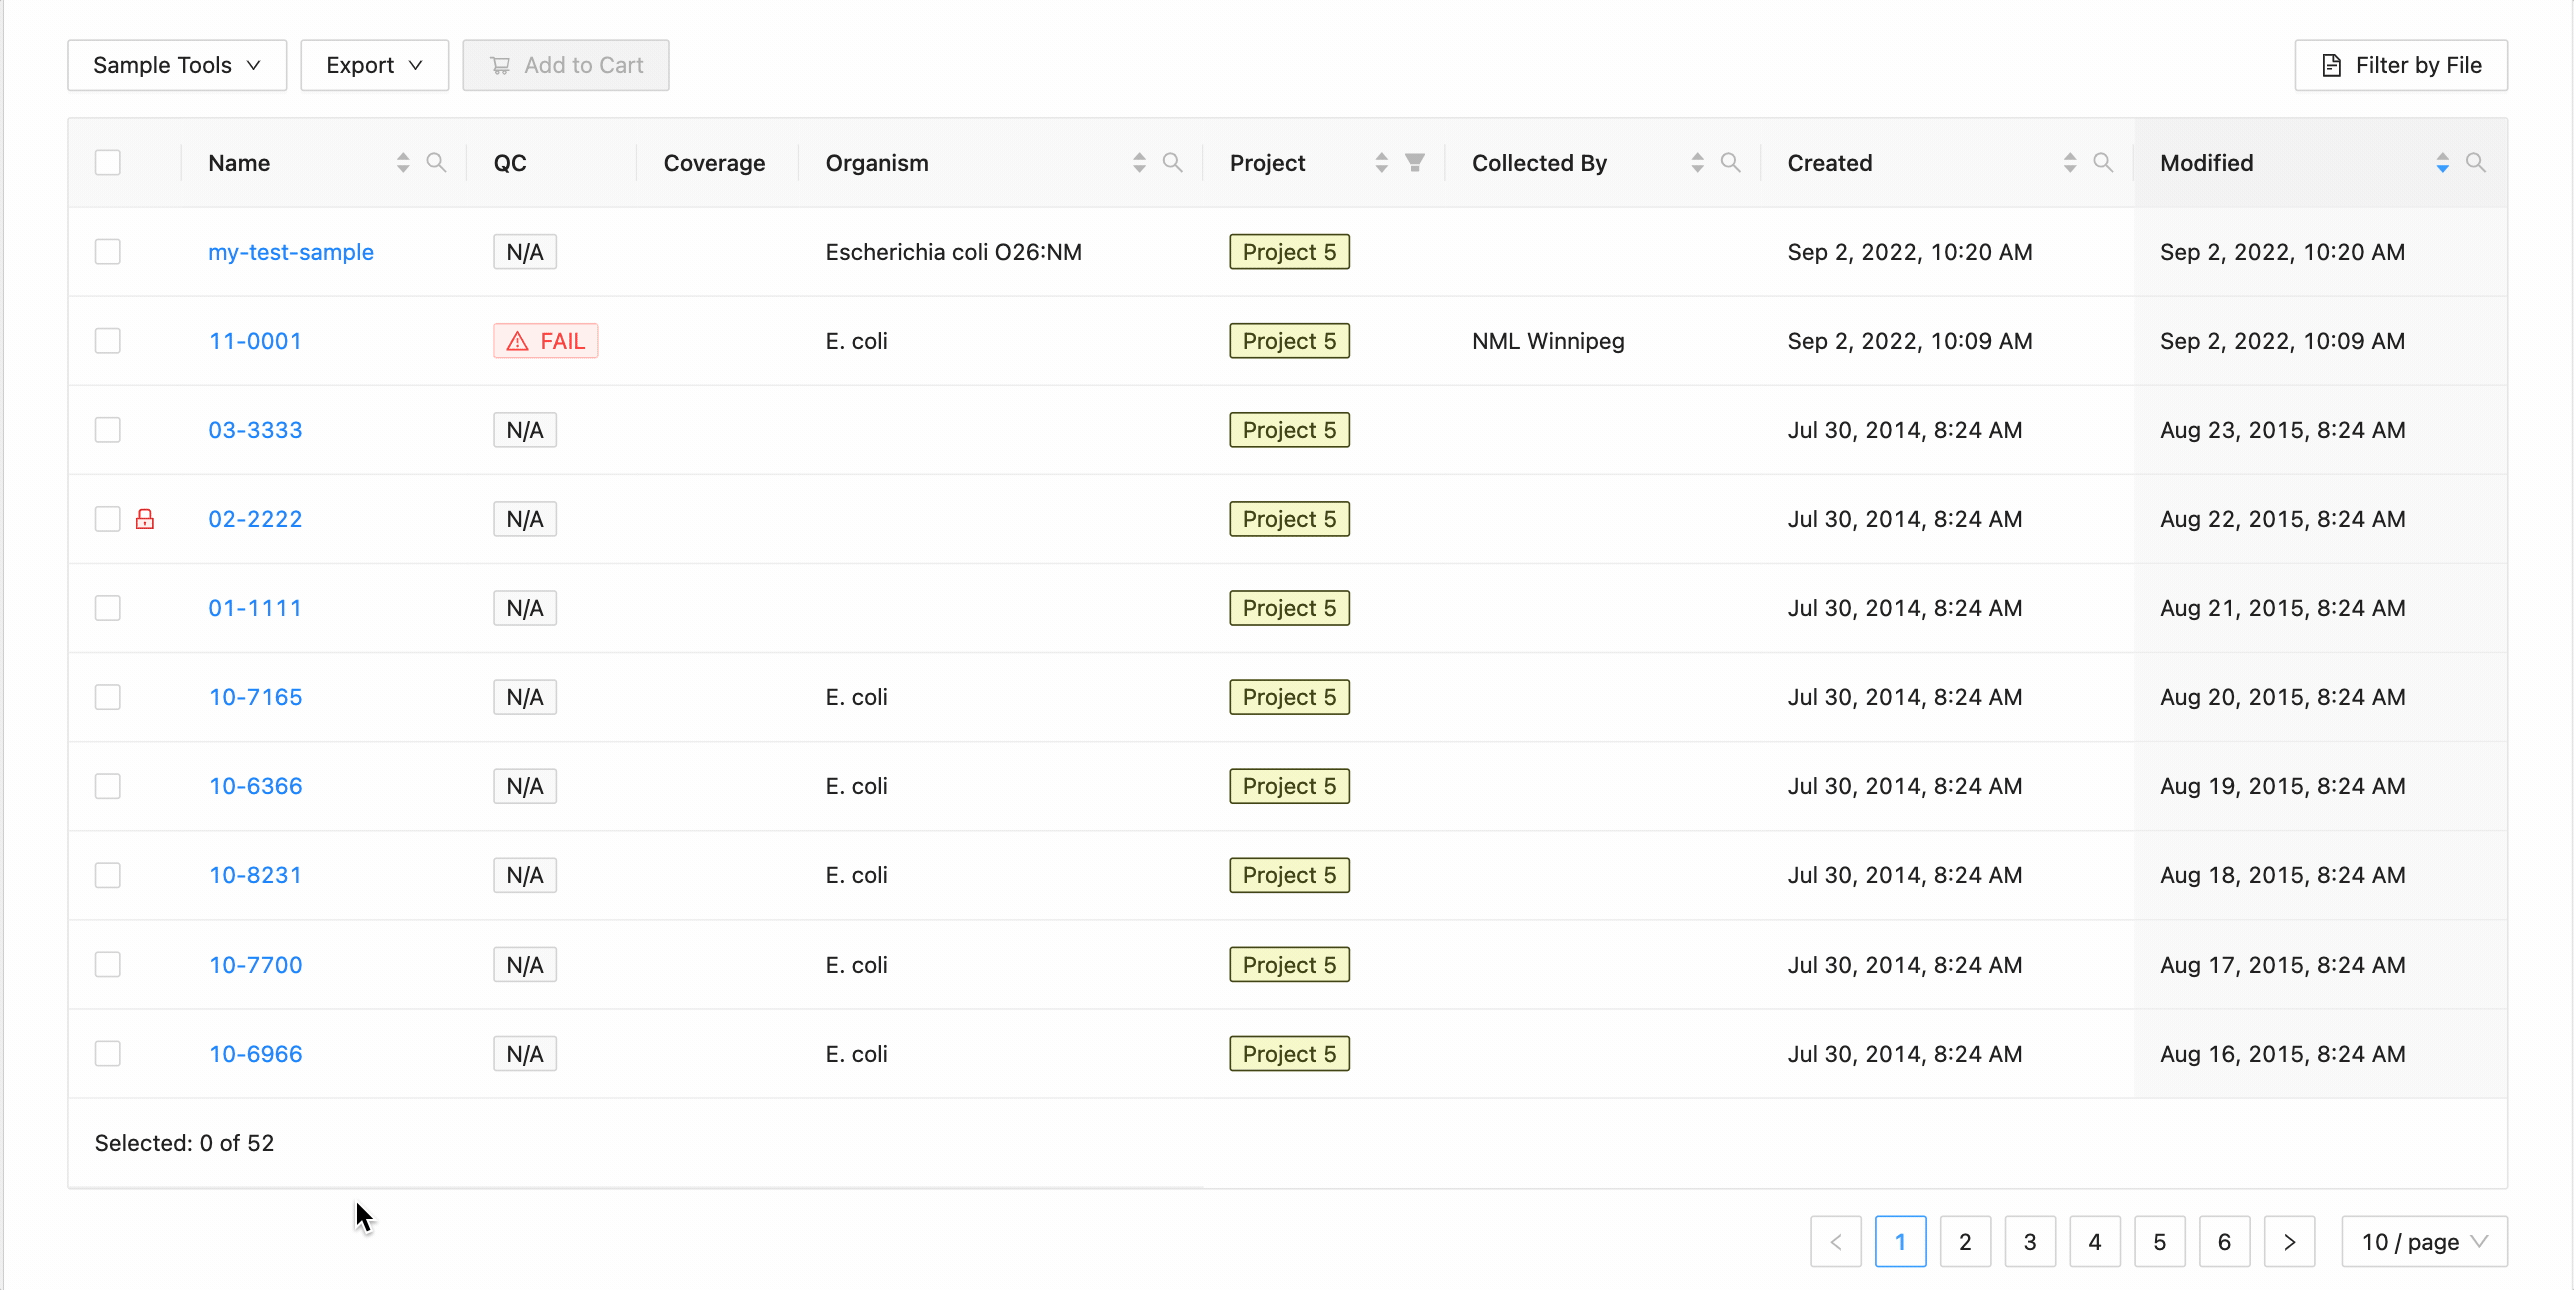
To filter the table by file click the “Filter by File” button at the top of the table. This will open a modal window which will allow you to select the file containing the list of names to filter by. Once selected, IRIDA will display the sample names that are within the projects currently visible in the table (you can add other project’s samples to the table using the projects filter). Once validated, you will see a summary:
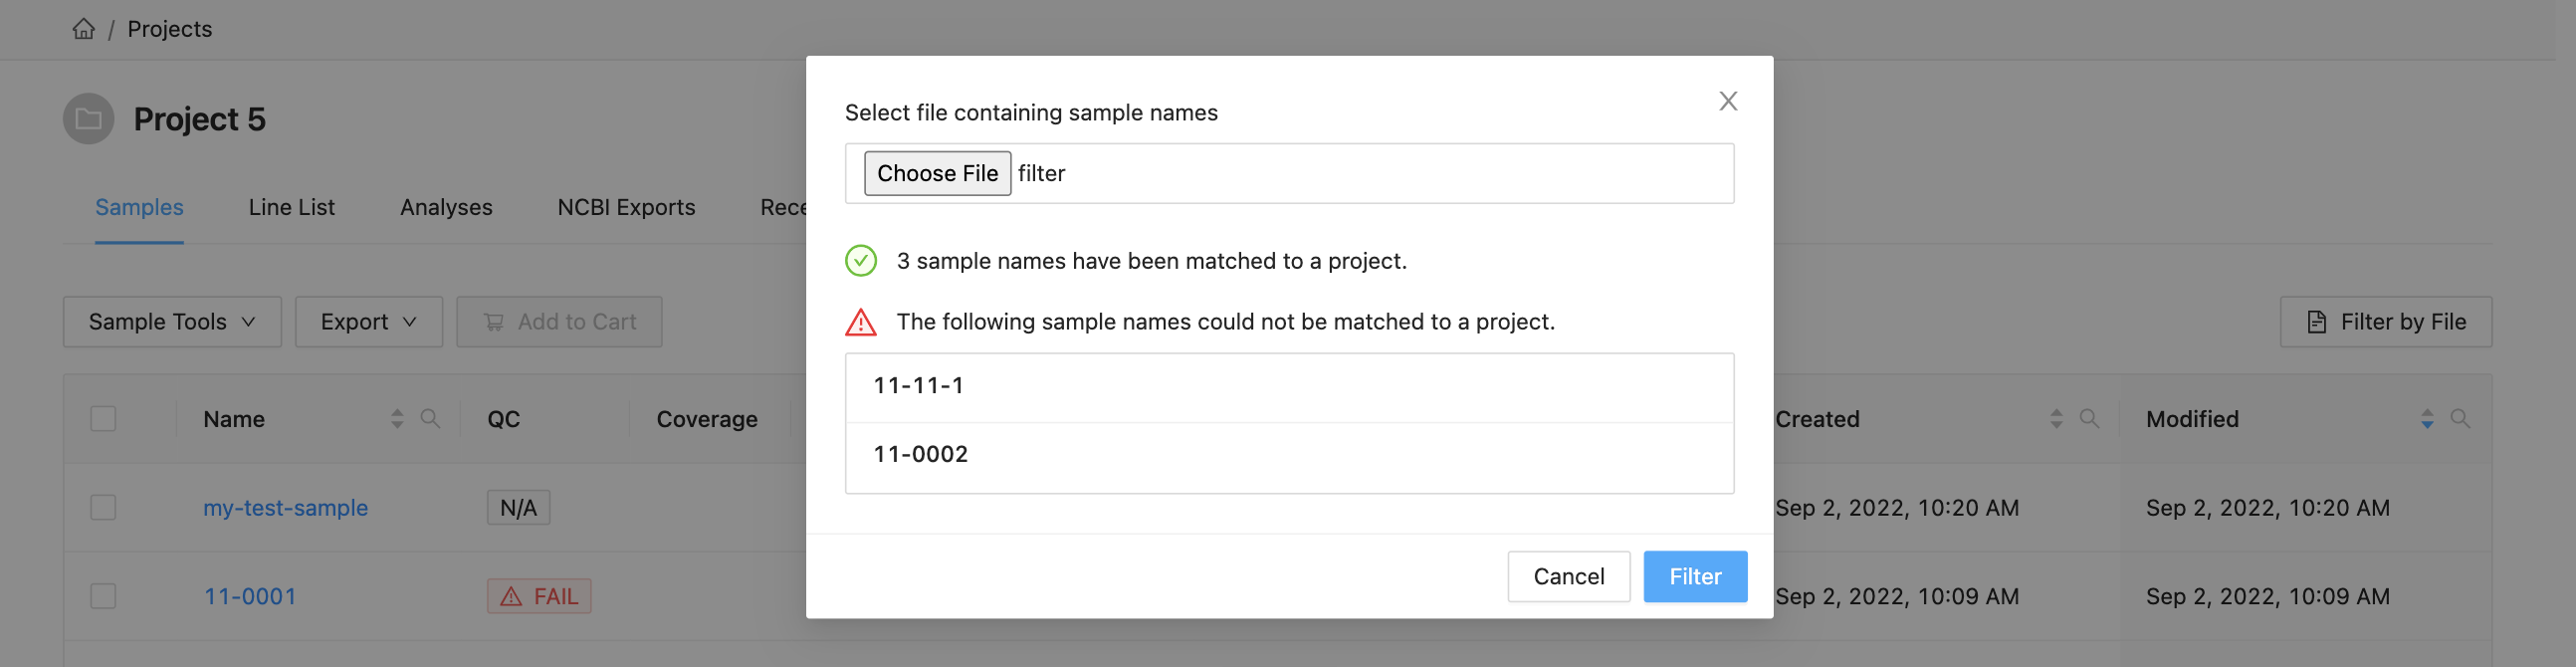
Here you can see that 3 samples where found in the current project and 2 samples were not. The sample names that were not found will be shown.
Clicking the “Filter” button at the bottom of the modal will filter the table with these sample names, while maintaining any existing filters that were in place.
Modifying samples
Only user accounts that have the Manager role on a project can modify the samples in a project.
Selecting samples
All sample modification actions require that samples be selected. You can select individual samples by clicking the checkbox at the start of the row :

Selecting Groupings of Samples
All samples in the project can be selected at once using the checkbox in the table header.
This will work during filtering as well. Just apply the necessary filters, and click the select all checkbox. Only the filtered samples will be selected.
Sharing samples between projects
Sharing and Moving Samples
Sharing and moving samples has been completely re-designed for the January 2022 release of IRIDA in an effort to allow faster sharing or moving greater number of samples. It is important to remember that you must be a manager on both the current project and the project you are trying to share or move samples to.
Samples can be selected on either the project samples page or the linelist page:
- Project Samples Page: Click the “Sample Tools” dropdown and select “Share / Move Samples”.
- Linelist Page: click the “Share Samples” button.

Once selected, you will be redirected to the new Share / Move Samples page.

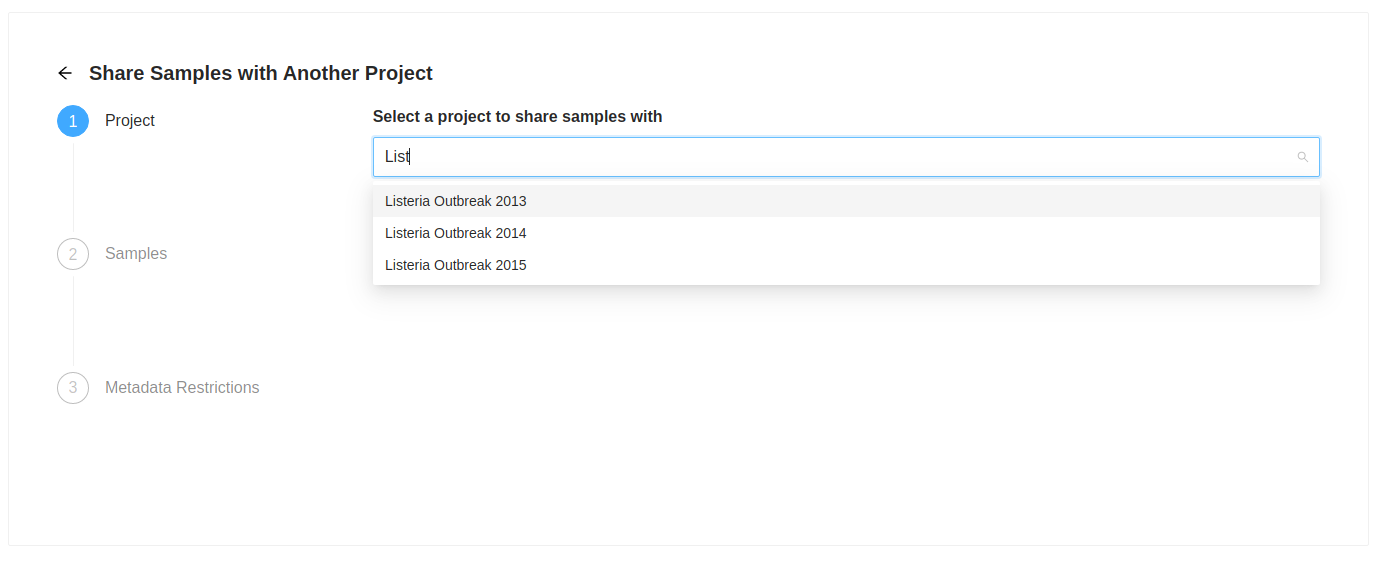
Destination Project Selection
The first action is to select the destination project. Start typing the name of the destination project in the “Select a project to share samples with” input. As you type a list of projects will be presented, select the project you want. Once you select a project to share with, the “Next” button will become enabled, clicking on it will allow you to review the samples that were selected to copy. the samples that were selected to copy.
Sample Review
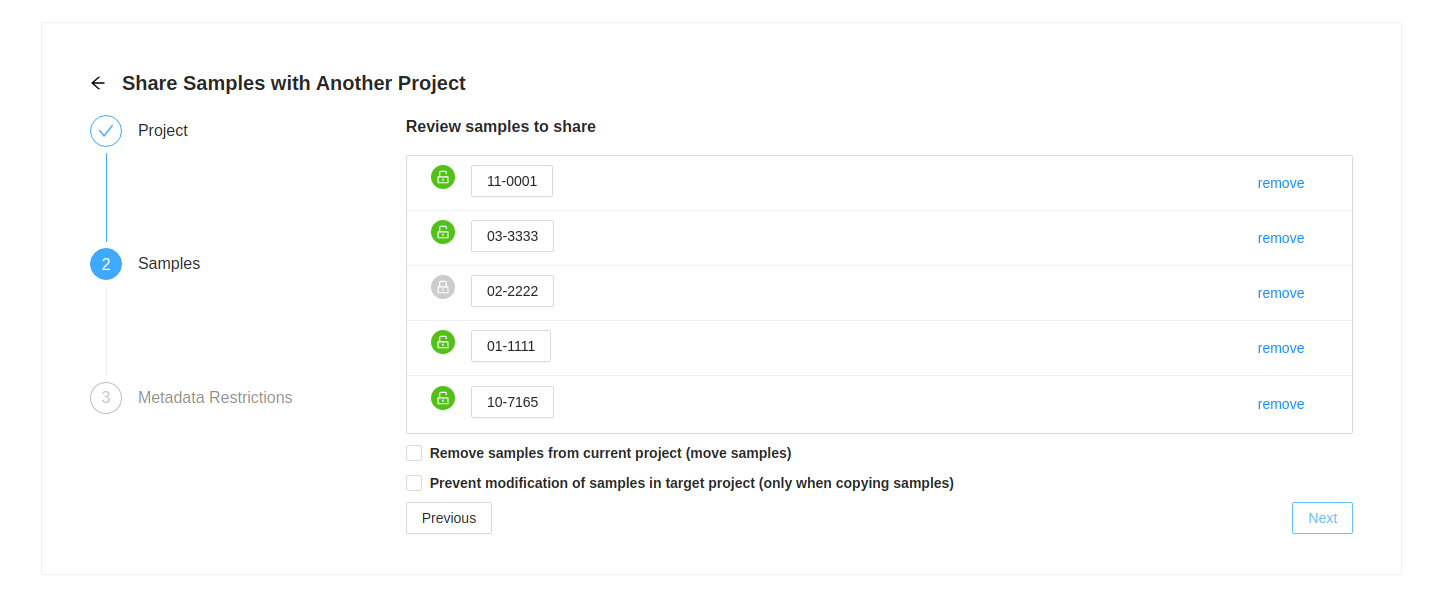
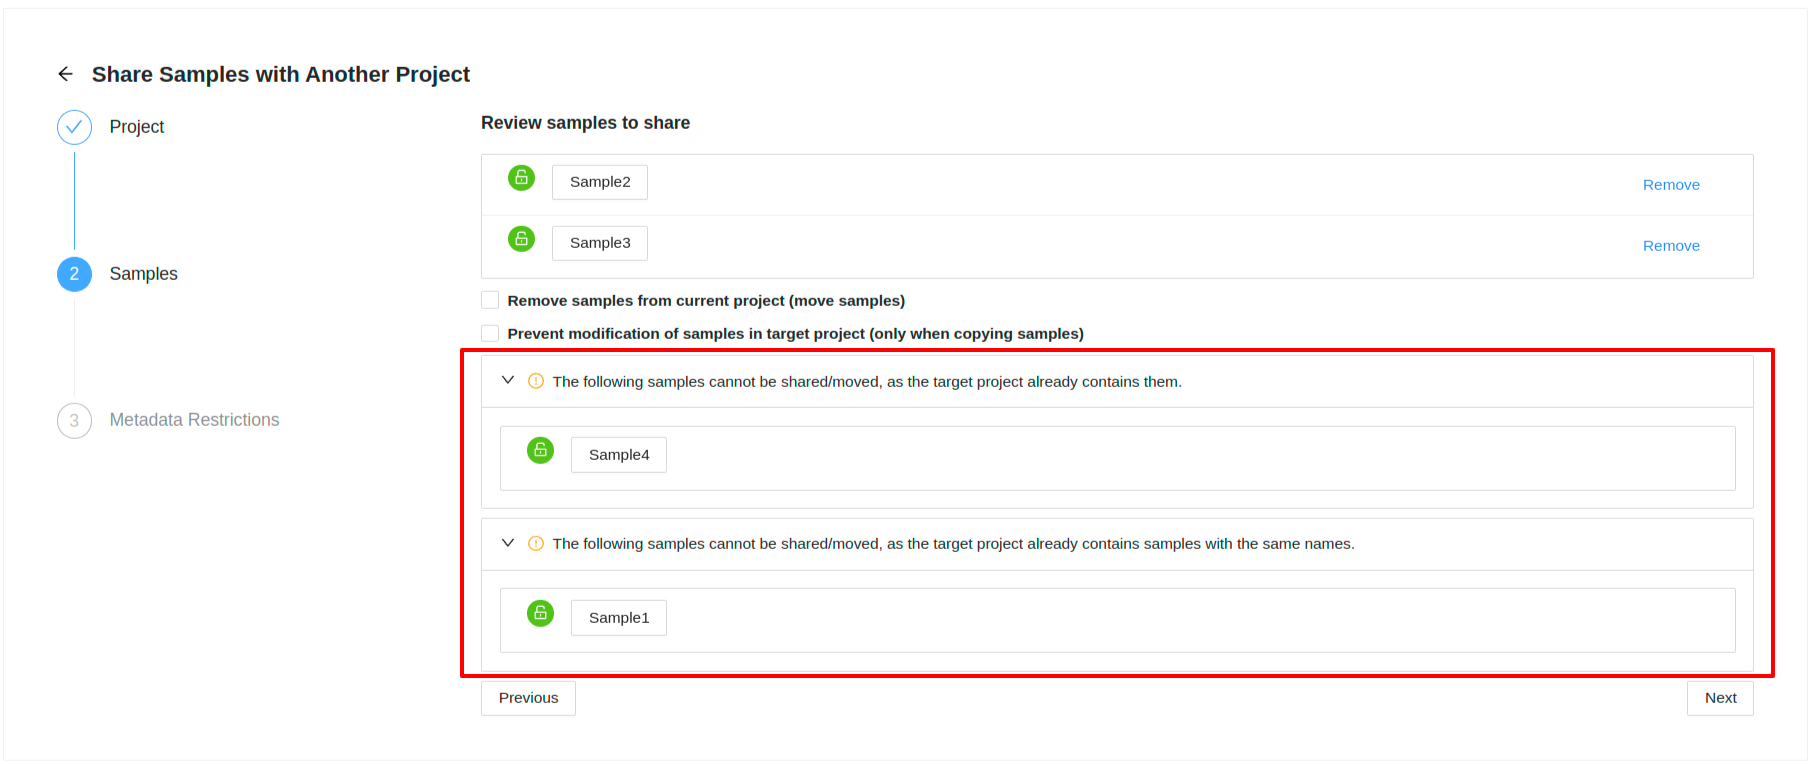
Next you will see the list of samples that were selected. If you decide you do not want one of them, just click on the ( remove) at the end of the row.
If a sample has a locked symbol, it means that the sample is locked from modification in the current project and will not be modifiable in the destination project.

If the destination project already has the same samples (sample ids and/or sample names) in it that are being shared from the source project, then you will see expandable warnings with these samples listed
Moving Samples
If you want to move samples, which means they will be in the destination project, but removed from the current project, then select the checkbox “Remove samples from current project (move samples)”

Locking Samples (ONLY FOR SHARING NOT MOVING)
If you are sharing samples and you do not want them to be modifiable in the destination project, select the checkbox “ Prevent modification of samples in target project (only when copying samples)”

NOTE: Both checkboxes cannot be selected at the same time.
Metadata Restrictions
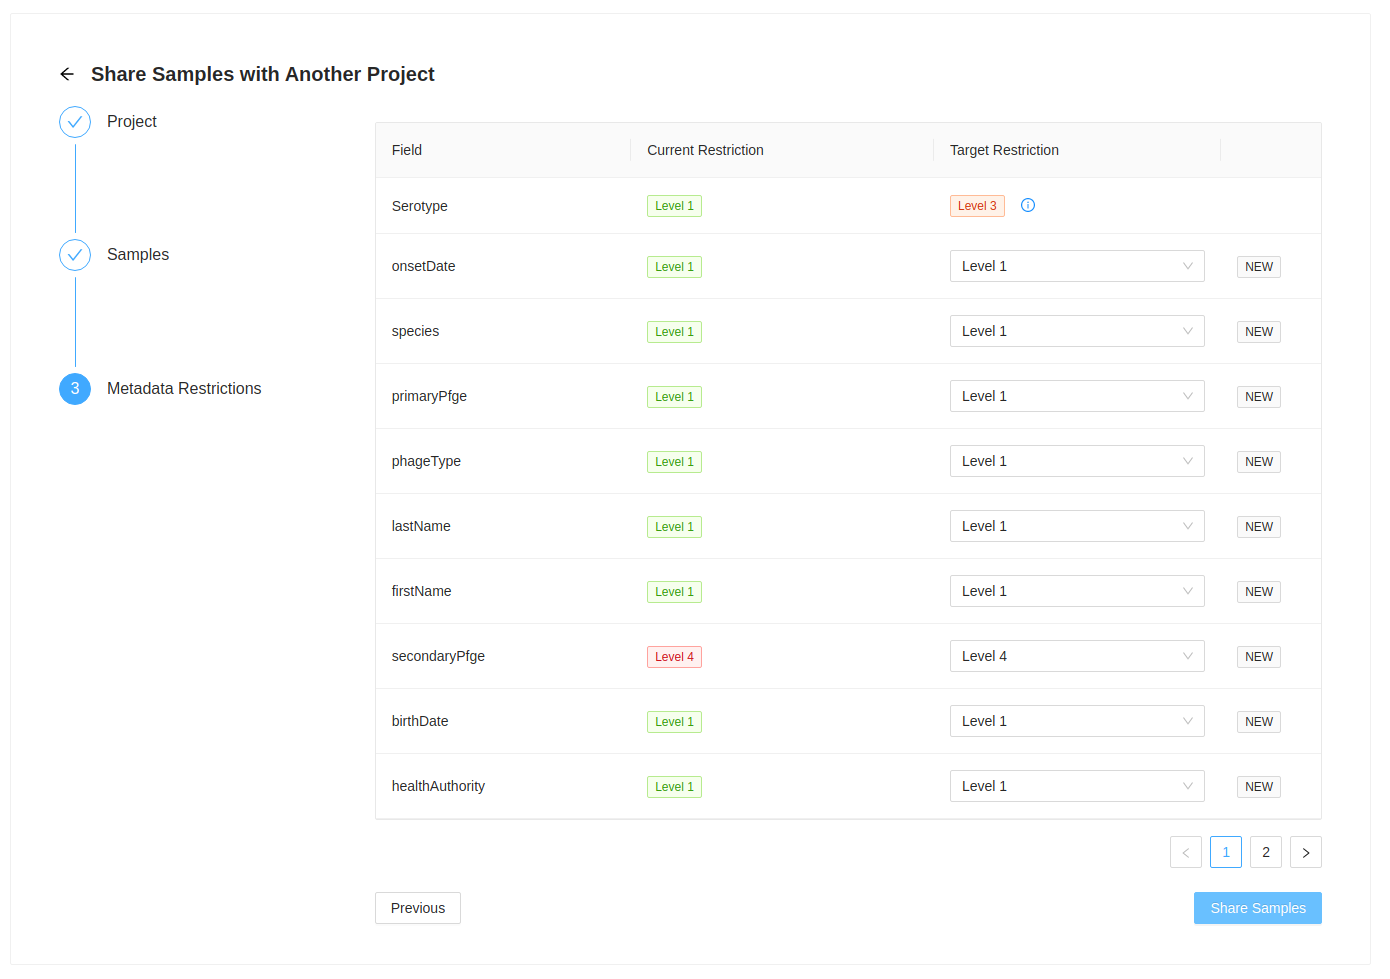
Samples are shared/moved with all their corresponding metadata. This step allows you to review the fields that are included with the sample as well as review the metadata restriction level that will used on the destination project.
If the metadata field does not exist in it will be set to the current metadata restriction level in the current project.

In this example, metadata field secondaryPfge has a restriction level of Level 4, the highest level, and birthDate
has a restriction level of Level 1, the lowest level. They both do not exist in the target project, so they are
initially set to that value. You can always set different levels in the destination project, but please ensure that
you mean to do this. All restriction levels can be updated in the project > settings > metadata panel.
If the metadata field exists in the destination project, then the restriction level is set to the destination project level and cannot be updated. This can be updated for all samples in that project in the project > settings > metadata panel.

Sharing
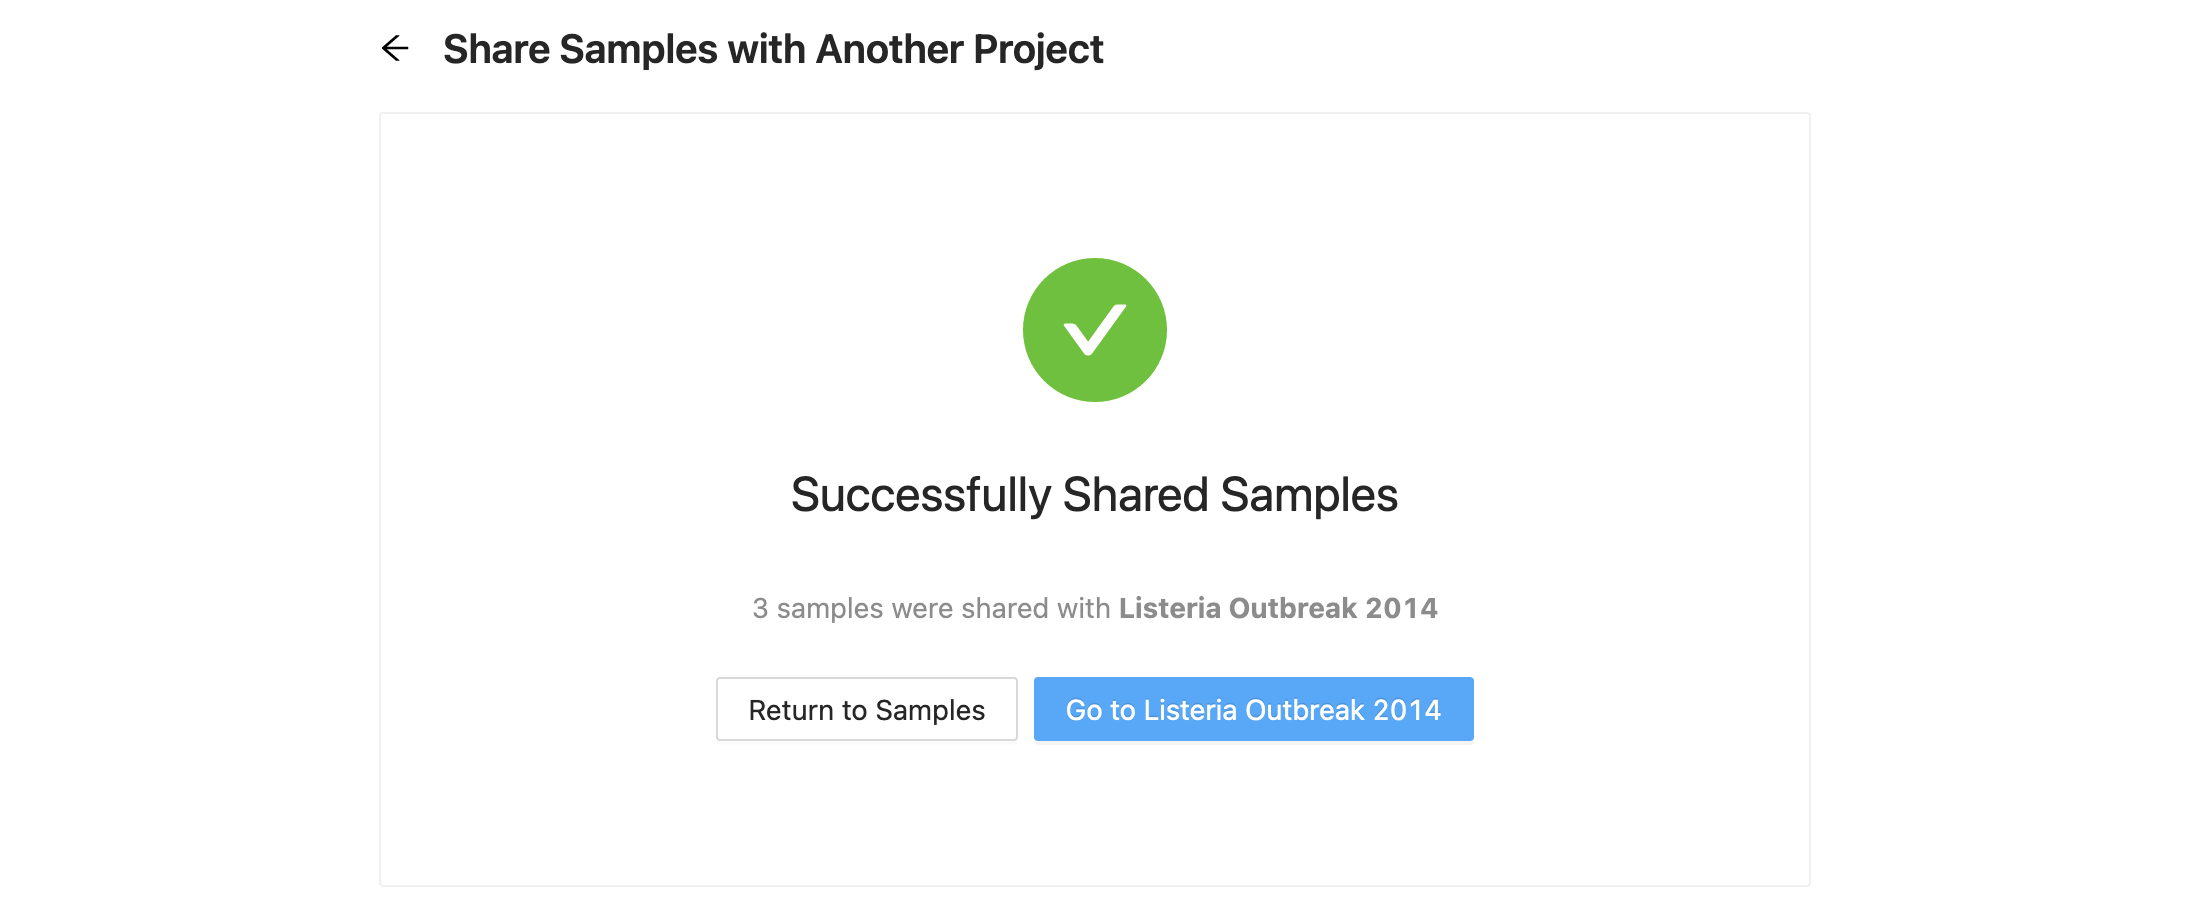
Once you are ready to copy / move the samples, click the “Share Samples” button at the bottom of the form. Once complete, a message stating that the share or move was successful. From here, you can select to either go back to the samples page, or continue to the destination project.
Warnings
Destination project already has the samples
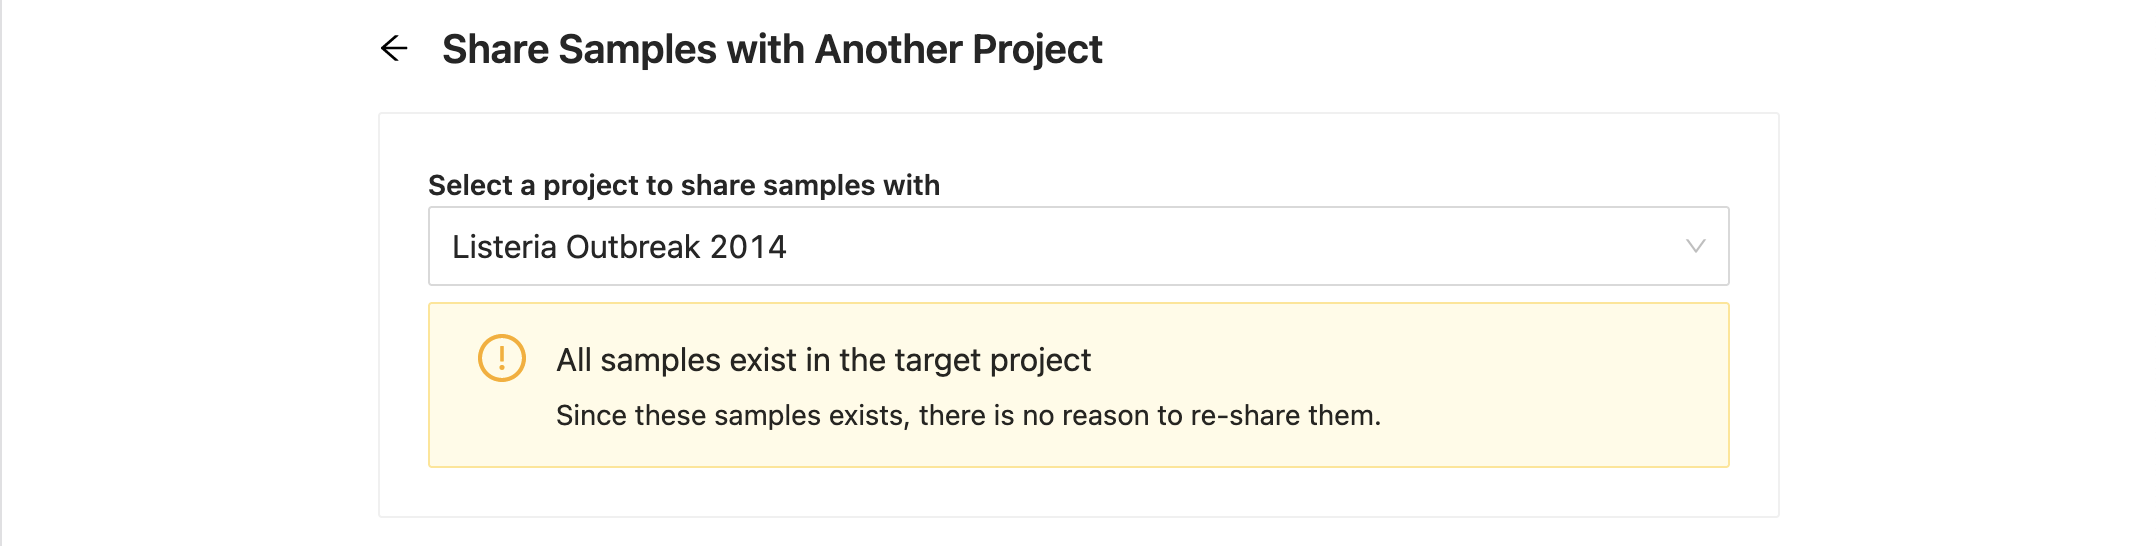
If the destination project already has all of the samples you are trying to copy, you will be shown a message stating this without the possibility to share again. You can still select another project at this point and continue.
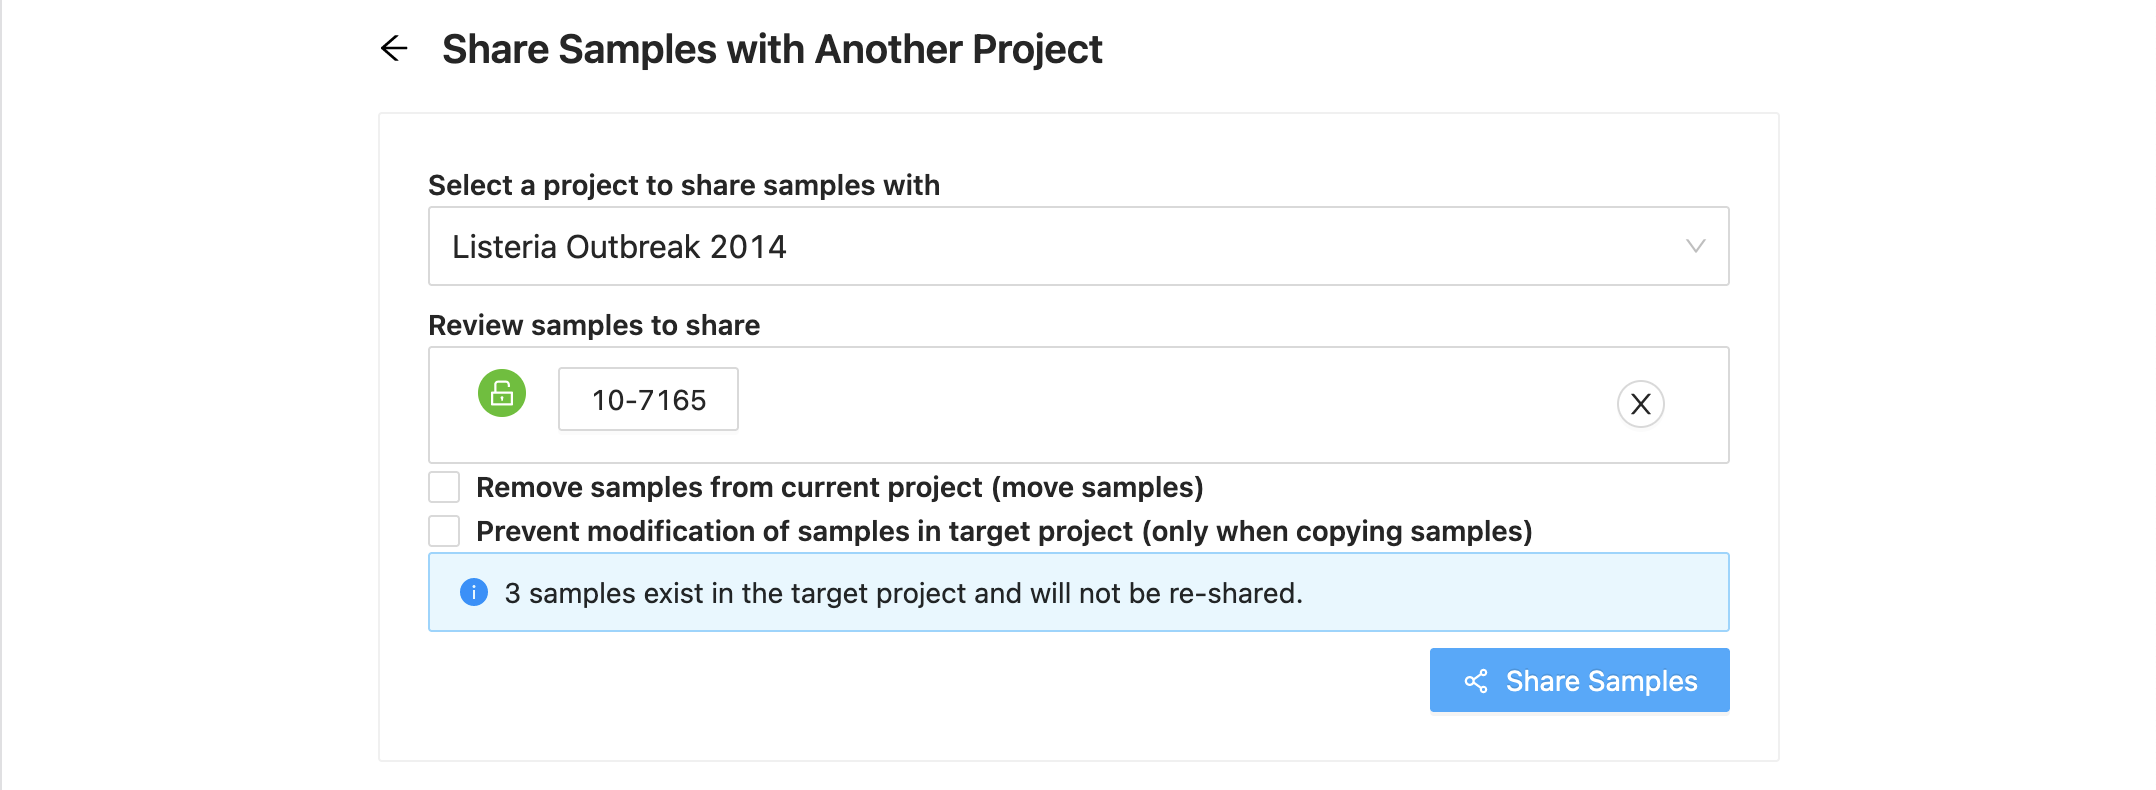
If the destination project already has some of the samples you are trying to copy, you will be shown a message saying how many samples cannot be copied. The list of samples will only display the samples that can be copied. You can proceed to copy the available samples.
Merging samples within a project
If a sample was created when sequencing data was uploaded with an incorrect name, you may want to merge two samples together. When you merge two samples, you will move all the sequencing files and assembled genomes from one sample to another, then delete the original sample. None of the sample metadata will be copied between the merged samples, instead you will select one sample as the target for the sample merge. Only users with the project Manager role can merge samples in a project and samples cannot be merged within remote projects.
Start by selecting the samples that you want to merge. You must select more than one sample to enable the merge samples button. Once you’ve selected the two or more samples that you would like to merge, click on the “Samples” button just above the samples list and select “Merge Samples”:

In the dialog that appears you will be presented with a list of the samples that are going to be merged, and an option to choose the target sample of the merge:
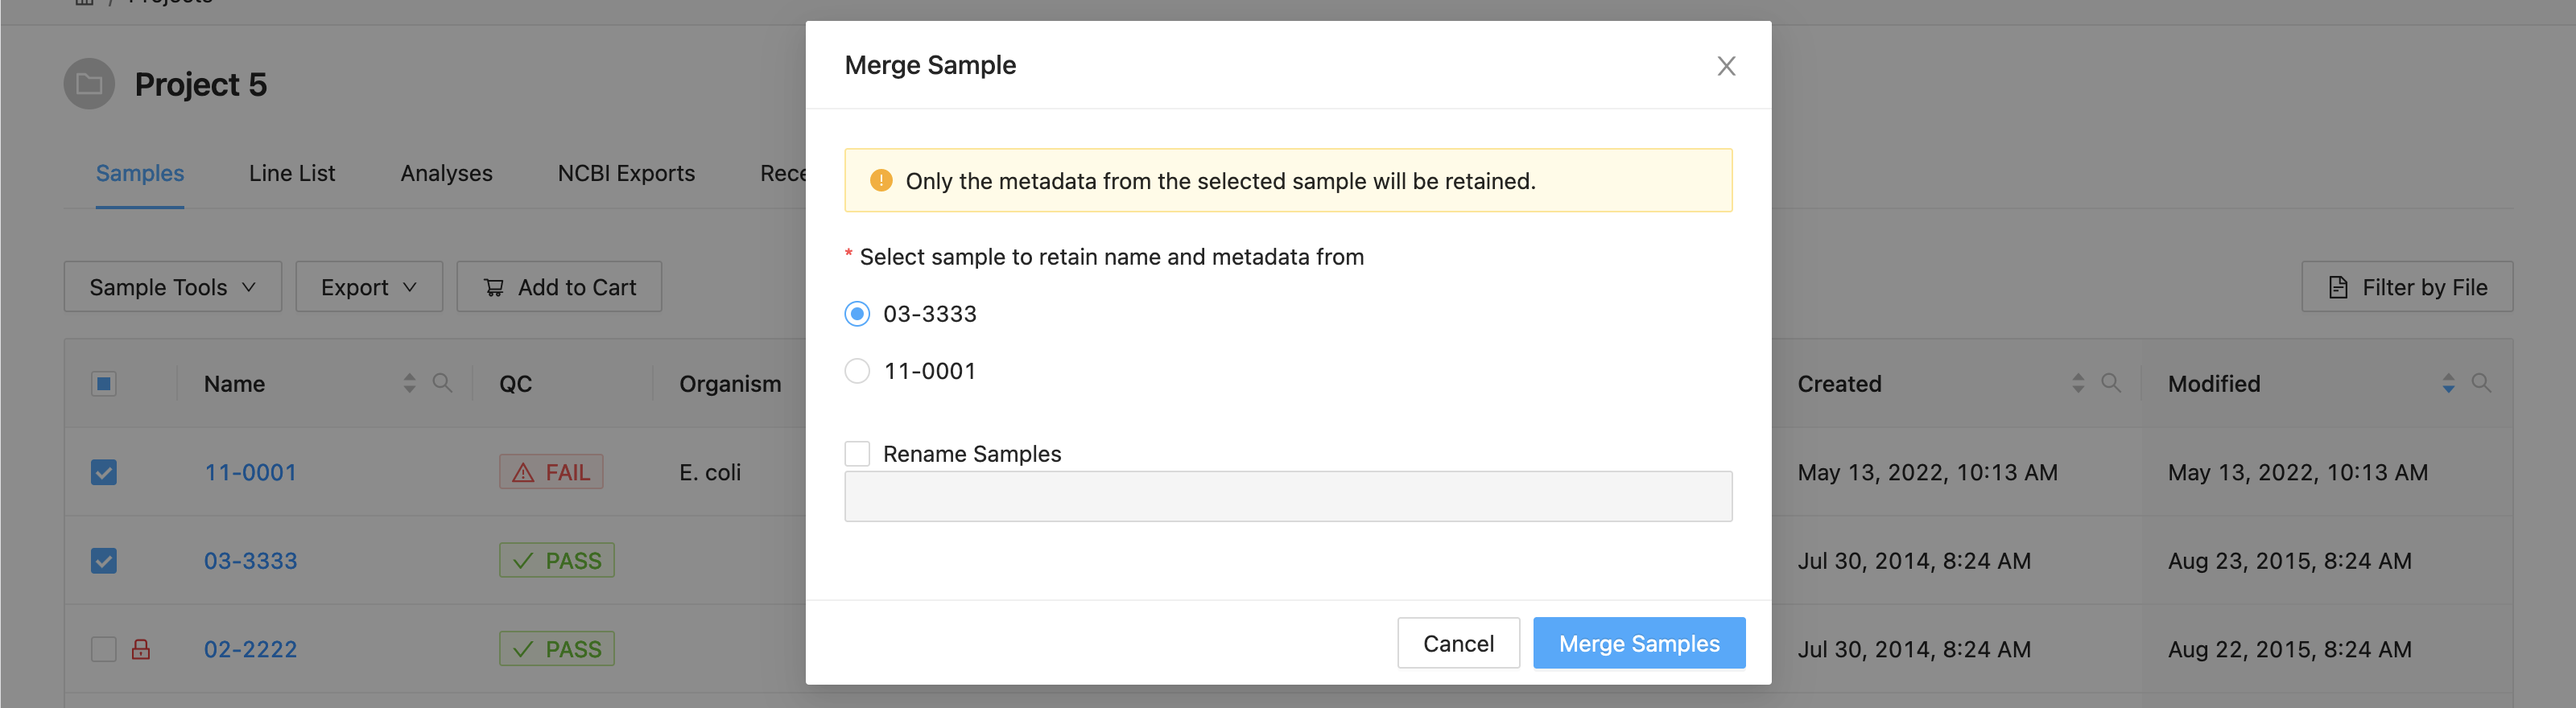
A list of the samples selected is displayed. You must select the sample that you want to retain the metadata from. All others will be overwritten by this sample.
If you want to rename the sample, click the checkbox “Rename Sample”, and enter a new name. The sample name must be at least 3 characters long, and must not contain white space characters (tab or space) or any of the following characters:
? ( ) [ ] / \ = + < > : ; " , * ^ | & '
. If you do not want to rename the target sample, leave this field blank.
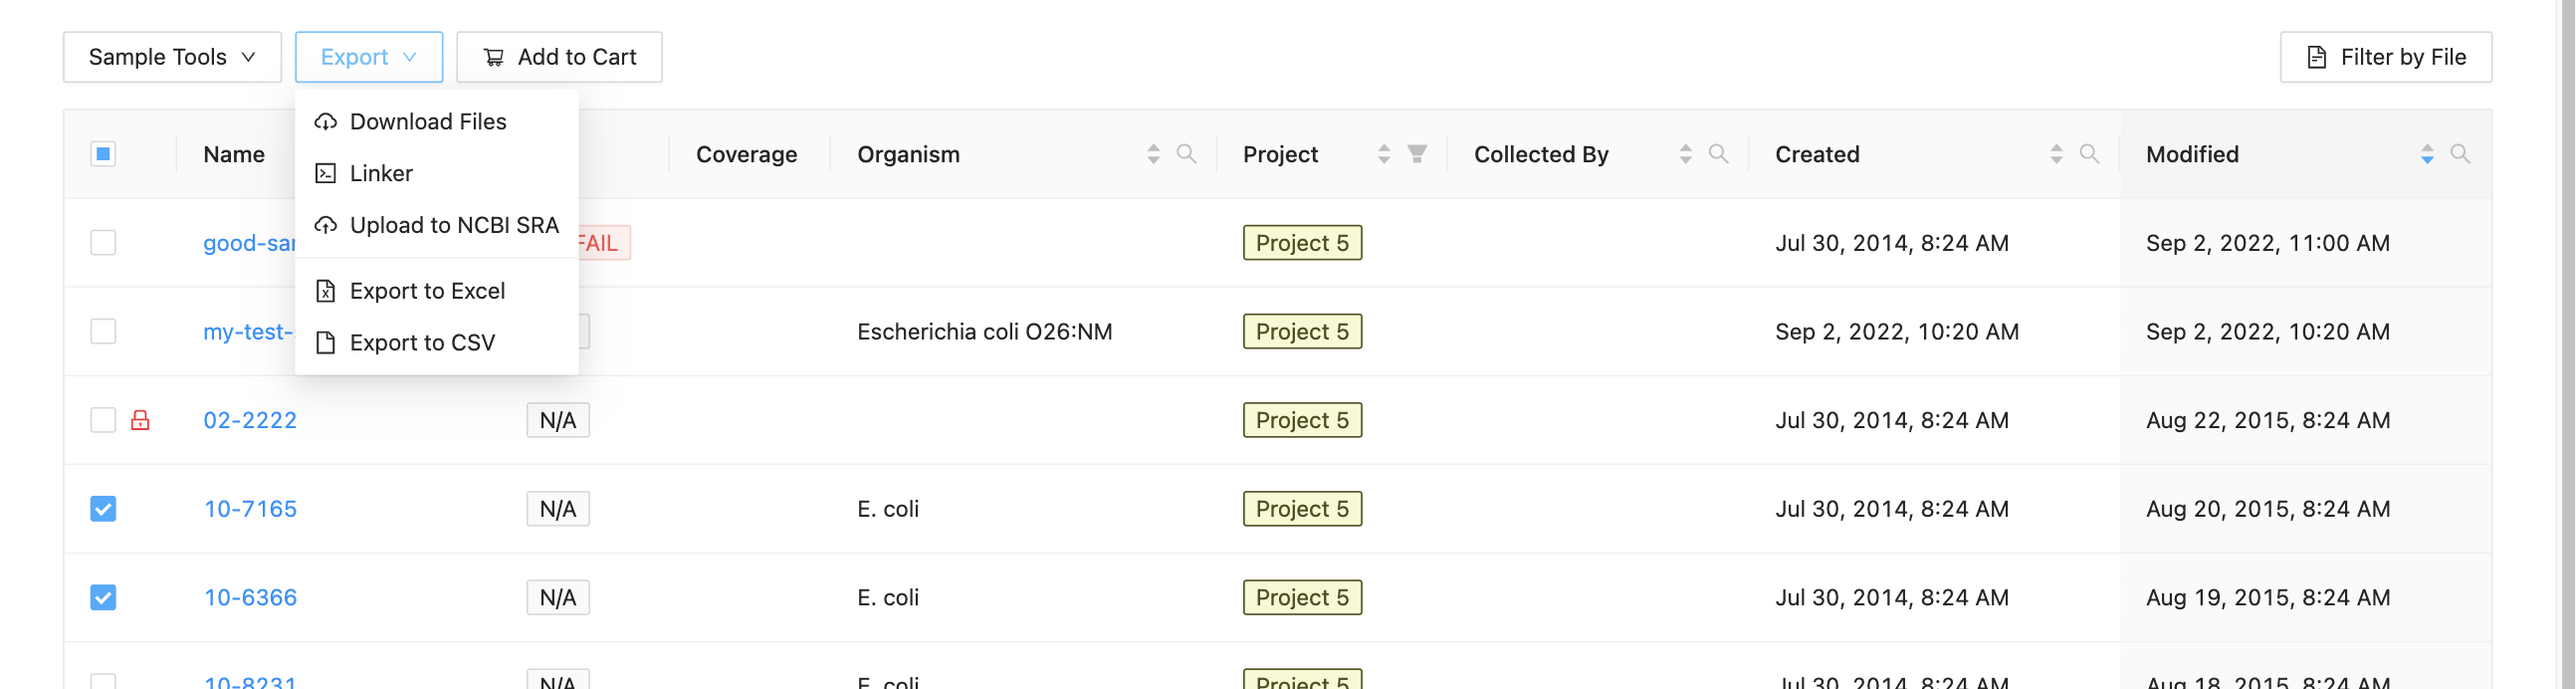
Exporting samples
The pipelines available in IRIDA may not be enough for the types of analysis that you want to run on your sequencing data. You can export your sample data from IRIDA in a number of different ways:
All export options require that you select the samples for export before you are able to export the samples.
Tip: For all types of export, you can export all of the data in a project using the Select All feature.
Downloading samples
You can download an individual sequence file from a sample by navigating to the file, then clicking on the icon (see: Downloading a sequence file).
You may download all of the files in a sample, or even download the files from multiple samples, by selecting the samples that you want to download, clicking on the “Export” button just above the samples list and clicking on “Download”:

IRIDA will provide you with a zip file containing the sequencing data for all of the selected samples. You can extract the files from the zip archive using the command-line program unzip, using the built-in Windows extractor tool, or using a program like 7-zip
WARNING: sequencing data can make for a very large download, especially when downloading all of the sequencing data for a project. We strongly recommend that you do not download data to your PC, especially if you are going to be using Linux command-line tools and the command-line export tool option is available.
Command-line export
The IRIDA package comes with a Linux command-line utility for linking to files in your current working directory. If you are working on a Linux workstation, we strongly encourage you to use the command-line utility for working with the sequencing data stored in IRIDA.
Start by selecting the samples that you want to export to the command-line, clicking on the “Export” button just above the samples list and clicking “Command-line Linker”:
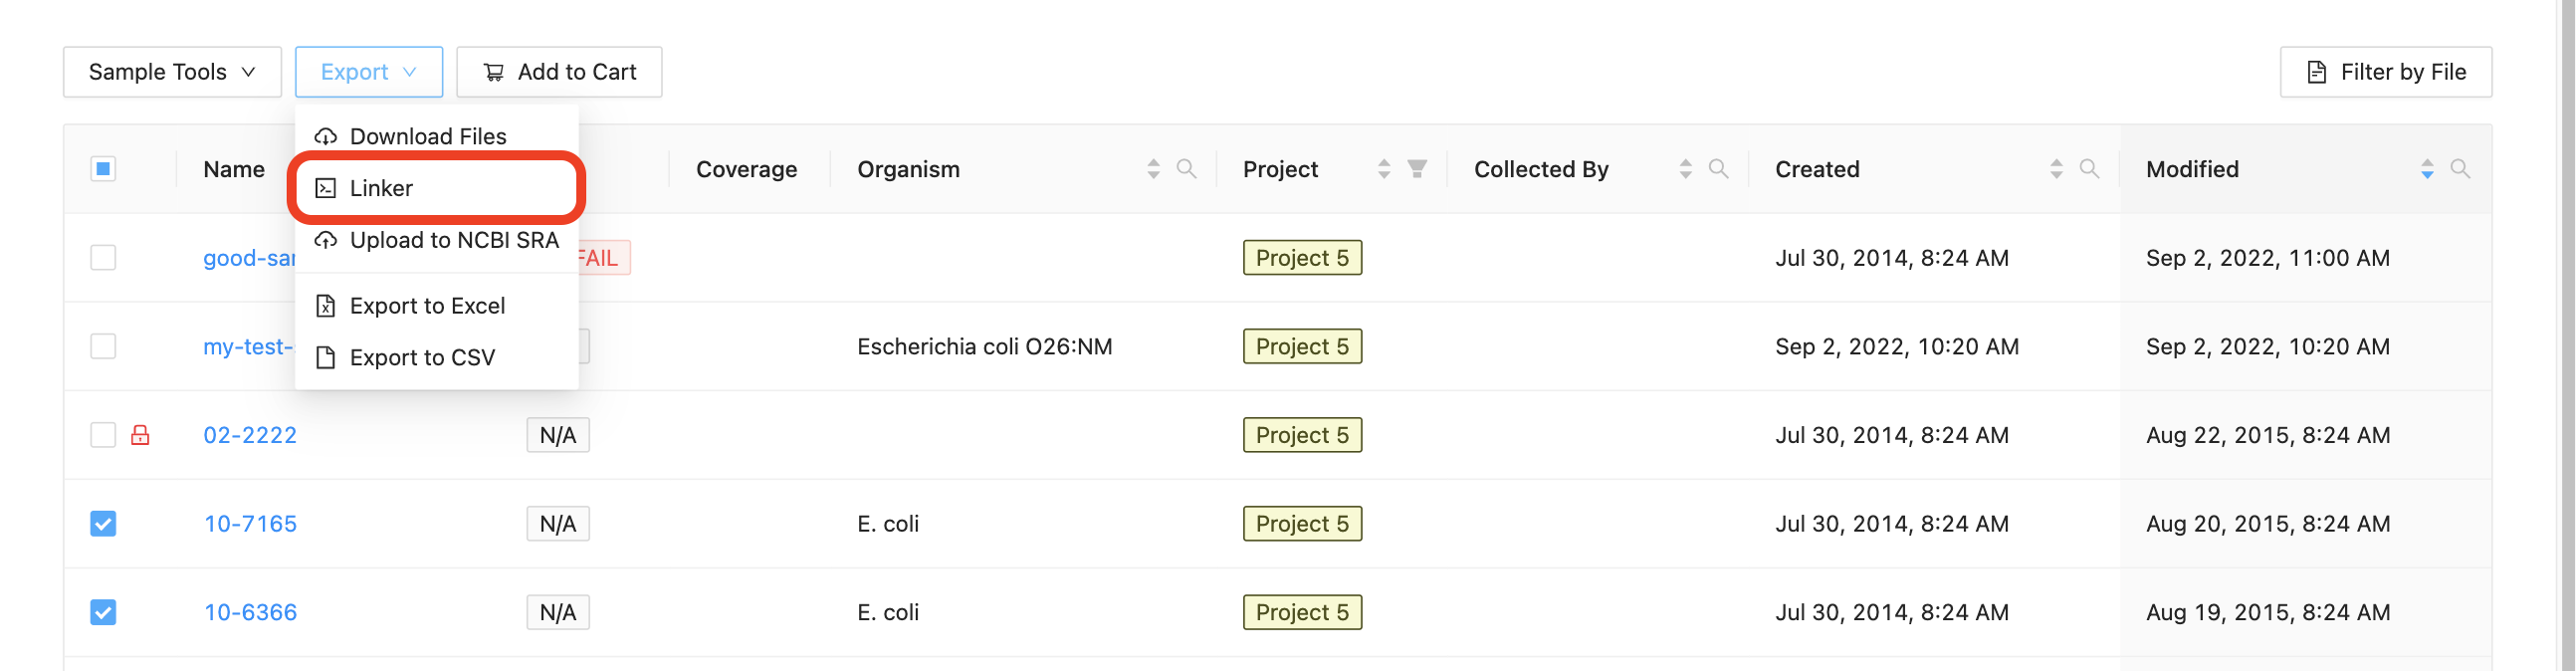
The dialog that appears will provide you with a command that you can copy and paste into a terminal window. You may select “Sequence Files” to get raw sequencing data, or “Assemblies” to get assembled data, or both.
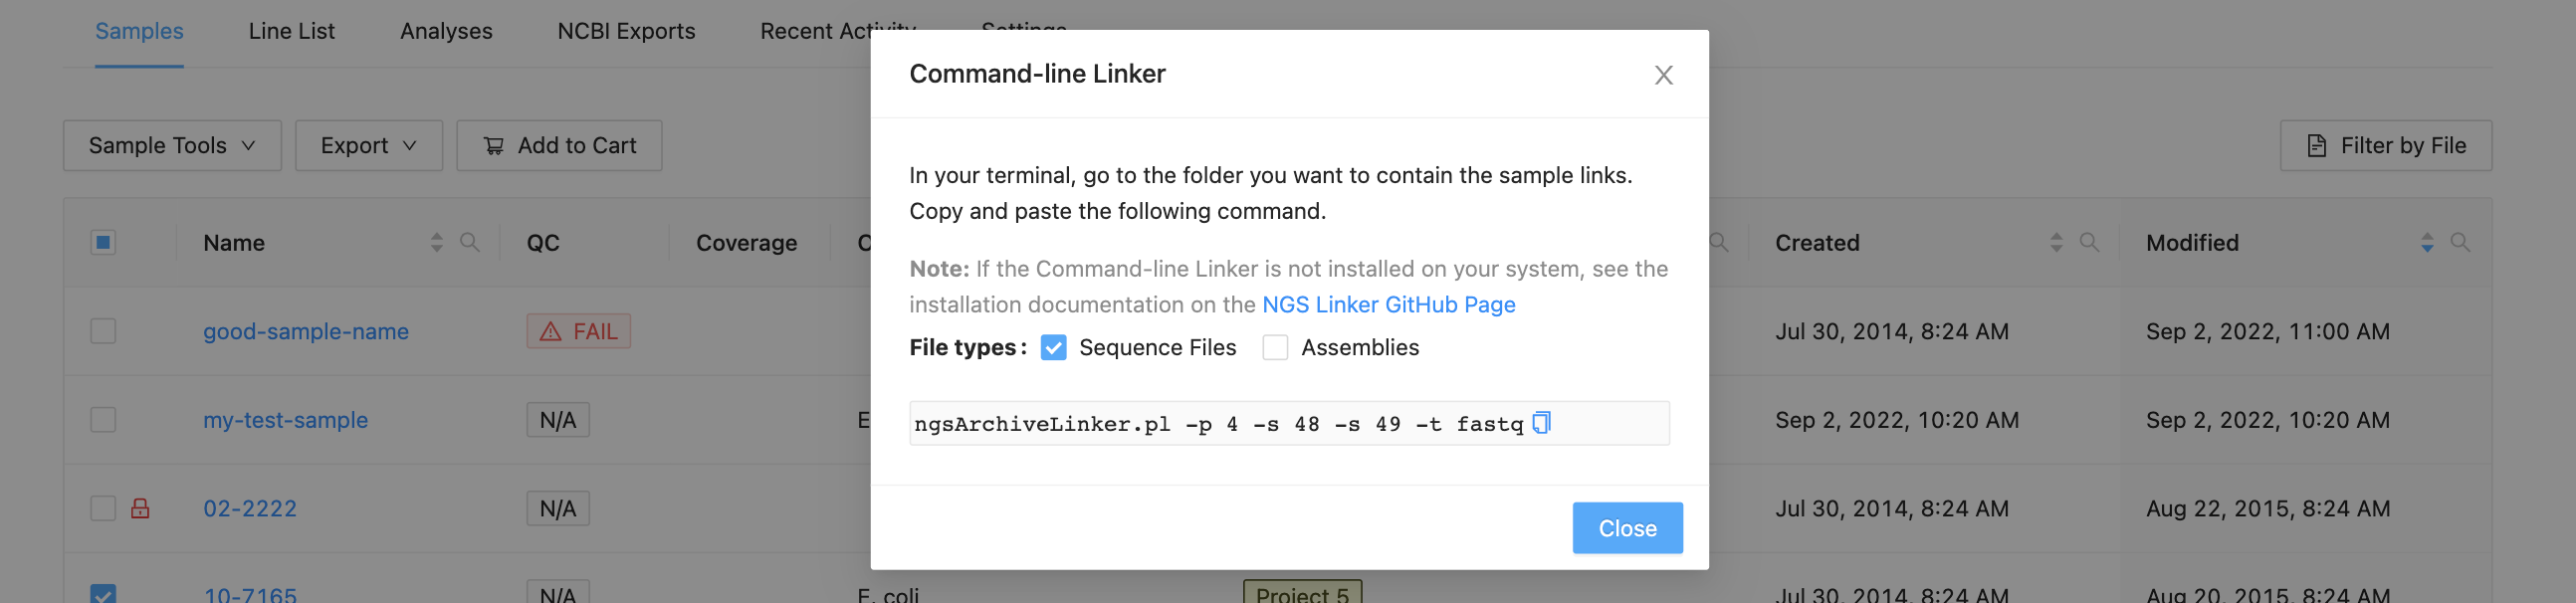
Copy and paste the command into a terminal window and use the username and password that you use to log in to IRIDA:
[user@waffles ~]$ ngsArchiveLinker.pl -p 2 -s 5
Writing files to /home/user
Enter username: user
Enter password:
Reading samples 5 from project 2
Created 2 files for 1 samples in /home/user/Project
[user@waffles ~]$
The folder structure that will be created in the current working directory will match the structure present in IRIDA:
[user@waffles ~]$ tree Project/
Project/
└── sample-1
    ├── sample-1_S1_L001_R1_001.fastq -> /opt/irida/sequence-files/1/sample-1_S1_L001_R1_001.fastq
    └── sample-1_S1_L001_R2_001.fastq -> /opt/irida/sequence-files/2/sample-2_S1_L001_R2_001.fastq

1 directory, 2 files
Importantly, the files that are stored in your directory structure are links and not copies of the files. The purpose of links is to reduce the use of disk space on shared resources. An unfortunate side effect of the link structure is that you cannot change the contents of the files.
Galaxy export
Samples can also be exported directly to Galaxy. Samples exported from IRIDA into Galaxy are loaded into a Galaxy data library that can be easily shared with multiple Galaxy users.
Note: The Galaxy tool being used by this tutorial is located on GitHub https://github.com/phac-nml/irida-galaxy-importer. Please see the GitHub page for installation instructions (if the tool is not already installed in your Galaxy instance).
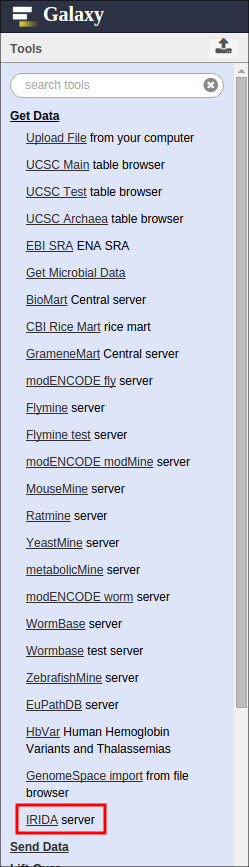
To export data from IRIDA to Galaxy, start in Galaxy and find the “IRIDA server” tool in the “Get Data” section:
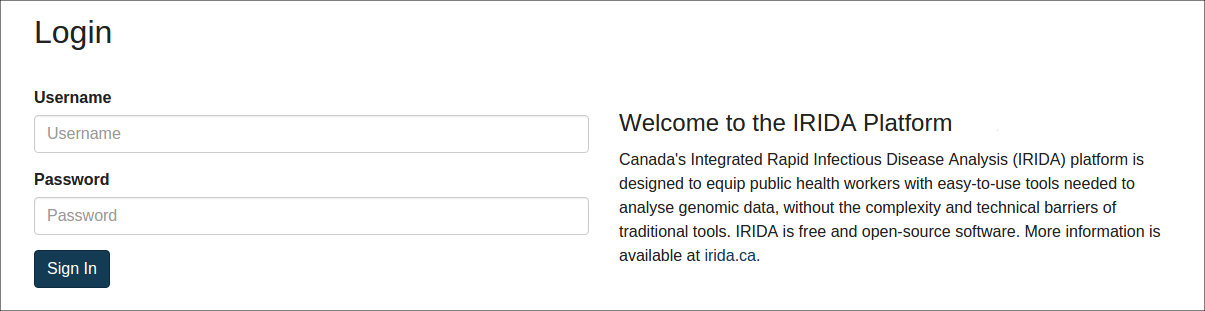
If you are not already logged into IRIDA, you will be required to log in using your IRIDA username and password:
After you log in to IRIDA (or if you were already logged in), you will be directed to the list of projects that you have permission to view. Choose the project containing the samples you wish to export:
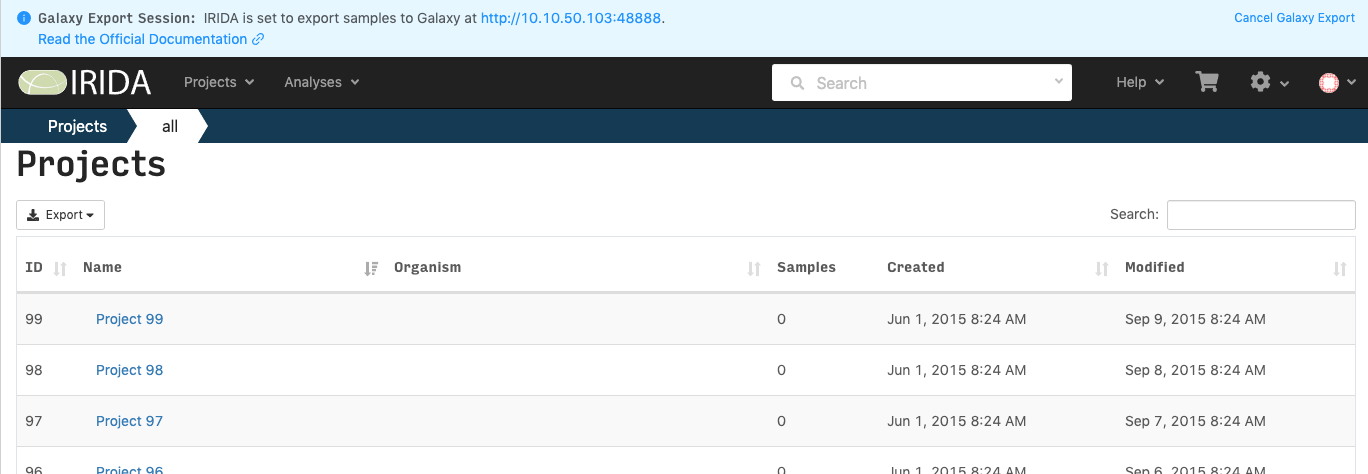
When you are connected to Galaxy from within IRIDA, there will be a notification at the top of the page. This will be there for the duration of your session. If you want to end you Galaxy session without exporting samples, click on the Cancel Galaxy Export link at the top right.
Navigate to the project that contains the samples that you’re interested in exporting by clicking on the project name. Then, select the samples that you want to export and click the Add to Cart button to add the samples to the cart. Samples can be added from any project that you have access to. Once all the samples have been added to the cart, click on the cart icon on the top menu bar. This will take you to the cart galaxy export page.
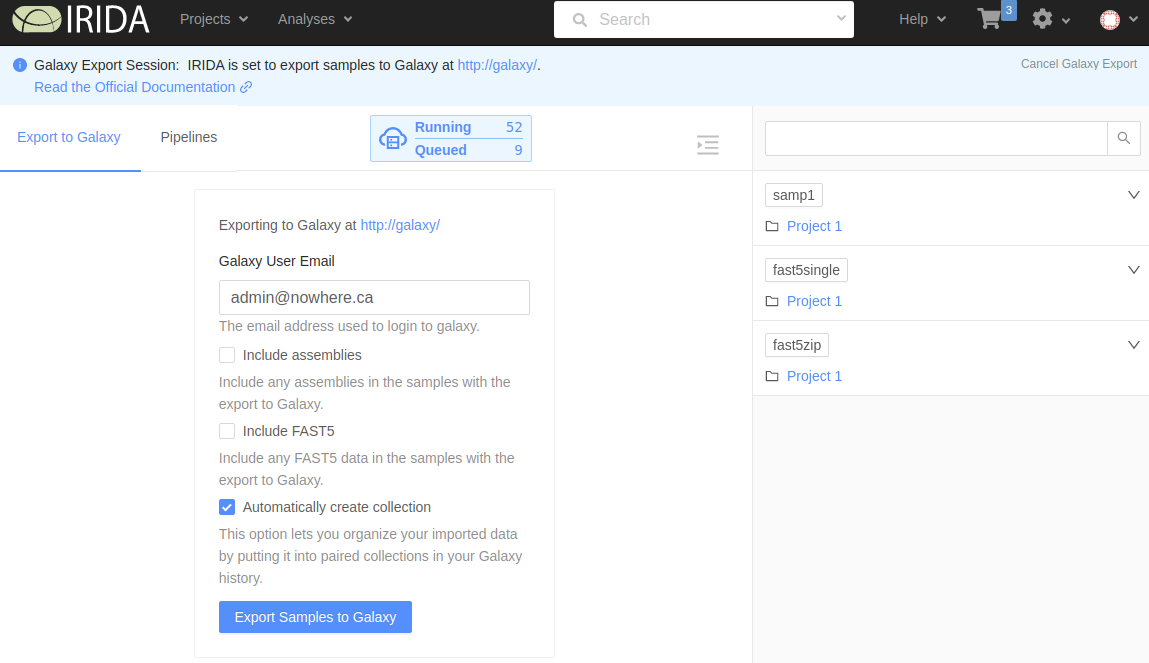
On this page you will fill in a few options about your Galaxy export:
- Galaxy User Email: This email must exactly match the email of your Galaxy account. Incorrectly adding your Galaxy email will result in a failed export.
- Include assemblies: Whether to include assemlies in the Galaxy export. If this box is checked, any assemblies associated with the samples in the cart will be included.
- Include FAST5: Whether to include FAST5 data in the Galaxy export. If this box is checked, any FAST5 files associated with the samples in the cart will be included.
- Automatically create collection: If this box is checked, a collection will be created in Galaxy with the contents of this export.
After selecting your options, click the Export Samples to Galaxy button to start the export.
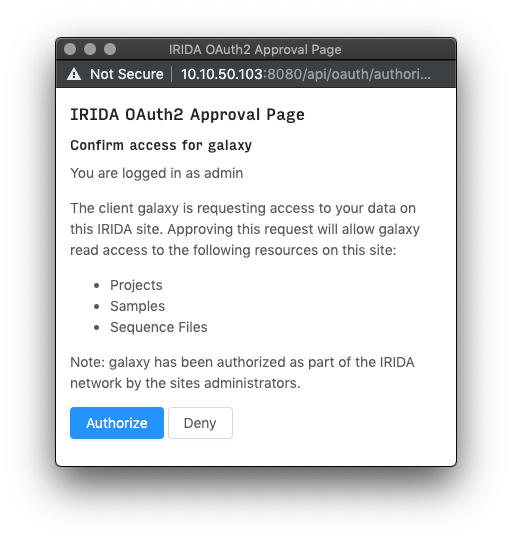
After clicking this button, if it is your first time exporting data to Galaxy you may recieve an authentication page. Read the disclaimer, then click “Authorize” to begin the import.
After authorizing, you will be redirected back to Galaxy and should see your files begin to import into the current history.
Additionally, if you opted to organize your data into collections of paired items, you will see the collections in your history:
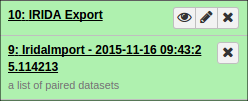
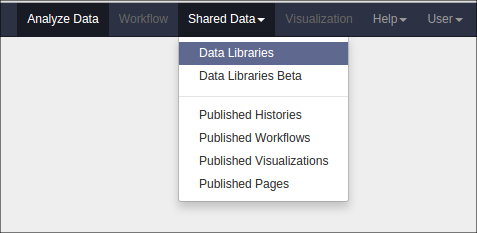
You can view a report of the exported samples by clicking on the name of the history item. You can find your data library by clicking on “Shared Data” at the top of Galaxy and clicking on “Data Libraries”:
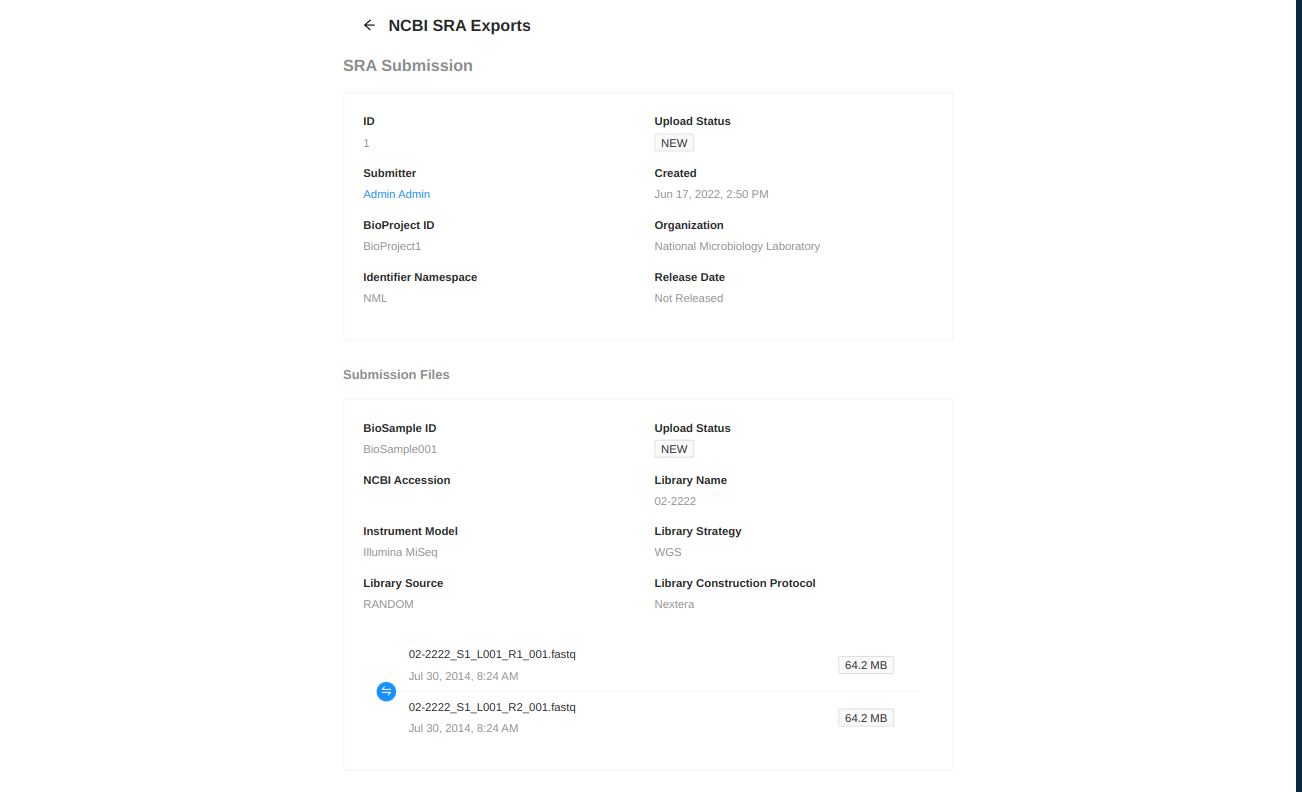
NCBI Upload
IRIDA can assist in uploading sequence files to NCBI’s Sequence Read Archive. IRIDA requires that BioProjects and BioSamples be created before uploading, and will assign uploaded sequence files to the given BioProject and BioSample identifiers. More information about the metadata which must be entered during the upload process can be found at NCBI Submission Quick Start Guide.
To begin submitting sequence files, select which samples you want to upload from the project samples page, then click the Export and Upload to NCBI SRA button.
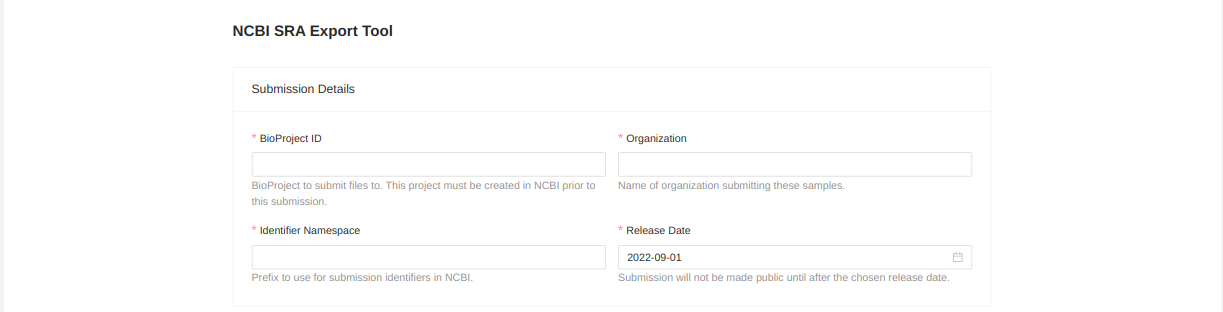
You will be forwarded to a page where you must enter metadata about the uploaded files. Start by entering information about the upload:
- BioProject ID - BioProject to submit files to. This project must be created in NCBI prior to this submission.
- Organization - Name of organization submitting these samples.
- Identifier Namespace - Prefix to use for submission identifiers in NCBI. This prefix will be used to assign upload identifiers in the SRA but may not be visible in the uploaded files.
- Release Date - Submission won’t be public until after the chosen release date.
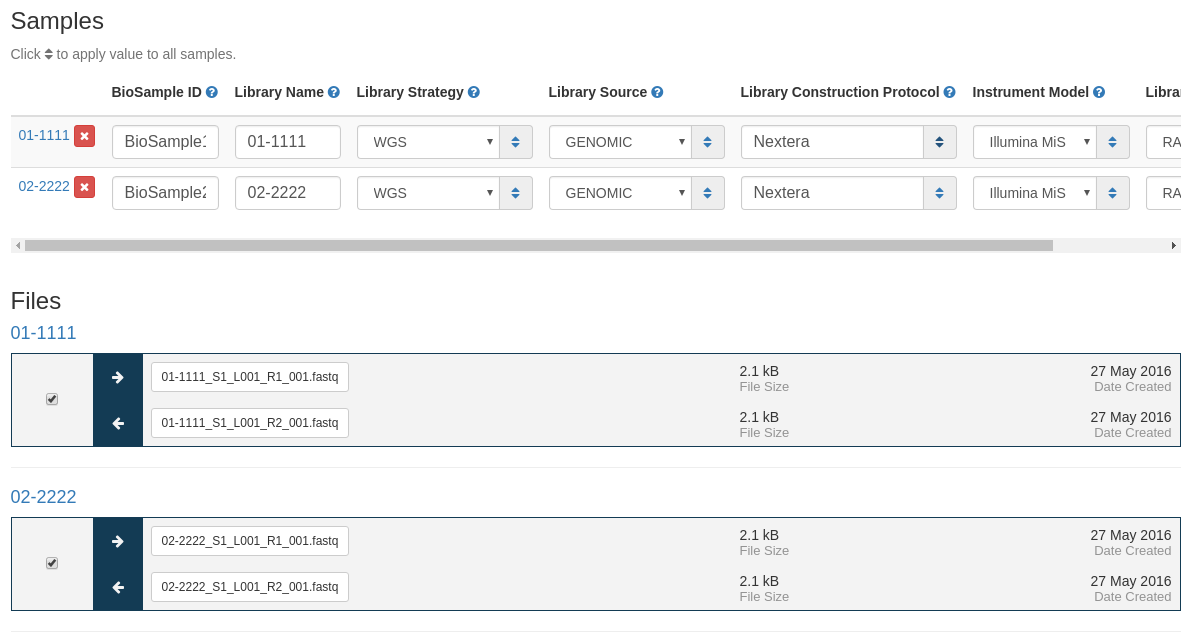
Next you must fill in information about the samples to be uploaded.
- BioSample ID - NCBI BioSample to add files to. This sample must be created in NCBI prior to this submission.
- Library Name - The submitters name for this library.
- Library Strategy - Sequencing technique intended for this library.
- Library Source - The type of source material that is being sequenced.
- Library Construction Protocol - Free form text describing the protocol by which the sequencing library was constructed.
- Instrument Model - The sequencing platform used to produce the data.
- Library Selection - Whether any method was used to select for or against, enrich, or screen the material being sequenced.
Default values for all samples can be set by clicking on the “Default Sample Settings” and setting the values for Library Strategy, Library Source, Library Construction Protocol, Instrument Model, Library Selection. You can set any number of these fields that you want, and the values can be overwritten directly within each sample.

Once all fields and files are selected for a sample, the label will change from “MISSING DATA” to “VALID” indicating that the sample is ready for submission. All samples must be valid before submitting.

After entering this metadata you can select which files should be uploaded from each sample. Only files selected with checkboxes will be uploaded to NCBI.
Click the Submit at the bottom of the page when the information is complete.
After submitting you will be redirected to a page showing the information you have entered for the upload and the status of the upload. IRIDA will periodically check the status of uploads in the SRA and update their status as necessary. After NCBI has assigned an accession number to your upload it will be displayed on this page.