
SISTR Typing
This workflow uses the software sistr_cmd for typing of Salmonella genomes which are first assembled using shovill, which uses SPAdes for assembly only and performs pre-assembly read correction with Lighter and post-assembly correction with BWA MEM and PILON. The specific Galaxy tools are listed in the table below.
| Tool Name | Owner | Tool Revision | Toolshed Installable Revision | Toolshed |
|---|---|---|---|---|
| shovill | iuc | f698c7604b3b | 2 (2018-10-07) | Galaxy Main Shed |
| sistr_cmd | nml | 5c8ff92e38a9 | 3 (2017-06-14) | Galaxy Main Shed |
To install these tools please proceed through the following steps.
Step 1: Galaxy Conda Setup
Galaxy makes use of Conda to automatically install some dependencies for SISTR. Please verify that the version of Galaxy is >= v16.01 and has been setup to use conda (by modifying the appropriate configuration settings, see here for additional details). A method to get SISTR to work with a Galaxy version < v16.01 is available in FAQ/Conda dependencies.
Address shovill related issues
Error 256 from running kmc/samtools
You will need to install the correct versions of some dependencies for kmc/samtools so after installing shovill:
# activate the Galaxy shovill conda env
source galaxy/deps/_conda/bin/activate galaxy/deps/_conda/envs/__shovill@0.9.0
# install ncurses and bzip2 from conda-forge channel
conda install -c conda-forge ncurses bzip2
PILON Java/JVM heap allocation issues
PILON is a Java application and may require the JVM heap size to be set (e.g. _JAVA_OPTIONS=-Xmx4g).
If shovill under Galaxy submits jobs to a SLURM workload manager, it may be necessary to allot about 4G more through SLURM than through shovill --ram (default is ${SHOVILL_RAM:-4} or 4G as of tool revision 57d5928f456e) so if you give shovill 4G, give the SLURM job 8G.
One way you can adjust the $SHOVILL_RAM environment variable is via the conda environment. That is, if you find the conda environment containing shovill you can set up files in etc/conda/activate.d and etc/conda/deactivate.d to set environment variables.
cd galaxy/deps/_conda/bin/activate galaxy/deps/_conda/envs/__shovill@0.9.0
mkdir -p etc/conda/activate.d
mkdir -p etc/conda/deactivate.d

echo -e "export _OLD_SHOVILL_RAM=\$SHOVILL_RAM\nexport SHOVILL_RAM=8" >> etc/conda/activate.d/shovill-ram.sh
echo -e "export SHOVILL_RAM=\$_OLD_SHOVILL_RAM" >> etc/conda/activate.d/shovill-ram.sh
You could also get fancier with this by setting SHOVILL_RAM based on GALAXY_MEMORY_MB, which is assigned by Galaxy based on your job configuration and resource requirements. For example, by setting SHOVILL_RAM=$($GALAXY_MEMORY_MB/1024).
Step 2: Install Galaxy Tools
Please install all the Galaxy tools in the table above by logging into Galaxy, navigating to Admin > Search and browse tool sheds, searching for the appropriate Tool Name and installing the appropriate Toolshed Installable Revision.
The install progress can be checked by monitoring the Galaxy log files galaxy/*.log. On completion you should see a message of Installed next to the tool when going to Admin > Manage installed tool shed repositories.
Step 3: Testing Pipeline
A Galaxy workflow and some test data has been included with this documentation to verify that all tools are installed correctly. To test this pipeline, please proceed through the following steps.
- Upload the SISTR Typing Galaxy Workflow by going to Workflow > Upload or import workflow.
-
Upload the sequence reads by going to Analyze Data and then clicking on the upload files from disk icon
 . Select the test/reads files. Make sure to change the Type of each file from Auto-detect to fastqsanger. When uploaded you should see the following in your history.
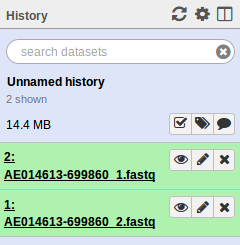
-
Construct a dataset collection of the paired-end reads by clicking the Operations on multiple datasets icon
 . Please check off the two .fastq files and then go to For all selected… > Build List of dataset pairs. You should see a screen that looks as follows.
- This should have properly paired your data and named the sample AE014613-699860. Enter the name of this paired dataset collection at the bottom and click Create list.
- Run the uploaded workflow by clicking on Workflow, clicking on the name of the workflow SISTR Analyze Reads v0.3 (imported from uploaded file) and clicking Run. This should auto fill in the dataset collection. At the very bottom of the screen click Run workflow.
-
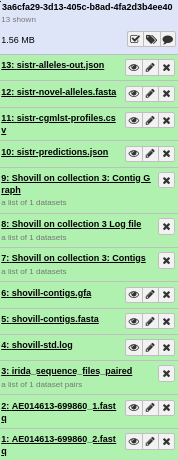
If everything was installed correctly, you should see each of the tools run successfully (turn green). On completion this should look like.
If you see any tool turn red, you can click on the view details icon
 for more information.
If everything was successfull then all dependencies for this pipeline have been properly installed.